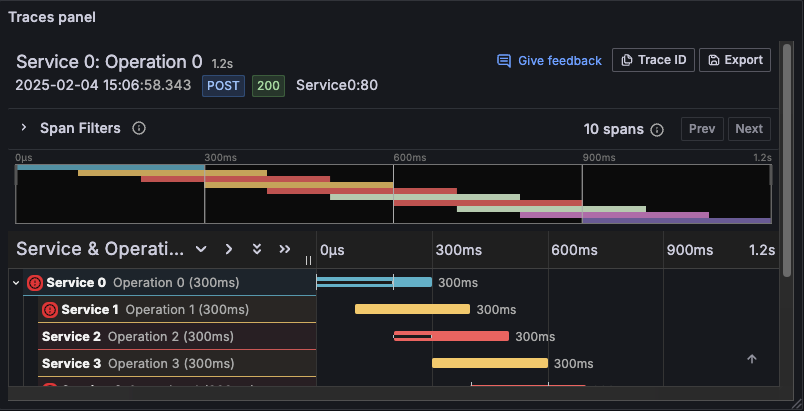
Traces
Traces visualizations let you follow a request as it traverses the services in your infrastructure. The traces visualization displays traces data in a diagram that allows you to easily interpret it. Traces visualizations currently render one trace traversal based on the traceID used in TraceQL or using a variable.
For more information about traces and how to use them, refer to the following documentation:
With Grafana Play, you can explore and see how it works, learning from practical examples to accelerate your development. This feature can be seen on Traces Panel.
Add a panel with tracing visualizations
After you have tracing data available in your Grafana instance, you can add tracing panels to your Grafana dashboards.
Using a dashboard variable, traceID, lets you create a query to show specific traces for a given trace ID.
For more information about dashboard variables, refer to the
Variables documentation.
Before you begin
To use this procedure, you need:
- A Grafana instance
- A Tempo data source connected to your Grafana instance
Steps
To view and analyze traces data in a dashboard, you need to add the traces visualization to your dashboard and define a query using the panel editor. The query determines the data that is displayed in the visualization. For more information on the panel editor, refer to the Panel editor documentation.
This procedure uses dashboard variables and templates to allow you to enter trace IDs which can then be visualized. You’ll use a variable called traceId and add it as a template query.
From your Grafana instance, do one of the following:
- On a new dashboard: Click or drag a panel onto the dashboard.
- On an existing dashboard: Click Edit in the top-right corner, click the Add new element icon, and then click or drag a panel onto the dashboard.
Click Configure visualization to open panel edit mode.
In the query editor, click the data source list and select the appropriate tracing data source.
In the top-right corner of the panel editor, select the All visualizations tab, search for, and select Traces.
Under the Panel options, enter a Title for your trace panel or have Grafana create one using generative AI features.
For more information on the panel editor, refer to the Configure panel options documentation.
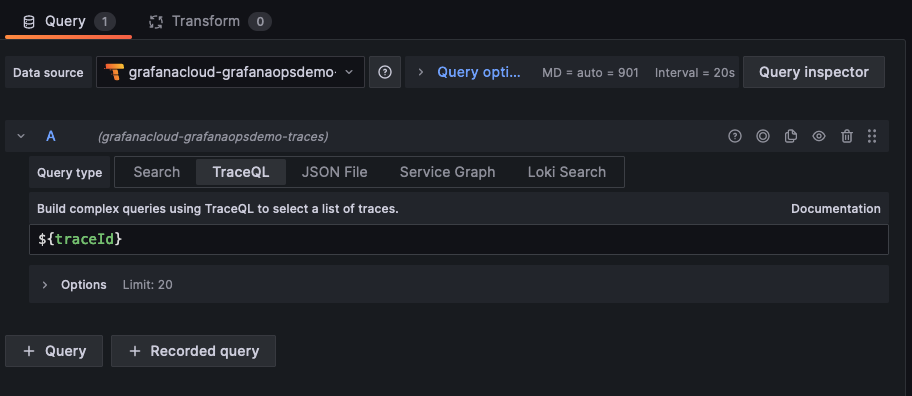
In the query editor, click the TraceQL query type tab.
Enter
${traceId}in the TraceQL query field to create a dashboard variable. This variable is used as the template query.![Add a template query]()
Click Back to dashboard.
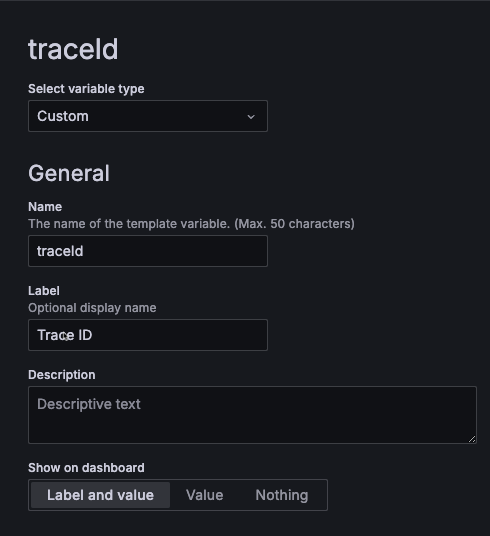
Click the Add new element icon and click Variable.
Add a new variable called
traceId, of variable type Custom, giving it a label if required.![Add a template query]()
Click Save.
Enter an optional description of your changes, and click Save.
Click Exit edit.
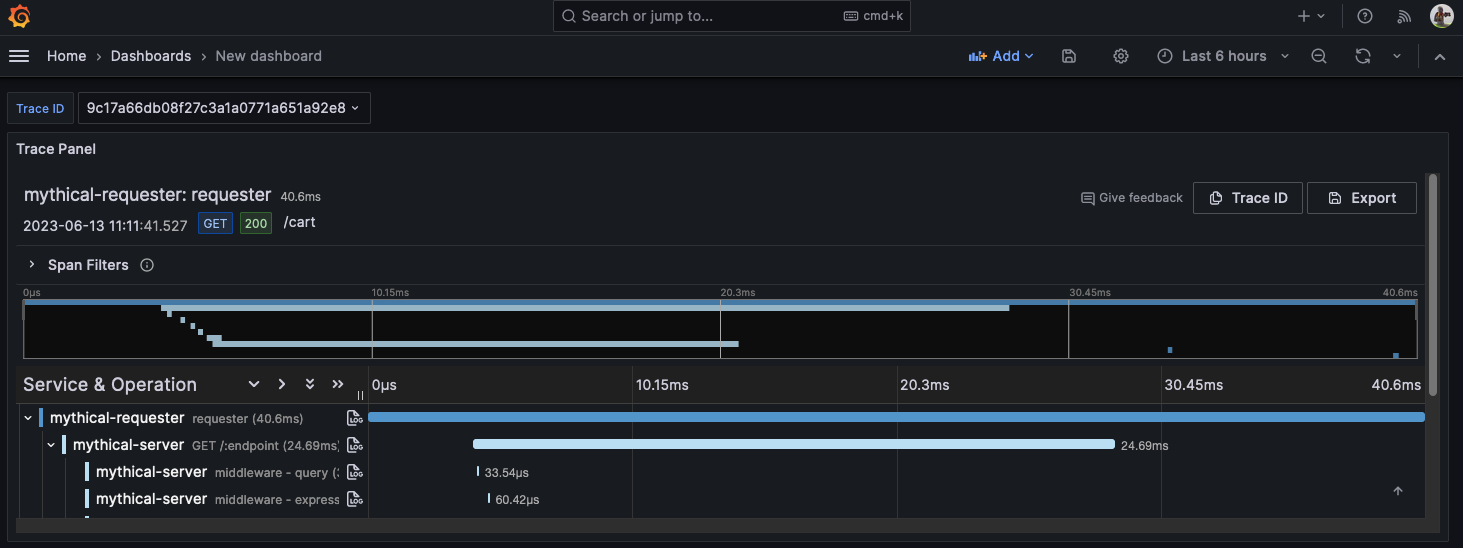
Verify that the panel works by using a valid trace ID for the data source used for the trace panel and editing the ID in the dashboard variable.
![Results of query in trace panel]()
Add TraceQL with table visualizations
While you can add a trace visualization to a dashboard, having to manually add trace IDs as a dashboard variable is cumbersome. It’s more useful to instead be able to use TraceQL queries to search for specific types of traces and then select appropriate traces from matching results.
In the same dashboard where you added the trace visualization, click Edit in the top-right corner.
Click the Add new element icon, and then click or drag a panel onto the dashboard.
Click Configure visualization.
Select the same trace data source you used in the previous task.
In the top-right corner of the panel editor, select the All visualizations tab, search for, and select Table.
In the query editor, select the TraceQL tab.
Under the Panel options, enter a Title for your trace panel or have Grafana create one using generative AI features.
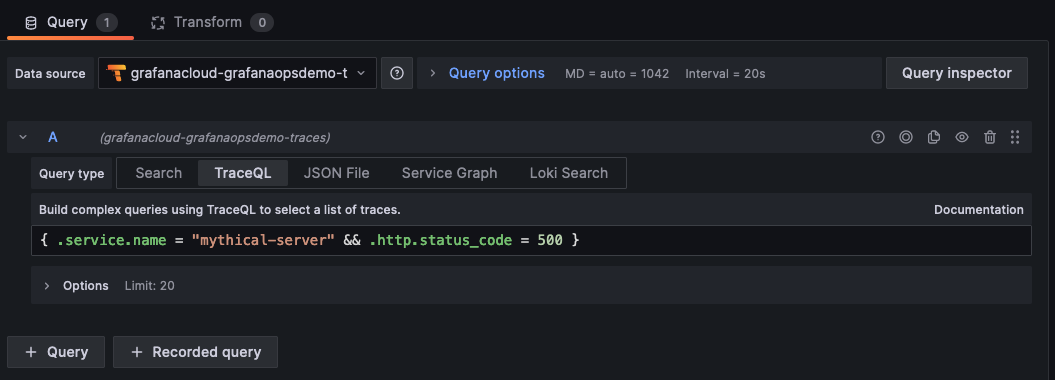
Add an appropriate TraceQL query to search for traces that you would like to visualize in the dashboard. This example uses a simple, static query. You can write the TraceQL query as a template query to take advantage of other dashboard variables, if they exist. This lets you create dynamic queries based on these variables.
![Create a dynamic query]()
Click Save.
Enter an optional description of your changes, and click Save.
Click Back to dashboard and Exit edit.
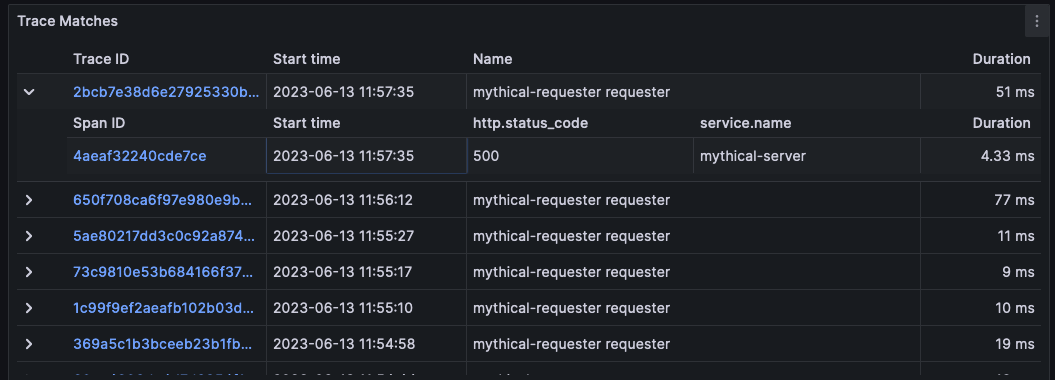
When results are returned from a query, the results are rendered in the panel’s table.
Use a variable to add other links to traces
The results in the traces visualization include links to the Explore page that renders the trace. You can add other links to traces in the table that fill in the traceId dashboard variable when selected, so that the trace is visualized in the same dashboard.
To create a set of data links in the panel, use the following steps:
In the panel editor menu, under Data links, click Add link.
Add a Title for the data link.
Find the UUID of the dashboard by looking in your browser’s address bar when the full dashboard is being rendered. Because this is a link to a dashboard in the same Grafana instance, only the path of the dashboard is required.
![Unique identifier for the dashboard]()
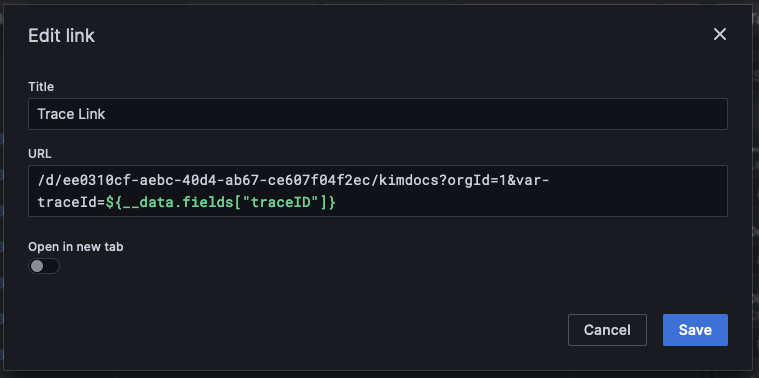
In the URL field, make a self-reference to the dashboard that contains both of the panels. This self-reference uses the value of the selected trace in the table to fill in the dashboard variable. Use the path for the dashboard from the previous step and then fill in the value of
traceIdusing the selected results from the TraceQL table. The trace ID is exposed using thetraceIDdata field in the returned results, so use that as the value for the dashboard variable.![Edit link and add the Trace link]()
Select Save to save the data link.
Enter an optional description of your changes, and click Save.
Click Back to dashboard and Exit edit.

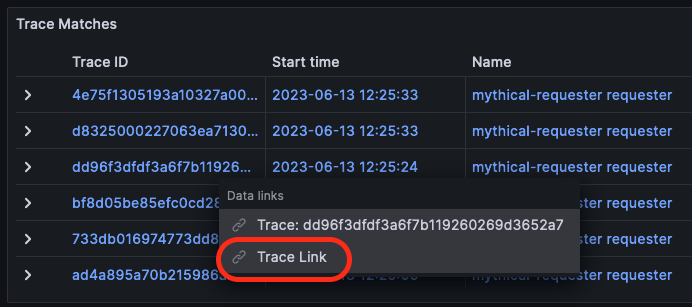
You should now see a list of matching traces in the table visualization. While selecting the TraceID or SpanID fields will give you the option to either open the Explore page to visualize the trace or following the data link, selecting any other field (such as Start time, Name or Duration) automatically follows the data link, filling in the traceId dashboard variable, and then shows the relevant trace in the trace panel.

Configuration options
The following section describes the configuration options available in the panel editor pane for this visualization. These options are, as much as possible, ordered as they appear in Grafana.
Panel options
In the Panel options section of the panel editor pane, set basic options like panel title and description, as well as panel links. To learn more, refer to Configure panel options.
Span filters options
The Span filters options control the initial state of the span filters when the visualization loads, allowing you to customize your trace analysis view.
Duration filters use the duration key with operators such as =, >=, <=, >, and <. In the visualization, users can toggle Show all spans to switch from the filtered view back to all spans.


