This is documentation for the next version of Grafana Tempo documentation. For the latest stable release, go to the latest version.
Set up monitoring for Tempo
You can set up monitoring for Tempo using an existing or new cluster. If you don’t have a cluster available, you can use the linked documentation to set up the Tempo, Mimir, and Grafana using Helm or you can use Grafana Cloud.
You can use this procedure to set up monitoring for Tempo running in monolithic (single binary) or microservices modes.
To set up monitoring, you need to:
- Use Grafana Alloy to remote-write to Tempo and set up Grafana to visualize the tracing data by following Set up a test app.
- Update your Alloy configuration to scrape metrics to monitor for your Tempo data.
This procedure assumes that you have set up Tempo using the Helm chart with Grafana Alloy.
The steps outlined below use the Alloy configurations described in Set up a test application for a Tempo cluster.
Note
Update any instructions in this document for your own deployment.
If you use the Kubernetes integration Grafana Alloy Helm chart, you can use the Kubernetes scrape annotations to automatically scrape Tempo. You’ll need to add the labels to all of the deployed components.
Before you begin
To configure monitoring using the examples on this page, you’ll need the following running in your Kubernetes environment:
- Tempo instance - For storing traces and emitting metrics (
install using the
tempo-distributedHelm chart) - Mimir - For storing metrics emitted from Tempo (install using the
mimir-distributedHelm chart) - Grafana - For visualizing traces and metrics ( install on Kubernetes)
You can use Grafana Alloy or the OpenTelemetry Collector. This procedure provides examples only for Grafana Alloy.
The rest of this documentation assumes that the Tempo, Grafana, and Mimir instances use the same Kubernetes cluster.
If you are using Grafana Cloud, you can skip the installation sections and set up the Mimir (Prometheus) and Tempo data sources in your Grafana instance.
Use a test app for Tempo to send data to Grafana
Before you can monitor Tempo data, you need to configure Grafana Alloy to send traces to Tempo.
Use these instructions to create a test application in your Tempo cluster.
These steps configure Grafana Alloy to remote-write to Tempo.
In addition, the test app instructions explain how to configure a Tempo data source in Grafana and view the tracing data.
Note
If you already have a Tempo environment, then there is no need to create a test app. This guide assumes that the Tempo and Grafana Alloy configurations are the same as or based on these instructions to create a test application, as you’ll augment those configurations to enable Tempo metrics monitoring.
In these examples, Tempo is installed in a namespace called tempo.
Change this namespace name in the examples as needed to fit your own environment.
Configure Grafana
In your Grafana instance, you’ll need:
- A Tempo data source (created in the previous section)
- A Mimir (Prometheus) data source
Metamonitoring for Tempo is handled by the Grafana Kubernetes Helm chart (>=v2.1). Metamonitoring can be used with both microservices and single binary deployments of Tempo.
The Helm chart configures Grafana Alloy to collect metrics and logs.
Steps
This procedure uses the Grafana Kubernetes Helm chart and a values.yml file to configure the chart.
Add the Grafana Community Helm Chart repository, or update, if already added.
helm repo add grafana-community https://grafana-community.github.io/helm-charts
helm repo update
Create a new file named
values.yml. Add the following example into yourvalues.ymlfile and save it. Where indicated, add the values specific to your instance.cluster: name: traces # Name of the cluster. This populates the cluster label. integrations: tempo: instances: - name: "traces" # This is the name for the instance label that reports. namespaces: - traces # This is the namespace that is searched for Tempo instances. Change this accordingly. metrics: enabled: true portName: prom-metrics logs: enabled: true labelSelectors: app.kubernetes.io/name: tempo alloy: name: "traces-monitoring" destinations: - name: "metrics" type: prometheus url: "<url>" # URL for Prometheus. Should look similar to "https://<prometheus host>/api/prom/push". auth: type: basic username: "<username>" password: "<password>" - name: "logs" type: loki url: "<url>" # URL for Loki. Should look similar to "https://<loki host>/loki/api/v1/push". auth: type: basic username: "<username>" password: "<password>" alloy-metrics: enabled: true podLogs: enabled: true gatherMethod: kubernetesApi namespaces: [traces] # Set to namespace from above under instances. collector: alloy-singleton alloy-singleton: enabled: true alloy-metrics: enabled: true # Sends Grafana Alloy metrics to ensure the monitoring is working properly.Install the Helm chart using the following command to create Grafana Alloy instances to scrape metrics and logs:
helm install k8s-monitoring grafana/k8s-monitoring \
--namespace monitoring \
--create-namespace \
-f values.yml
Verify that data is being sent to Grafana.
- Log into Grafana.
- Select Metrics Drilldown and select
cluster=<cluster.name>wherecluster.nameis the name specified in thevalues.ymlfile. - Do the same for Logs Drilldown.
This example doesn’t include ingestion for any other data such as traces for sending to Tempo, but can be included with some configuration updates. Refer to Configure Alloy to remote-write to Tempo for more information.
Install Tempo dashboards in Grafana
Alloy scrapes metrics from Tempo and sends them to Mimir or another Prometheus compatible time-series database. You can then monitor Tempo using the mixins.
Tempo ships with mixins that includes:
- Relevant dashboards for overseeing the health of Tempo as a whole, as well as its individual components
- Recording rules that simplify the generation of metrics for dashboards and free-form queries
- Alerts that trigger when Tempo falls out of operational parameters
To install the mixins in Grafana, you need to:
Download the mixin dashboards from the Tempo repository.
Import the dashboards in your Grafana instance.
Upload
alerts.yamlandrules.yamlfiles for Mimir or Prometheus
Download the tempo-mixin dashboards
First, clone the Tempo repository from Github:
git clone git+ssh://github.com/grafana/tempoOnce you have a local copy of the repository, navigate to the
operations/tempo-mixin-compileddirectory.cd operations/tempo-mixin-compiled
This contains a compiled version of the alert and recording rules, as well as the dashboards.
Note
If you want to change any of the mixins, make your updates in the
operations/tempo-mixindirectory. Use the instructions in the README in that directory to regenerate the files. The mixins are generated in theoperations/tempo-mixin-compileddirectory.
Import the dashboards to Grafana
The dashboards directory includes the six monitoring dashboards that can be installed into your Grafana instance.
Refer to Import a dashboard in the Grafana documentation.
Tip
Install all six dashboards. You can only import one dashboard at a time. Create a new folder in the Dashboards area, for example “Tempo Monitoring”, as an easy location to save the imported dashboards.
To create a folder:
- Open your Grafana instance and select Dashboards.
- Select New in the right corner.
- Select New folder from the New drop-down.
- Name your folder, for example, “Tempo Monitoring”.
- Select Create.
To import a dashboard:
- Open your Grafana instance and select Dashboards.
- Select New in the right corner.
- Select Import.
- On the Import dashboard screen, select Upload.
- Browse to
operations/tempo-mixin-compiled/dashboardsand select the dashboard to import. - Drag the dashboard file, for example,
tempo-operational.json, onto the Upload area of the Import dashboard screen. Alternatively, you can browse to and select a file. - Select a folder in the Folder drop-down where you want to save the imported dashboard. For example, select Tempo Monitoring created in the earlier steps.
- Select Import.
The imported files are listed in the Tempo Monitoring dashboard folder.
To view the dashboards in Grafana:
- Select Dashboards in your Grafana instance.
- Select Tempo Monitoring, or the folder where you uploaded the imported dashboards.
- Select any files in the folder to view it.
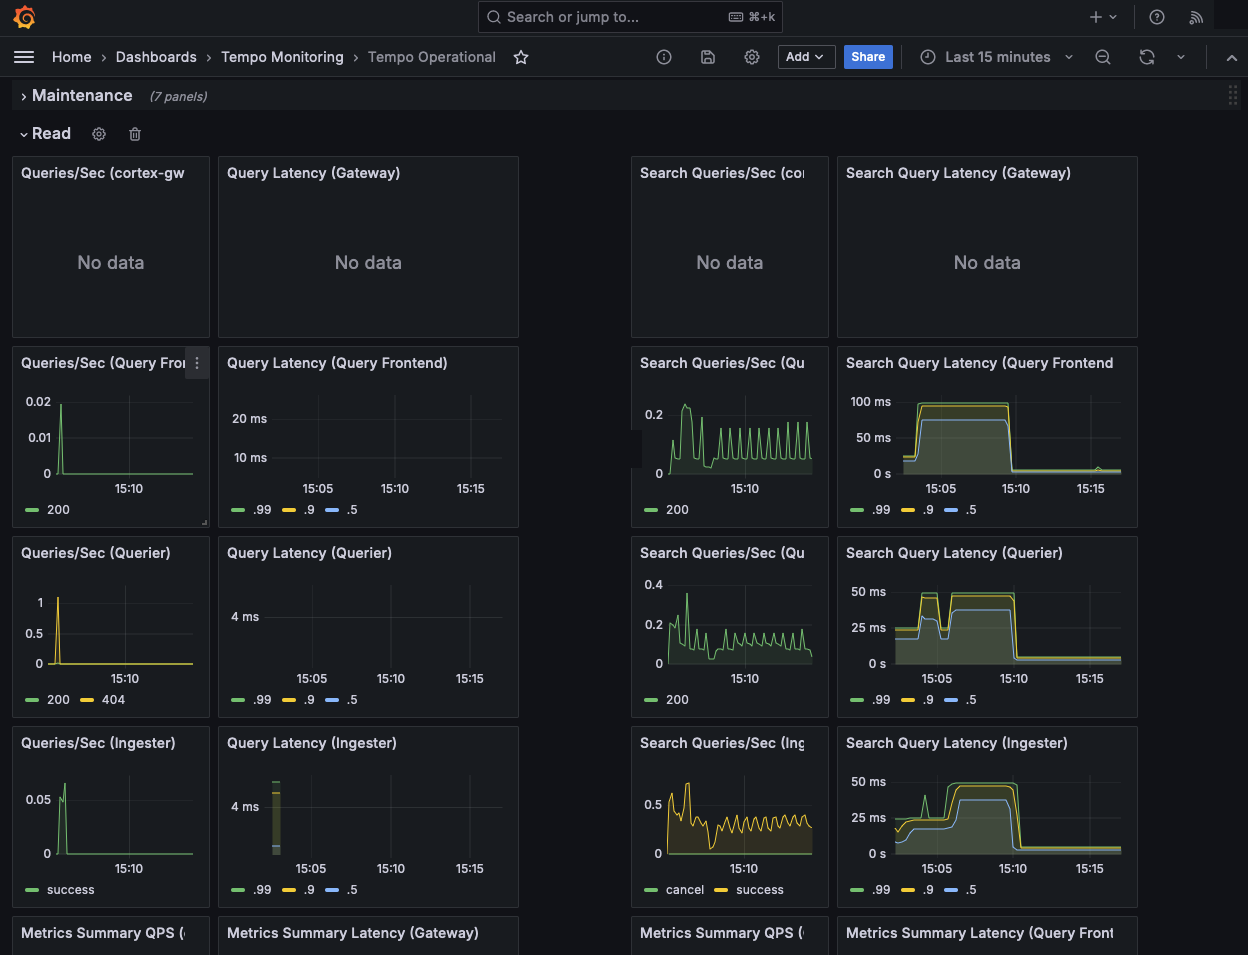
The ‘Tempo Operational’ dashboard shows read (query) information:
Add alerts and rules to Prometheus or Mimir
The rules and alerts need to be installed into your Mimir or Prometheus instance. To do this in Prometheus, refer to the recording rules and alerting rules documentation.
For Mimir, you can use mimirtool to upload rule and alert configuration. Using a default installation of Mimir used as the metrics store for the Alloy configuration, you might run the following:
mimirtool rules load operations/tempo-mixin-compiles/rules.yml --address=https://mimir-cluster.distributor.mimir.svc.cluster.local:9001

mimirtool alertmanager load operations/tempo-mixin-compiles/alerts.yml --address=https://mimir-cluster.distributor.mimir.svc.cluster.local:9001
For Grafana Cloud, you need to add the username and API key as well. Refer to the mimirtool documentation for more information.