This is documentation for the next version of Grafana Pyroscope documentation. For the latest stable release, go to the latest version.
Python
The Python profiler, when integrated with Pyroscope, transforms the way you analyze and optimize Python applications. This combination provides unparalleled real-time insights into your Python codebase, allowing for precise identification of performance issues It’s an essential tool for Python developers focused on enhancing code efficiency and application speed.
Note
Refer to Available profiling types for a list of profile types supported by each language.
Before you begin
To capture and analyze profiling data, you need either a hosted Pyroscope OSS server or a hosted Pyroscope instance with Grafana Cloud Profiles (requires a free Grafana Cloud account).
The Pyroscope server can be a local server for development or a remote server for production use.
Profiling on macOS
macOS has a feature called System Integrity Protection (SIP) that prevents even the root user from reading memory from any binary located in system folders.
The easiest way to avoid interference from SIP, is by installing a Python distribution into your home folder. This can be achieved for example by using pyenv:
# Setup pyenv
brew update
brew install pyenv
echo 'export PYENV_ROOT="$HOME/.pyenv"' >> ~/.zshrc
echo '[[ -d $PYENV_ROOT/bin ]] && export PATH="$PYENV_ROOT/bin:$PATH"' >> ~/.zshrc
echo 'eval "$(pyenv init - zsh)"' >> ~/.zshrc
#  Restart your shell
exec "$SHELL"
# Install Python 3.12
pyenv install 3.12
Add Python profiling to your application
Install the pyroscope-io pip package:
pip install pyroscope-ioConfigure the Python client
Add the following code to your application. This code will initialize the Pyroscope profiler and start profiling:
import pyroscope

pyroscope.configure(
  application_name = "my.python.app", # replace this with some name for your application
  server_address   = "http://my-pyroscope-server:4040", # replace this with the address of your Pyroscope server
)
Optionally, you can configure several additional parameters:
import os
import pyroscope

pyroscope.configure(
    application_name    = "my.python.app", # replace this with some name for your application
    server_address      = "http://my-pyroscope-server:4040", # replace this with the address of your Pyroscope server
    sample_rate         = 100, # default is 100
    detect_subprocesses = False, # detect subprocesses started by the main process; default is False
    oncpu               = True, # report cpu time only; default is True
    gil_only            = True, # only include traces for threads that are holding on to the Global Interpreter Lock; default is True
    enable_logging      = True, # does enable logging facility; default is False
    tags                = {
        "region": f'{os.getenv("REGION")}',
    }
)
Add profiling labels to Python applications
You can add tags to certain parts of your code:
# You can use a wrapper:
with pyroscope.tag_wrapper({ "controller": "slow_controller_i_want_to_profile" }):
    slow_code()
Sending data to Pyroscope OSS or Grafana Cloud Profiles with Python SDK
import pyroscope

pyroscope.configure(
    application_name = "example.python.app",
    server_address = "<URL>",
    basic_auth_username = '<User>',
    basic_auth_password = '<Password>',
    # Optional Pyroscope tenant ID (only needed if using multi-tenancy). Not needed for Grafana Cloud.
    # tenant_id = "<TenantID>",
)
To configure the Python SDK to send data to Pyroscope, replace the <URL> placeholder with the appropriate server URL. This could be the Grafana Cloud URL or your own custom Pyroscope server URL.
If you need to send data to Grafana Cloud, you’ll have to configure HTTP Basic authentication. Replace <User> with your Grafana Cloud stack user and <Password> with your Grafana Cloud API key.
If your Pyroscope server has multi-tenancy enabled, you’ll need to configure a tenant ID. Replace <TenantID> with your Pyroscope tenant ID.
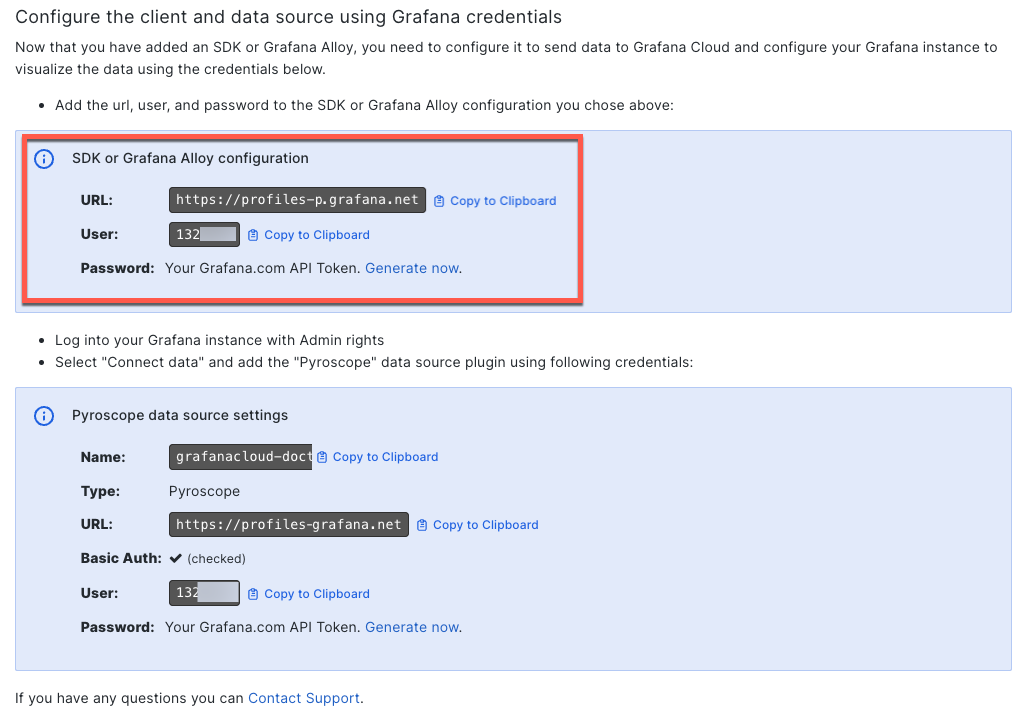
Locate the URL, user, and password in Grafana Cloud Profiles
When you configure Alloy or your SDK, you need to provide the URL, user, and password for your Grafana Cloud stack. This information is located in the Pyroscope section of your Grafana Cloud stack.
- Navigate to your Grafana Cloud stack.
- Select Details next to your stack.
- Locate the Pyroscope section and select Details.
- Copy the URL, User, and Password values in the Configure the client and data source using Grafana credentials section.
![Locate the SDK or Grafana Alloy configuration values]()
- Use these values to complete the configuration.
As an alternative, you can also create a Cloud Access Policy and generate a token to use instead of the user and password. For more information, refer to Create a Cloud Access Policy.
Python profiling examples
Check out the following resources to learn more about Python profiling:
- Python examples demonstrating how Django, Flask, and FastAPI apps can be profiled with Pyroscope.
- A Python demo on play.grafana.org.
Was this page helpful?
Related resources from Grafana Labs