Generator
The Generator takes the output of a test recording and gives you options to customize the test with a visual interface and generate a test script from it, without having to manually write JavaScript code.
You can use it to define a list of hosts to allow or remove from your script, tweak the load profile for your test, include variables in your script, and configure rules to extract values, parameterize requests, and more.
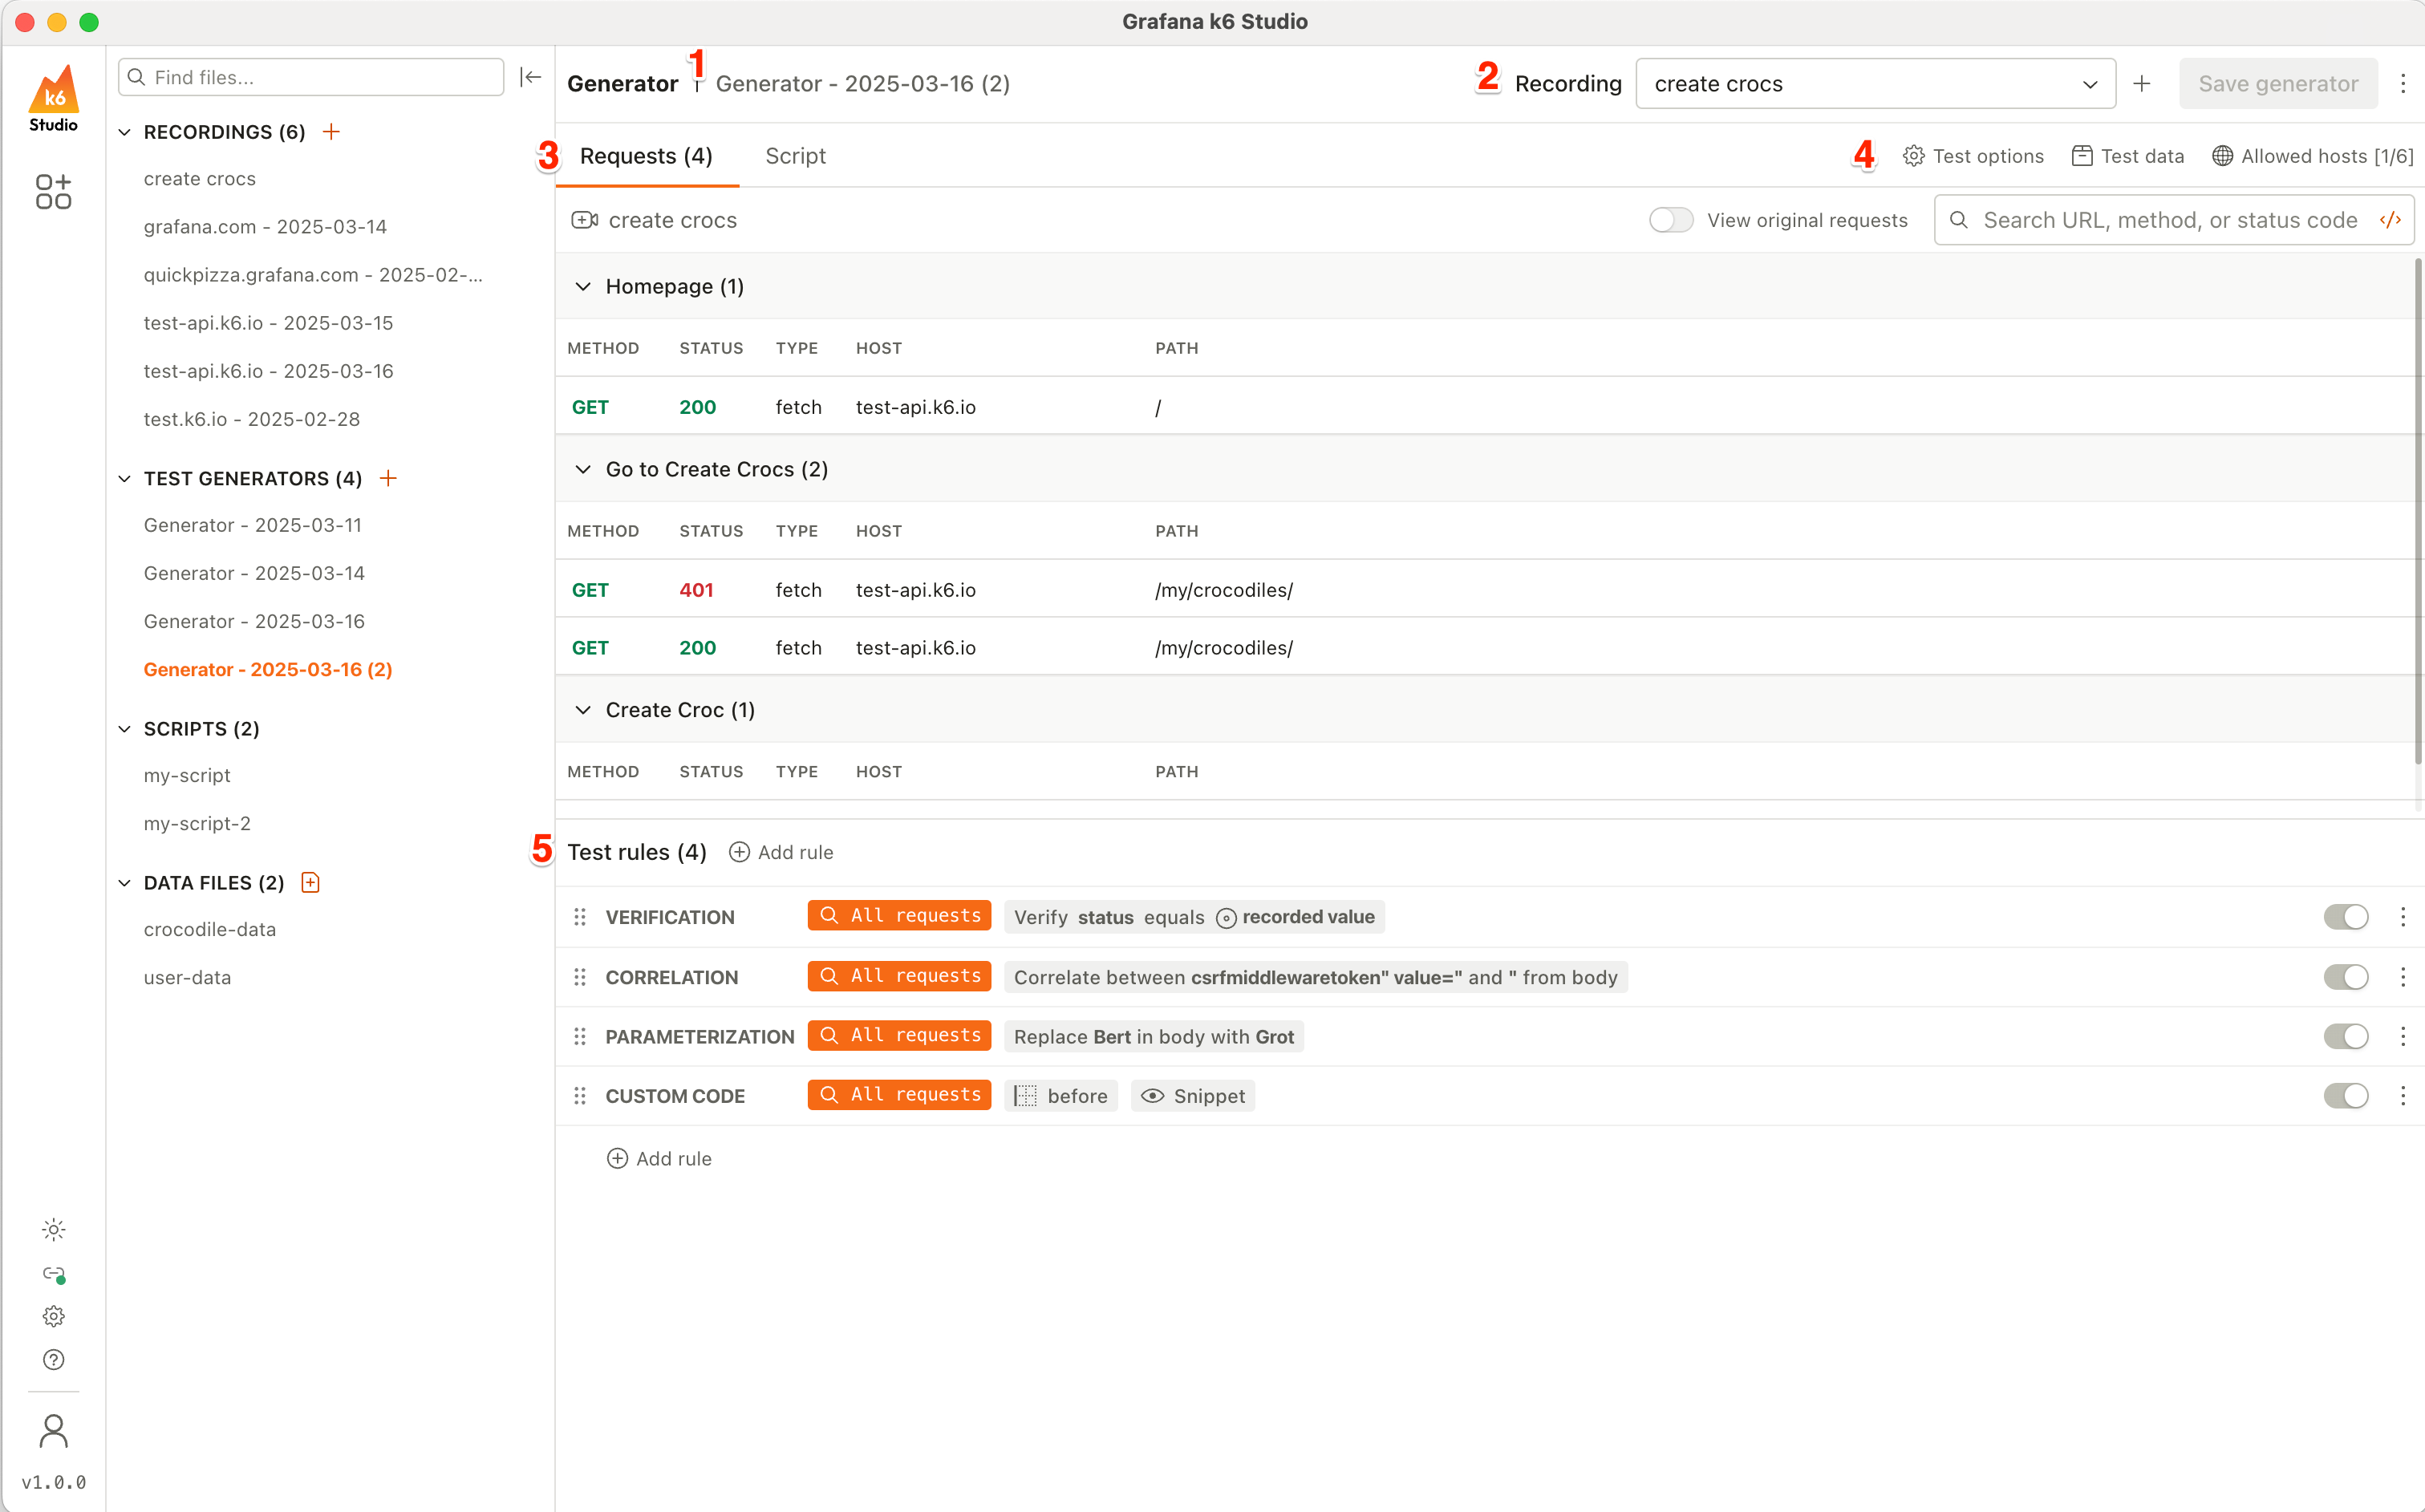
The Generator window is composed of:
- Generator name: The name of the test generator. This is automatically generated, but you can rename it to help keep your files organized.
- Generator actions: On the top-right you can see the action buttons for the Generator. From here you can select a recording, click Save Generator to save changes to your test generator file, or click the menu icon to:
- Validate script: Opens the Validator and starts a one iteration run of the test script.
- Export script: Opens the export script dialog box. You can enter a name for your script, and also select whether you want to overwrite a script if one with the same name already exists.
- Delete generator: Deletes the selected test generator.
- Requests and Script inspector: The list of requests, and groups if any, from the selected recording. The requests are organized by time, and you can see the method, status code, host, and path for each one. You can also collapse and expand groups to inspect them more easily. Clicking on any request opens the request inspector, where you can view the request and response details.
- Generator options: Below the test generator name, you can see:
- Add rule: Opens a list of rule types that you can add to the generator.
- Test options: Configure the load profile, thresholds, think time, and load zones.
- Test data: Define variables, and configure data files that can be used in your test rules.
- Allowed hosts: Shows a list of hosts for the recording, and lets you select which ones to include or remove from the script.
- Test rules list: The list of test rules applied to this particular generator. The rules can be reordered, and you can see some details about how they’re configured.
Test options
The test options tab lets you configure three separate parts of your test script:
- Load profile
- Thresholds
- Think time
- Load zones
Load profile
The load profile controls how k6 schedules VUs and iterations to run your performance test.
There are two executors available under load profiles:
- Ramping VUs: A variable number of VUs execute as many iterations as possible for a specified amount of time.
- Shared iterations: A fixed number of iterations are shared between a number of VUs, and the test ends once all iterations have been executed.
Each executor has different variables you can configure. For more details, refer to Executors.
Thresholds
Thresholds are the pass/fail criteria that you define for your test metrics. If the performance of the system under test (SUT) doesn’t meet the conditions of your threshold, the test finishes with a failed status.
Thresholds are commonly used to codify SLOs, for example, fail this test if an endpoint has a response time above 500ms. They can also be used as a way to set up alerts based on test failures.
In k6 Studio, you can click on Add threshold to add one or more thresholds to your test script. For each threshold, you can configure the metric, as well as the failure conditions, and if you want a failure to stop the test execution.
Refer to Thresholds for more details.
Think time
The think time option lets you configure a fixed or random delay, between groups or iterations, to simulate a more realistic test. This isn’t required, but it’s a best practice when creating and running performance tests.
Load zones
Note
Load zones only affects tests that are executed in Grafana Cloud k6.
Load zones represent different regions that you can use to run your tests from. You can use them to get a more accurate picture of what your users are seeing when they’re accessing your application from different parts of the world.
In the Load zones tab, you can use the Add new load zone button to add one or more load zones to your test script. You can also use the Distribution toggle to manually choose the percentage of the load that runs from each zone, or to distribute them evenly.
When you add a load zone to your test script, you can see it reflected in the options object. For example:
export const options = {
  cloud: {
    distribution: {
      'amazon:us:ashburn': { loadZone: 'amazon:us:ashburn', percent: 50 },
      'amazon:ie:dublin': { loadZone: 'amazon:ie:dublin', percent: 50 },
    },
  },
};
Refer to Use load zones for more details.
Test data
The test data option lets you define two types of data for use in your test scripts: variables and data files.
Variables
In the Variables tab, you can define a name and a value, as a string. You can then use the variables in your custom code and parameterization rules.
After you define a variable, you can refer to them in your custom code rules by using: VARS["VARIABLE_NAME"].
Data files
When running performance tests, it’s common to use randomly generated data, or a specific set of data that’s relevant to your application. In k6 Studio, you can import data files, either via the Data files section of the main menu, or via a Generator -> Test data -> Data files -> Add data file +, and then use them in parameterization rules.
The requirements for data files supported in k6 Studio are:
- The file format must be CSV or JSON.
- The maximum file size is 10 MB.
- For CSV files:
- They must contain a header.
- They must use
,as the separator.
- For JSON files:
- They should be flat arrays without nesting. Nested values are not supported, and won’t show up in parameterization rules.
After you import a data file, you can add it to your Generator by:
- Click on Test data.
- Click on the Data files tab.
- Click on Add data file +.
- Select the data file from the drop-down list.
After that, you can use your data file in a parameterization rule, in the Replace with section. The generated k6 test script will use a unique item from the file per iteration to simulate user behavior.
Allowed hosts
The Allowed hosts option lets you configure which hosts you want to include in your test script. It shows all the hosts that are identified from your HAR recording file, and you can choose to select which ones you want to include or remove from your test script.
For performance testing, it’s common to not include static assets, or remove hosts from 3rd-party services from your tests, but you can include them depending on your use case.
Autocorrelation
Note
This feature is in public preview and subject to change.
Autocorrelation is an AI-powered feature that automatically creates correlation rules for your test scripts. It detects dynamic values, such as session tokens, CSRF tokens, and resource IDs, that change between recording and playback, and creates rules to extract and reuse these values so your scripts work correctly.
When you record a user session, many applications include dynamic values in their requests and responses. These values, like authentication tokens or session IDs, are generated at runtime and differ each time the session is replayed. Without correlation, your test script fails because it uses the original recorded values instead of the new ones.
Autocorrelation is powered by Grafana Assistant and runs against your Grafana Cloud account. Autocorrelation:
- Runs validation to identify mismatches between your recording and a live test run
- Detects values that change between runs
- Creates correlation rules to extract and reuse these values automatically
Before you begin
Before using Autocorrelation, make sure you have:
- A Grafana Cloud account. You can sign in or create a free account from the Autocorrelation dialog.
- A recording with requests. Open an existing recording in the Generator, or create a new recording first.
- Proxy online. The proxy must be running to validate your script.
Note
Data from your recording is sent to Grafana Assistant for analysis, and the generated correlation rules are applied locally in k6 Studio. Authentication tokens are stored using your operating system’s secure storage (such as Keychain on macOS or Credential Manager on Windows).
Use Autocorrelation
To automatically create correlation rules for your recording:
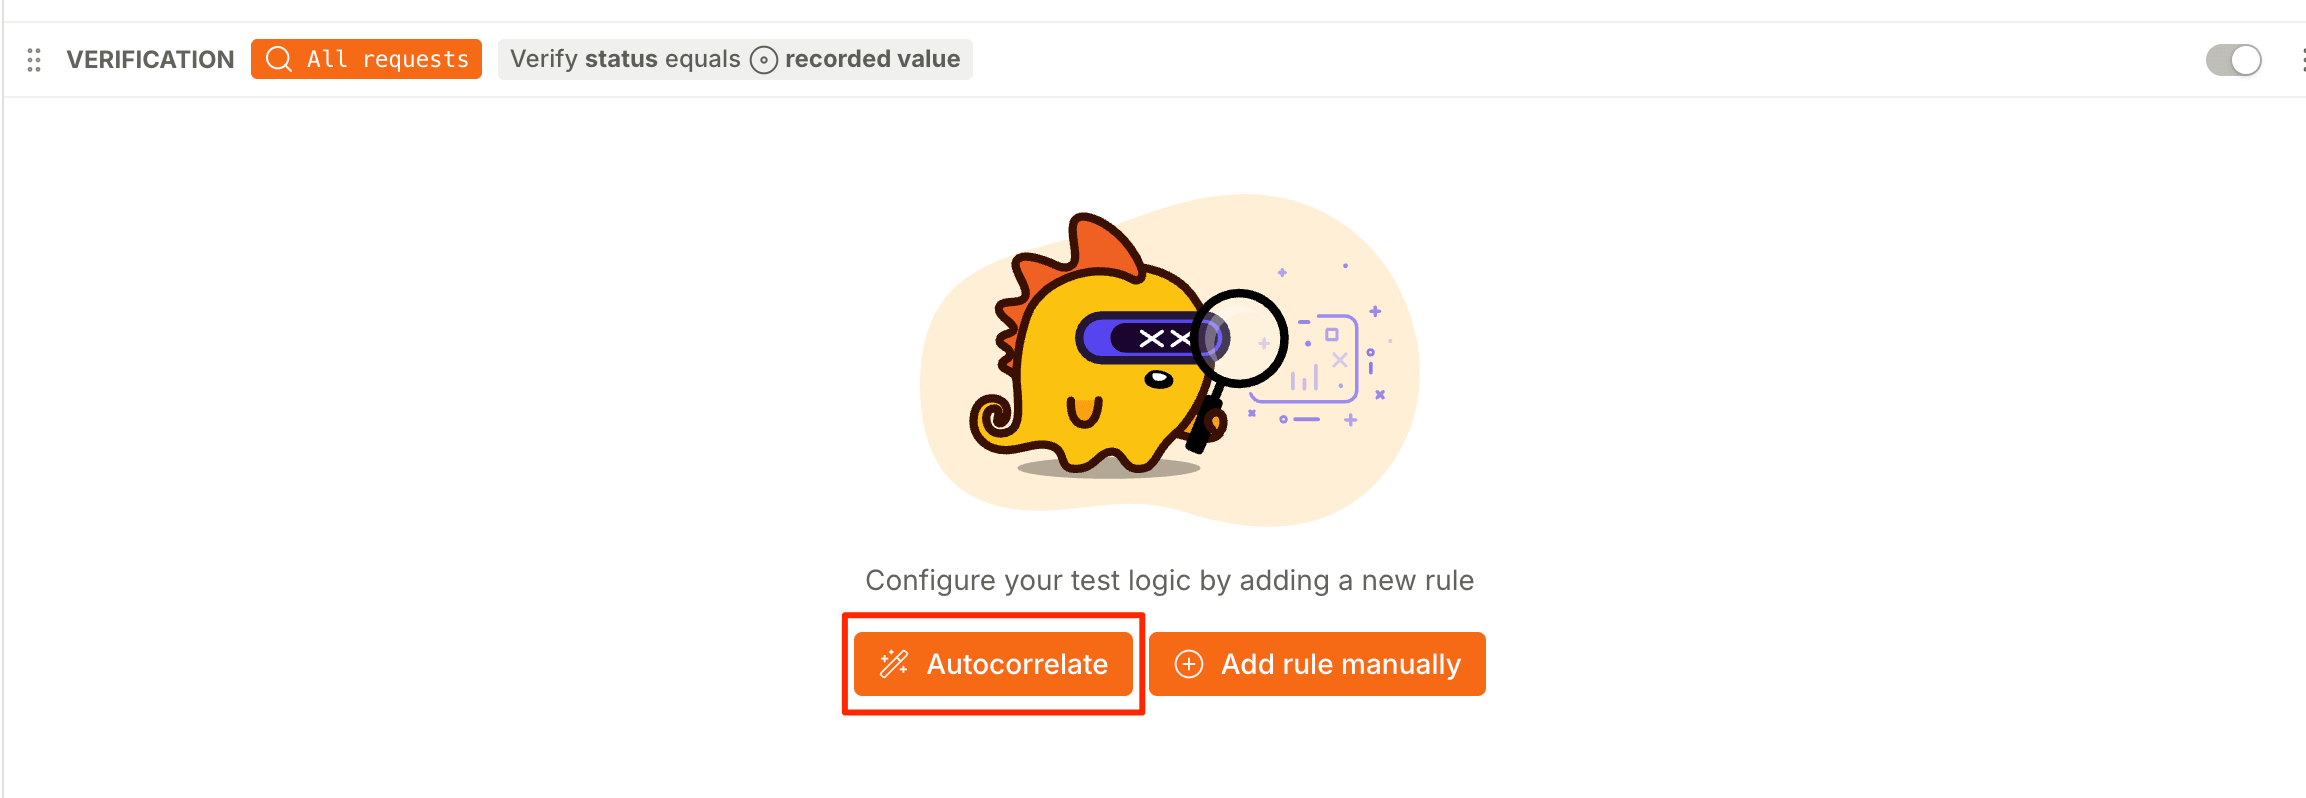
Open the Generator with your recording loaded.
In the Test rules section, click Autocorrelate.
![k6 Studio Generator window, highlighting the Autocorrelate button]()
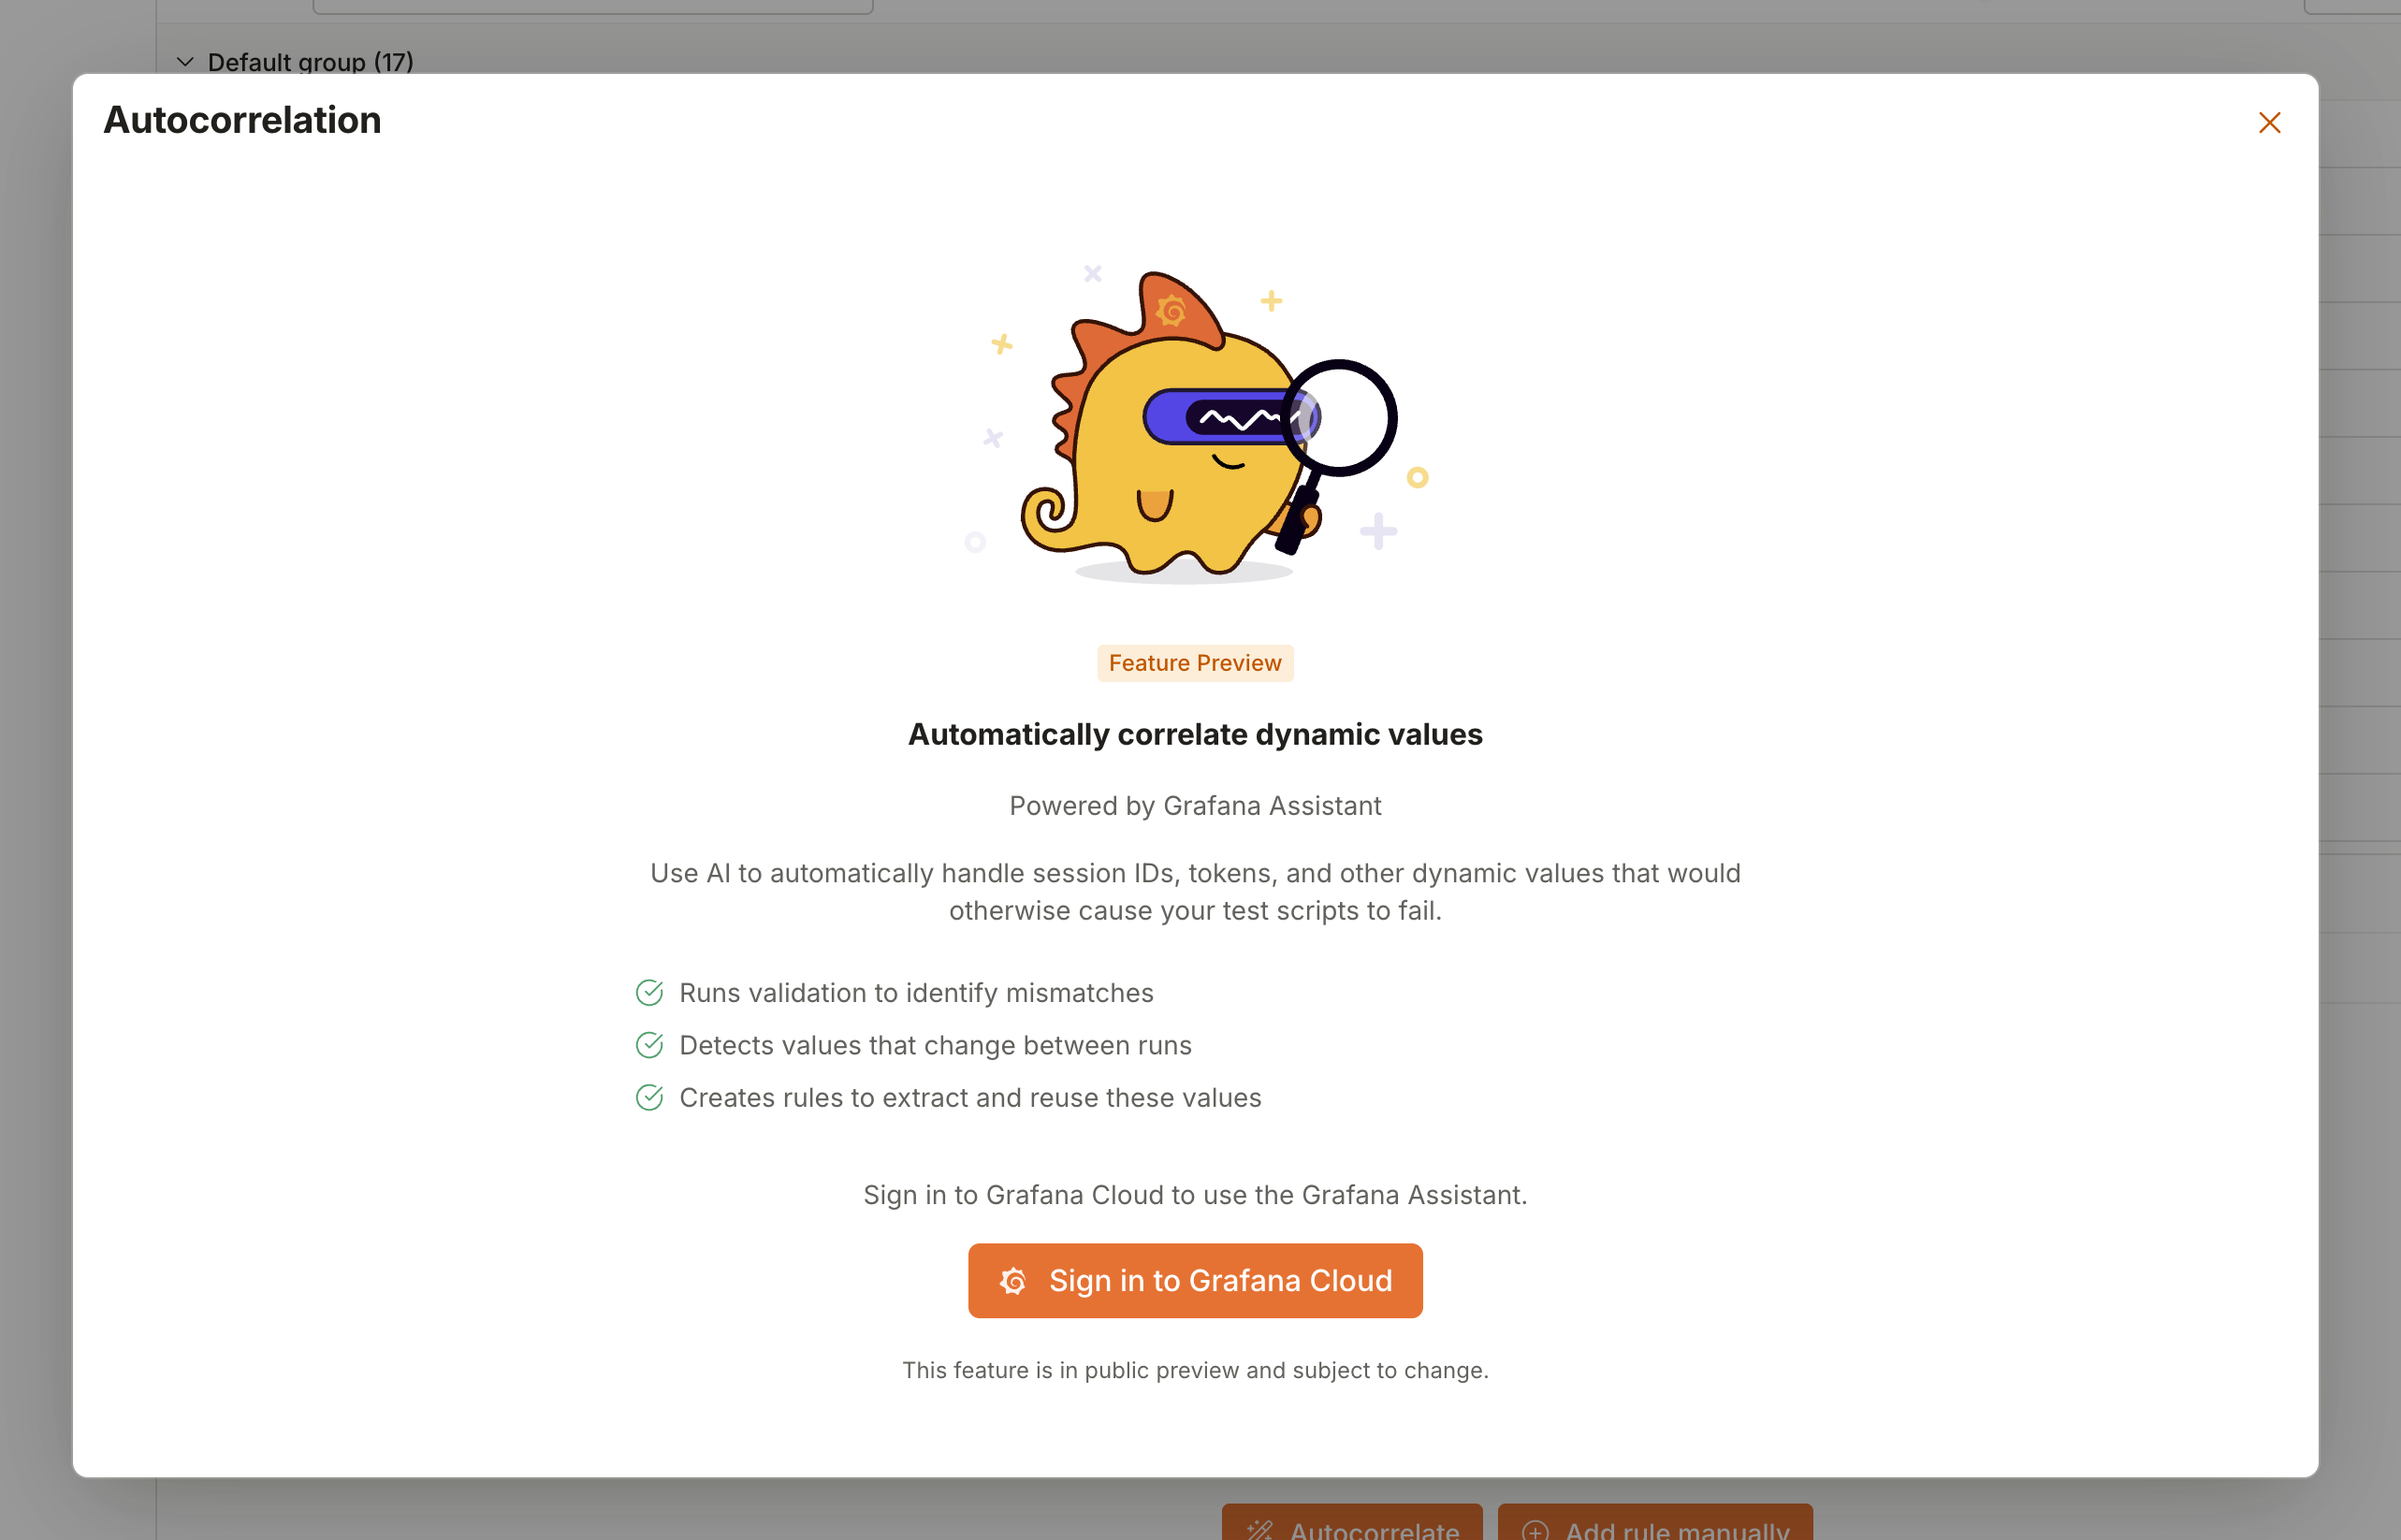
Sign in if prompted. In the Autocorrelation dialog, click Sign in to Grafana Cloud, complete the sign-in in your browser, and select the Grafana Cloud stack you want to use.
![Autocorrelation dialog prompting the user to sign in to Grafana Cloud]()
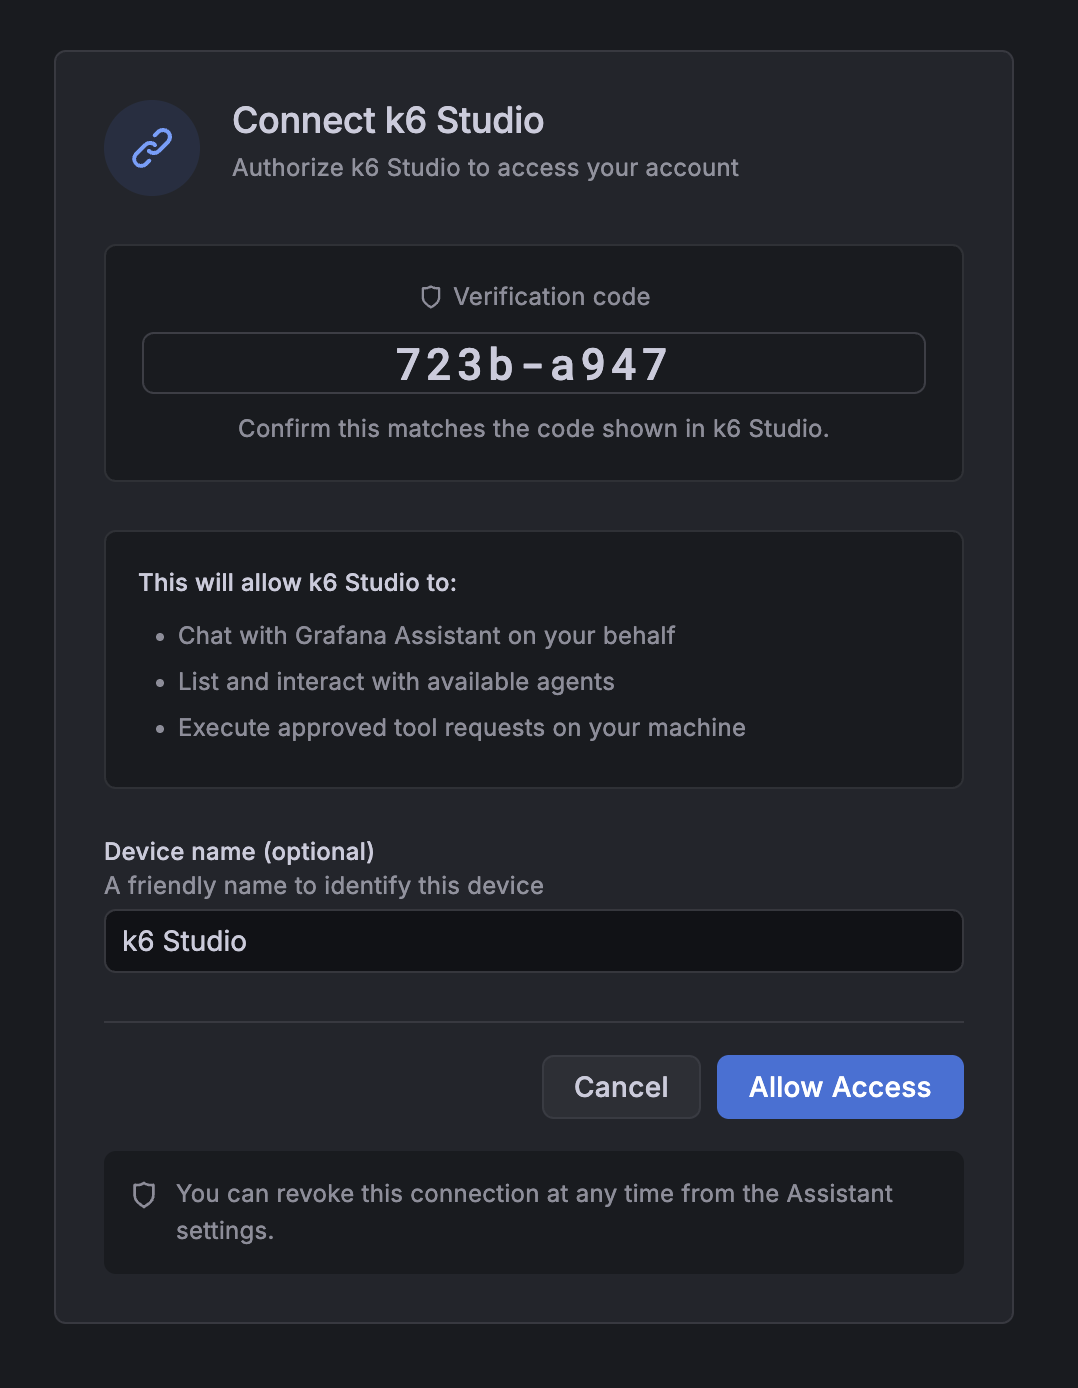
Connect to Grafana Assistant if prompted. Click Connect to Grafana Assistant to open your browser. Approve the sign-in, check that the verification code in the browser matches the one shown in k6 Studio, then return to the app. If this is your first time using Grafana Assistant, you’re also prompted to review and accept the terms and conditions in the browser before the connection completes.
![Permission approval dialog in Grafana Assistant]()
Click Analyze recording to start the process.
Wait for analysis to complete. Autocorrelation:
- Validates your script to identify mismatches
- Analyzes the recording to find dynamic values
- Creates correlation rules to handle those values
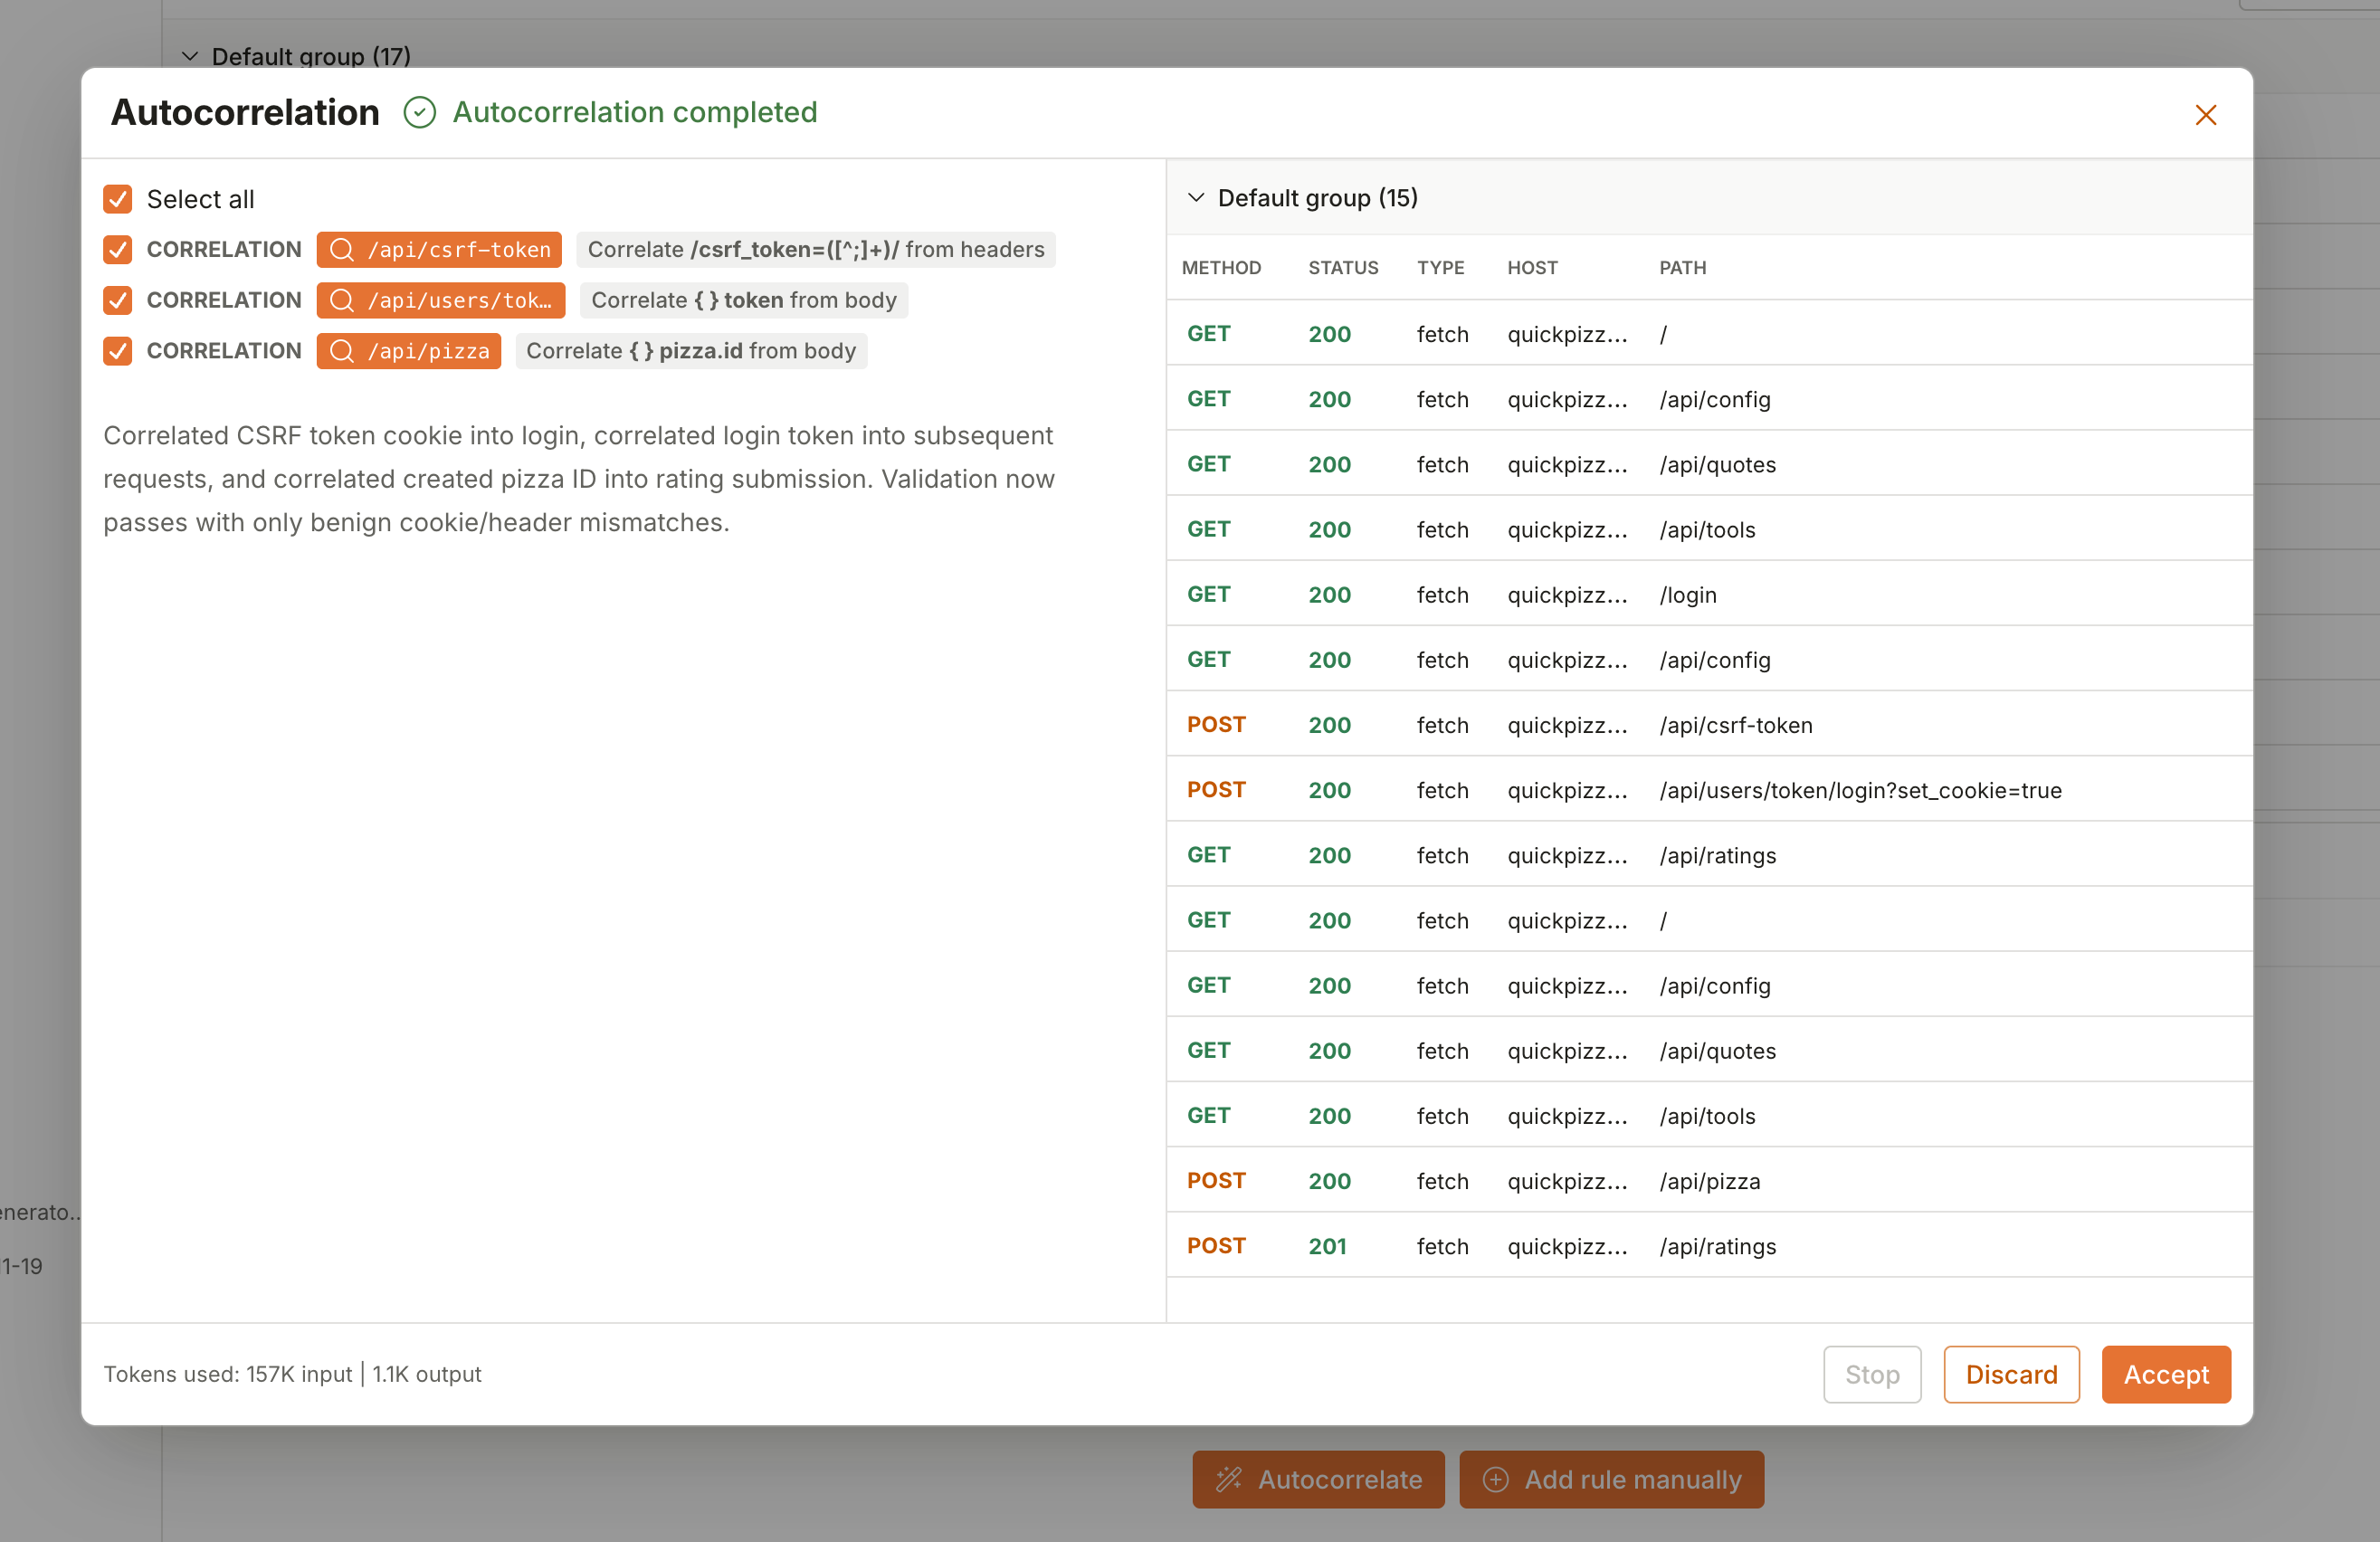
Review validation results. The right panel shows the validation requests, so you can see how the script performed.
Review the suggested rules. The left panel shows the rules that were created. Each rule is selected by default. You can:
- Clear the checkbox next to a rule to exclude it
- Use Select all to toggle all rules at once
Accept or discard the rules:
- Click Accept to add the selected rules to your generator
- Click Discard to close the dialog without adding any rules
- Click Stop to cancel the analysis while it’s running
![k6 Studio autocorrelation dialog with suggested rules]()
Understand the results
After analysis completes, you see one of these outcomes:
Troubleshoot Autocorrelation
Considerations
- Feature preview. Autocorrelation is in public preview. Functionality might change in future releases.
- Data processing. Your recording data is sent to Grafana Assistant for analysis. The generated rules are applied locally in k6 Studio.
- Manual rules. You can still create correlation rules manually using the Add rule menu. Autocorrelation complements manual rule creation; it doesn’t replace it.
- Large recordings. Very large recordings might exceed the context available for analysis. Try reducing the number of allowed hosts, working with a smaller recording, or splitting your recording into multiple smaller sessions.
Rules
Test rules are rules you can add and configure to your test generator, that allow you to customize the generated test script. These rules can use the information from a test recording, to then generate code changes to help make your test scripts more reliable, and reusable.
The available rules are:
- Verification rule
- Correlation rule
- Parameterization rule
- Custom code rule
You can add multiple correlation and custom code rules to your test generator.
You can also use Autocorrelation to automatically create correlation rules using AI.
Verification rule
The verification rule is a default rule that’s created for every test generator. It adds a check statement after every request that validates if the response status code is the same as the one from the test recording.
The verification rule is useful for making sure that your systems are performing as expected. Failed checks do not cause a test to abort, or interrupt a test run. Checks generate a metric that you can inspect after a test run is completed to understand how your system performed.
For more details about checks, refer to Checks.
Correlation rule
The correlation rule lets you extract data from your test recording, and reuse it across your test script. This is a common use case when working with applications that have unique IDs that are generated for a request, and then are passed to every subsequent request, for example.
The correlation rule includes an Extractor and a Replacer. They both have the same configuration options, but the Extractor can be used to find and extract the value you want to use across the script, and the Replacer can be used to find the places where you want to replace and use the extracted value.
The configuration fields are:
- Filter: Define a request path that this filter applies to. Plain text and regular expression are supported.
- Target: Select the headers, body, or URL path as the target for the extractor or replacer.
- Type: Select Begin-End, Regex, or JSON as the way to search for the value to be extracted or replaced.
- Begin-End: Define the Begin and End values as the strings immediately before and after the value to be extracted or replaced.
- Regex: Define the regular expression to match the value to be extracted or replaced.
- JSON: Define the JSON path to match the value to be extracted or replaced.
When creating or editing a correlation rule, you can use the Rule preview panel to check that your configuration options are working as intended, and being applied to the correct requests and values in your test script.
Parameterization rule
The parameterization rule lets you parameterize your requests to use a text value, or the value from a variable. For example, you can replace a userId value in all requests with a test user ID defined as a text value in the rule tab, or use a variable name or data file from the Test data option.
The configuration fields are:
- Filter: Define a request path that this filter applies to. Plain text and regular expression are supported.
- Target: Select the headers, body, or URL path as the target for the extractor or replacer.
- Type: Select Begin-End, Regex, or JSON as the way to search for the value to be replaced.
- Begin-End: Define the Begin and End values as the strings immediately before and after the value to be replaced.
- Regex: Define the regular expression to match the value to be replaced.
- JSON: Define the JSON path to match the value to be replaced.
- Replace with: Configure how you want to replace the values when a match is found. You can use:
- Text value: Define a text value.
- Variables: Use a variable from the drop-down list. Make sure that you configure the variable value to be used under Test data -> Variables.
- Data file: Select a data file from the drop-down list. After you select a data file, you can select any properties from the Property name list. The test script will use a different value for each iteration of the test run. Refer to Data files for more details.
- Custom code: Use a custom JavaScript code snippet to define a value. You must include a
returnstatement with the value you’d like to use.
When creating or editing a parameterization rule, you can use the Rule preview panel to check that your configuration options are working as intended, and being applied to the correct requests and values in your test script.
Custom code rule
The custom code rule lets you insert a custom JavaScript code snippet in your test script.
The custom code rule has two options:
- Filter: Define a request path that this filter applies to. Plain text and regular expression are supported.
- Placement: Select between Before matched requests or After matched requests.
Rule selectors
For correlation and parameterization rules, you can use the following selectors:
- Begin-end: Match a value between two strings.
- JSON: Use dot notation to match a value in the JSON payload or response body.
- Regex: Use a regular expression to match a value.
Begin-end selector
This selector is useful when your target value is between two known strings. For example, to match a value in a URL:
https://example.com/products/1234/detailsTo replace 1234 with another value, use the following configuration:
Target: URL
Type: Begin-end
Begin: /products/
End: /details
JSON selector
This selector is ideal when your target value is in a JSON payload or response body. It uses dot notation to access nested properties. For example, in this JSON:
{
  "name": "Product name",
  "details": {
    "id": 1234
  },
  "tags": ["electronics", "sale"],
  "variants": [
    {
      "color": "blue",
      "stock": 5
    },
    {
      "color": "red",
      "stock": 3
    }
  ]
}
You can replace values use the following configurations:
# Replace nested object value
Target: Body
Type: JSON
Path: details.id

# Replace array element
Target: Body
Type: JSON
Path: tags.0

# Replace nested array object value
Target: Body
Type: JSON
Path: variants.0.stock
Regex selector
When the previous selectors don’t meet your needs, you can use regular expressions for more granular matching. For example, to match an authorization token in a header:
Headers
Authorization: Bearer eyJhbGciOiJIUzI1NiI
To replace eyJhbGciOiJIUzI1NiI with another value, use the following configuration:
Target: Headers
Type: Regex
Regex: Bearer (.+)
Note
The regular expression must include a capturing group
()to specify the value you want to replace.
Validate and export script
After you’re done configuring the test options and rules for your test generator, you can click the menu icon on the top-right to validate and export your script.
When clicking on validate script, the Validator opens and runs one iteration of your test script. You can click on each request to inspect the request and response, and view the logs, checks, and script tab to review the output of the test generator.
After validating your script, you can export it so you can run it using the k6 CLI, or using Grafana Cloud k6.