Run the Promtail client on AWS EKS
In this tutorial we’ll see how to set up Promtail on EKS. Amazon Elastic Kubernetes Service (Amazon EKS) is a fully managed Kubernetes service, using Promtail we’ll get full visibility into our cluster logs. We’ll start by forwarding pods logs then nodes services and finally Kubernetes events.
Caution
Promtail has been deprecated and is in Long-Term Support (LTS) through February 28, 2026. Promtail will reach an End-of-Life (EOL) on March 2, 2026. You can find migration resources here.
After this tutorial you will able to query all your logs in one place using Grafana.
Requirements
Before we start you’ll need:
- The AWS CLI configured (run
aws configure). - kubectl and eksctl installed.
- A Grafana instance with a Grafana Loki data source already configured, you can use GrafanaCloud free trial.
For the sake of simplicity we’ll use a GrafanaCloud Loki and Grafana instances, you can get an free account for this tutorial on our website, but all the steps are the same if you’re running your own Open Source version of Loki and Grafana instances.
Setting up the cluster
In this tutorial we’ll use eksctl, a simple command line utility for creating and managing Kubernetes clusters on Amazon EKS. AWS requires creating many resources such as IAM roles, security groups and networks, by using eksctl all of this is simplified.
Note
We’re not going to use a Fargate cluster. Do note that if you want to use Fargate daemonset are not allowed, the only way to ship logs with EKS Fargate is to run a fluentd or fluentbit or Promtail as a sidecar and tee your logs into a file. For more information on how to do so, you can read this [blog post][blog ship log with fargate].
eksctl create cluster --name loki-promtail --managedThis usually takes about 15 minutes. When this is finished you should have kubectl context configured to communicate with your newly created cluster. To verify, run the following command:
kubectl versionYou should see output similar to the following:
Client Version: version.Info{Major:"1", Minor:"18", GitVersion:"v1.18.5", GitCommit:"e6503f8d8f769ace2f338794c914a96fc335df0f", GitTreeState:"clean", BuildDate:"2020-07-04T15:01:15Z", GoVersion:"go1.14.4", Compiler:"gc", Platform:"darwin/amd64"}
Server Version: version.Info{Major:"1", Minor:"16+", GitVersion:"v1.16.8-eks-fd1ea7", GitCommit:"fd1ea7c64d0e3ccbf04b124431c659f65330562a", GitTreeState:"clean", BuildDate:"2020-05-28T19:06:00Z", GoVersion:"go1.13.8", Compiler:"gc", Platform:"linux/amd64"}
Adding Promtail DaemonSet
To ship all your pods logs we’re going to set up Promtail as a DaemonSet in our cluster. This means it will run on each nodes of the cluster, we will then configure it to find the logs of your containers on the host.
What’s nice about Promtail is that it uses the same service discovery as Prometheus, you should make sure the scrape_configs of Promtail matches the Prometheus one. Not only this is simpler to configure, but this also means Metrics and Logs will have the same metadata (labels) attached by the Prometheus service discovery. When querying Grafana you will be able to correlate metrics and logs very quickly, you can read more about this on our blogpost.
Let’s add the Loki repository and list all available charts. To add the repo, run the following command:
helm repo add grafana https://grafana.github.io/helm-charts
helm upgrade -i promtail grafana/promtail
You should see the following message.
"loki" has been added to your repositoriesTo list the available charts, run the following command:
helm search repoYou should see output similar to the following:
NAME                   CHART VERSION   APP VERSION     DESCRIPTION
loki/fluent-bit 0.3.0           v1.6.0          Uses fluent-bit Loki go plugin for gathering lo...
loki/loki       0.31.0          v1.6.0          Loki: like Prometheus, but for logs.
loki/loki-stack 0.40.0          v1.6.0          Loki: like Prometheus, but for logs.
loki/promtail   0.24.0          v1.6.0          Responsible for gathering logs and sending them...
If you want to install Loki, Grafana, Prometheus and Promtail all together you can use the loki-stack chart, for now we’ll focus on Promtail. Let’s create a new helm value file, we’ll fetch the default one and work from there:
curl https://raw.githubusercontent.com/grafana/helm-charts/main/charts/promtail/values.yaml > values.yamlFirst we’re going to tell Promtail to send logs to our Loki instance, the example below shows how to send logs to GrafanaCloud, replace your credentials. The default value will send to your own Loki and Grafana instance if you’re using the loki-chart repository.
loki:
  serviceName: "logs-prod-us-central1.grafana.net"
  servicePort: 443
  serviceScheme: https
  user: <userid>
  password: <grafancloud apikey>
Once you’re ready let’s create a new namespace monitoring and add Promtail to it. To create the namespace, run the following command:
kubectl create namespace monitoringYou should see the following message.
namespace/monitoring createdTo add Promtail, run the following command:
helm install promtail --namespace monitoring loki/promtail -f values.yamlYou should see output similar to the following:
NAME: promtail
LAST DEPLOYED: Fri Jul 10 14:41:37 2020
NAMESPACE: default
STATUS: deployed
REVISION: 1
TEST SUITE: None
NOTES:
Verify the application is working by running these commands:
  kubectl --namespace default port-forward daemonset/promtail 3101
  curl http://127.0.0.1:3101/metrics
Verify that Promtail pods are running. You should see only two since we’re running a two nodes cluster.
kubectl get -n monitoring podsYou should see output similar to the following:
NAME             READY   STATUS    RESTARTS   AGE
promtail-87t62   1/1     Running   0          35s
promtail-8c2r4   1/1     Running   0          35s
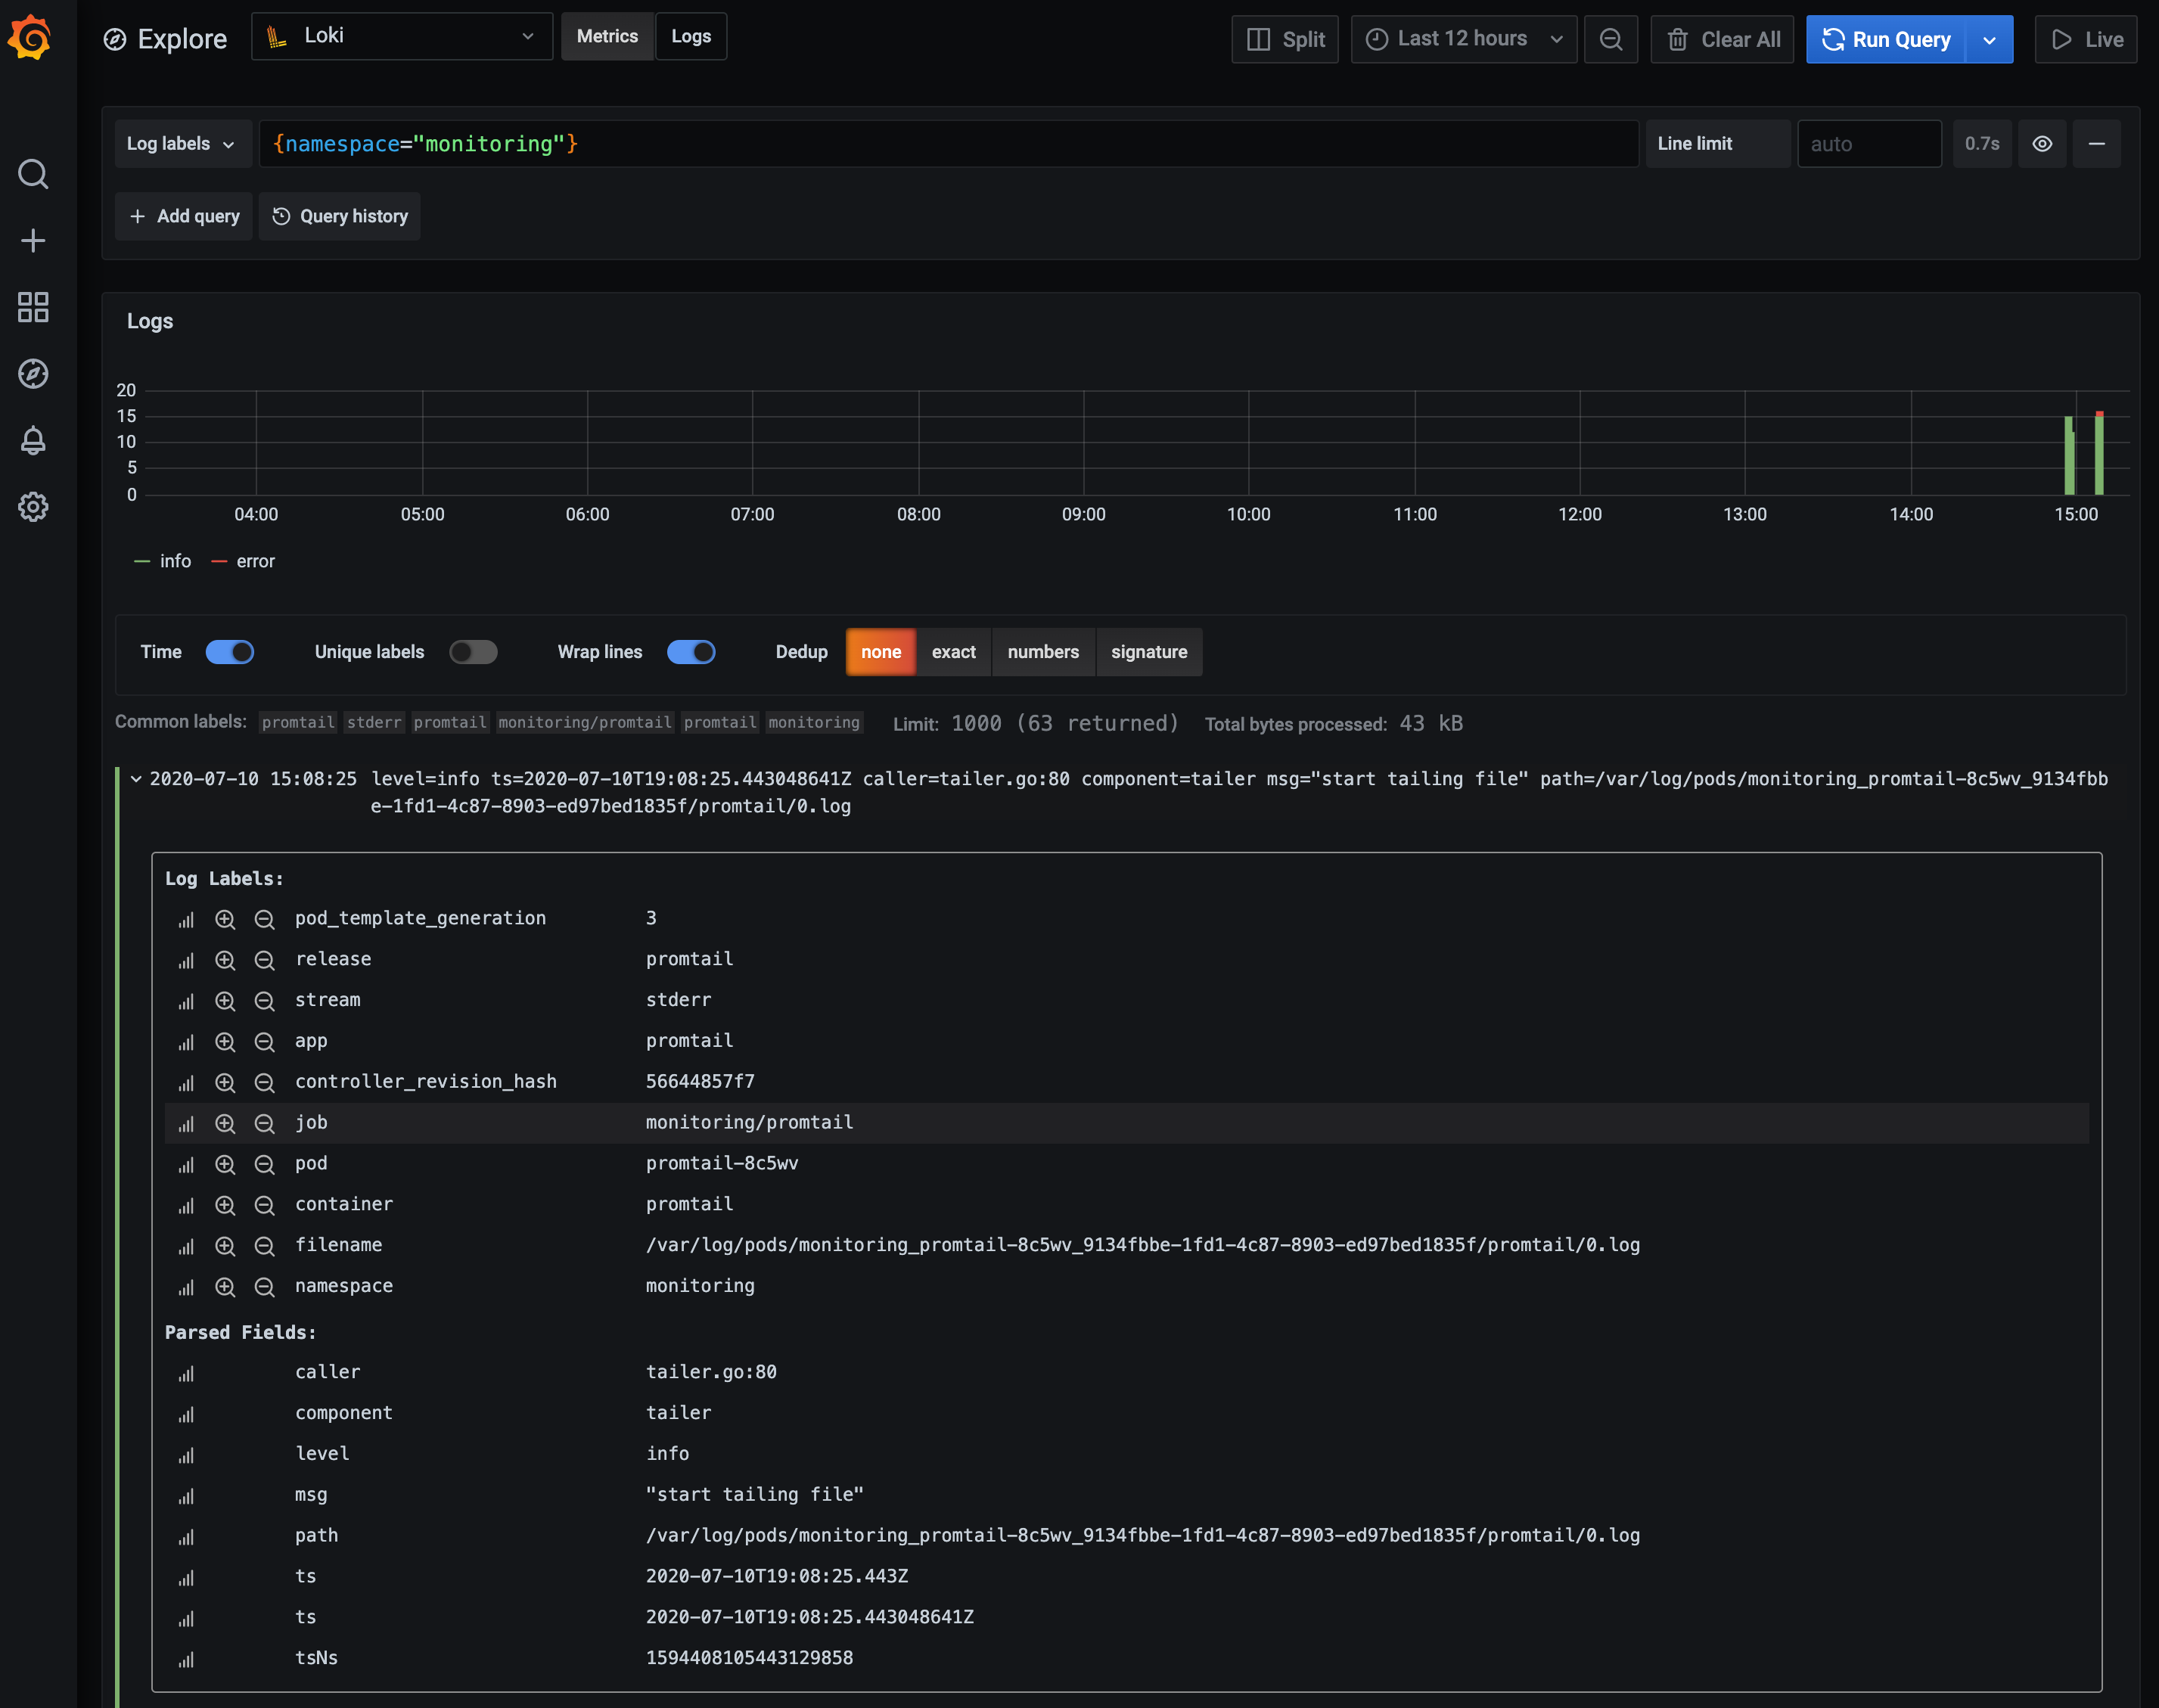
You can reach your Grafana instance and start exploring your logs. For example if you want to see all logs in the monitoring namespace use {namespace="monitoring"}, you can also expand a single log line to discover all labels available from the Kubernetes service discovery.

Fetching kubelet logs with systemd
So far we’re scrapings logs from containers, but if you want to get more visibility you could also scrape systemd logs from each of your machine. This means you can also get access to kubelet logs.
Let’s edit our values file again and extraScrapeConfigs to add the systemd job:
extraScrapeConfigs:
  - job_name: journal
    journal:
      path: /var/log/journal
      max_age: 12h
      labels:
        job: systemd-journal
    relabel_configs:
      - source_labels: ['__journal__systemd_unit']
        target_label: 'unit'
      - source_labels: ['__journal__hostname']
        target_label: 'hostname'
Feel free to change the relabel_configs to match what you would use in your own environnement.
Now we need to add a volume for accessing systemd logs:
extraVolumes:
  - name: journal
    hostPath:
      path: /var/log/journal
And add a new volume mount in Promtail:
extraVolumeMounts:
  - name: journal
    mountPath: /var/log/journal
    readOnly: true
Now that we’re ready we can update the Promtail deployment:
helm upgrade promtail loki/promtail -n monitoring -f values.yamlLet go back to Grafana and type in the query below to fetch all logs related to Volume from Kubelet:
{unit="kubelet.service"} |= "Volume"Filter expressions are powerful in LogQL they help you scan through your logs, in this case it will filter out all your kubelet logs not having the Volume word in it.
The workflow is simple, you always select a set of labels matchers first, this way you reduce the data you’re planing to scan.(such as an application, a namespace or even a cluster). Then you can apply a set of filters to find the logs you want.
Promtail also supports syslog.
Adding Kubernetes events
Kubernetes Events (kubectl get events -n monitoring) are a great way to debug and troubleshoot your kubernetes cluster. Events contains information such as Node reboot, OOMKiller and Pod failures.
We’ll deploy a the eventrouter application created by Heptio which logs those events to stdout.
But first we need to configure Promtail, we want to parse the namespace to add it as a label from the content, this way we can quickly access events by namespace.
Let’s update our pipelineStages to parse logs from the eventrouter:
pipelineStages:
- docker:
- match:
    selector: '{app="eventrouter"}'
    stages:
    - json:
        expressions:
          namespace: event.metadata.namespace
    - labels:
        namespace: ""
Pipeline stages are great ways to parse log content and create labels (which are indexed), if you want to configure more of them, check out the pipeline documentation.
Now update Promtail again:
helm upgrade promtail loki/promtail -n monitoring -f values.yamlAnd deploy the eventrouter using:
kubectl create -f https://raw.githubusercontent.com/grafana/loki/main/docs/sources/send-data/promtail/cloud/eks/eventrouter.yamlYou should see output similar to the following:
serviceaccount/eventrouter created
clusterrole.rbac.authorization.k8s.io/eventrouter created
clusterrolebinding.rbac.authorization.k8s.io/eventrouter created
configmap/eventrouter-cm created
deployment.apps/eventrouter created
Let’s go in Grafana Explore and query events for our new monitoring namespace using {app="eventrouter",namespace="monitoring"}.
For more information about the eventrouter make sure to read our blog post from Goutham.
Conclusion
That’s it ! You can download the final and complete values.yaml if you need.
Your EKS cluster is now ready, all your current and future application logs will now be shipped to Loki with Promtail. You will also able to explore kubelet and Kubernetes events. Since we’ve used a DaemonSet you’ll automatically grab all your node logs as you scale them.
If you want to push this further you can check out Joe’s blog post on how to automatically create Grafana dashboard annotations with Loki when you deploy new Kubernetes applications.
If you need to delete the cluster simply run
eksctl delete cluster --name loki-promtail


