Core concepts
This topic explains the core concepts of Scenes and how to use them in creating your own scene.
Scene
A scene is a collection of objects, called scene objects. These objects represent different aspects of the scene: data, time ranges, variables, layout, and visualizations. Together, scene objects form an object tree:
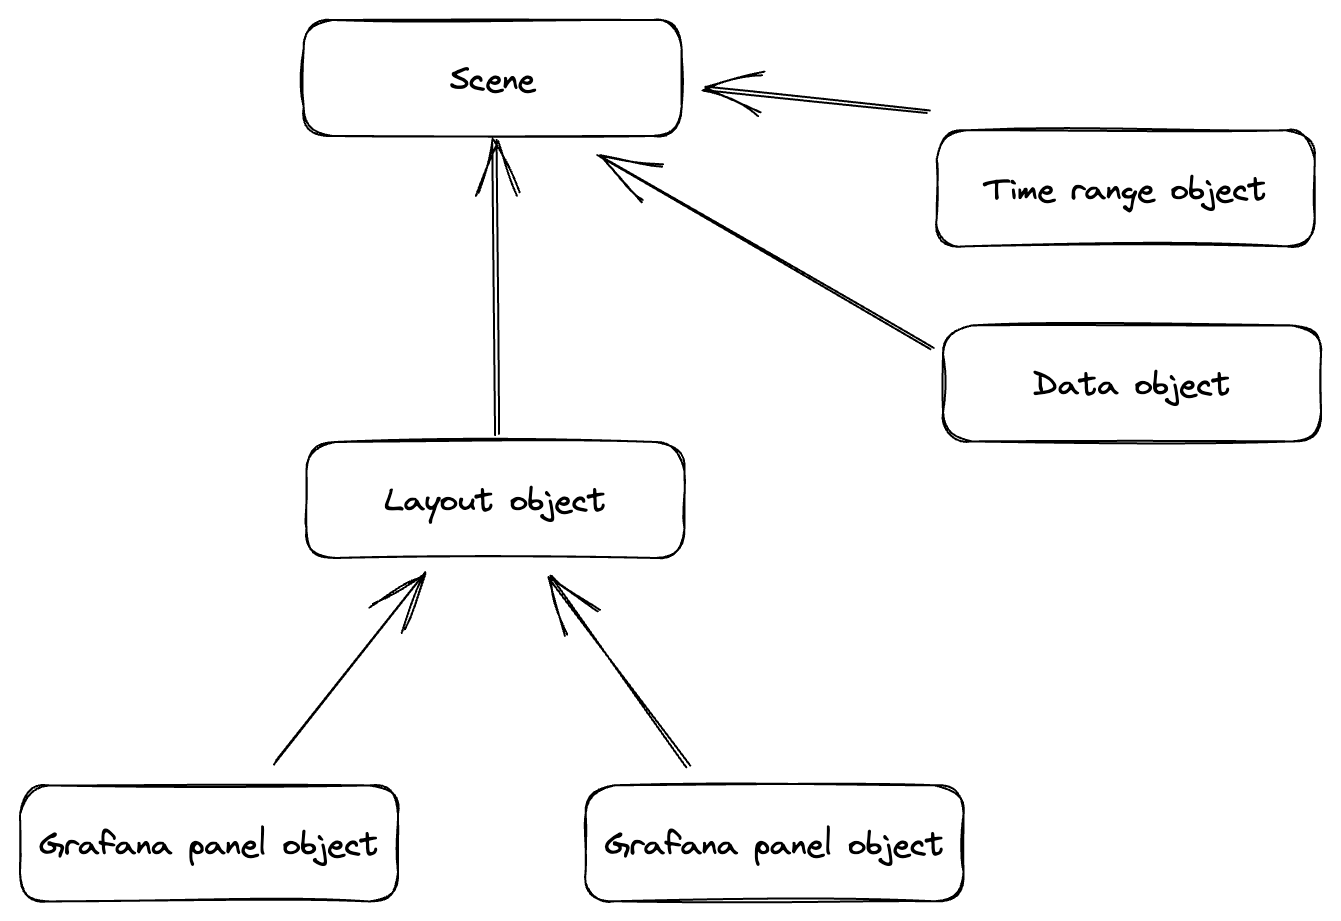
Scenes allow you to group and nest objects. Things like data, time ranges, or variables can be added to any object in the tree, making them available to that object and all descendant objects. Because of this, scenes allow you to create dashboards that have multiple time ranges, queries that can be shared and transformed, or nested variables.
@grafana/scenes comes with multiple objects—like SceneQueryRunner, SceneFlexLayout, VizPanel, and more—to solve common problems. However, you can also create your own scene objects to extend functionality.
Scene object
Scenes are built from atomic objects called scene objects. A scene object is defined with:
- State - An interface extending
SceneObjectState.
import { SceneObjectState } from '@grafana/scenes';

// 1. Create interface that describes state of the scene object
interface CounterState extends SceneObjectState {
  count: number;
}
- Model - A class extending
SceneObjectBaseclass. The Model contains scene object logic.
import { SceneObjectBase } from '@grafana/scenes';

export class Counter extends SceneObjectBase<CounterState> {
  public static Component = CounterRenderer;

  public constructor() {
    super({
      count: 0,
    });
  }

  public onIncrement = () => {
    this.setState({
      count: this.state.count + 1,
    });
  };
}
- React component - Used to render a scene object.
import React from 'react';
import { SceneComponentProps } from '@grafana/scenes';

function CounterRenderer({ model }: SceneComponentProps<Counter>) {
  const { count } = model.useState();

  return (
    <div>
      <div>Counter: {count}</div>
      <button onClick={model.onIncrement}>Increase</button>
    </div>
  );
}
State
Scene objects can have associated state. The shape of an object's state is expressed through an interface that must extend the SceneObjectState interface:
interface CounterState extends SceneObjectState {
  count: number;
}
Subscribe to state changes
A component can read the state from a scene object by using the model property that it receives when rendered. To subscribe to state changes, call the model.useState method:
function CounterRenderer({ model }: SceneComponentProps<Counter>) {
  const { count } = model.useState();

  // ...
}
Subscribing to an object's state using model.useState() will make the component reactive to state changes. Every change to the scene object state is immutable and will cause a re-render of the component.
Modify state
To change the state of a scene object, use the setState method that each scene object has. This can be done directly from the component:
function CounterRenderer({ model }: SceneComponentProps<Counter>) {
  const { count } = model.useState();
  const onIncrement = () => model.setState({ count: count + 1 });

  // ...
}
This can also be done from a scene object class:
export class Counter extends SceneObjectBase<CounterState> {
  // ...
  public onIncrement = () => {
    this.setState({
      count: this.state.count + 1,
    });
  };
}

function CounterRenderer({ model }: SceneComponentProps<Counter>) {
  const { count } = model.useState();

  return (
    <div>
      <div>Counter: {count}</div>
      <button onClick={model.onIncrement}>Increase</button>
    </div>
  );
}
We suggest that you implement the state-modifying methods in the scene object rather than in the component to separate the model complexity from the component.
Data and time range
Use the $data property to add data coming from Grafana data sources to a scene. Queries are configured using the SceneQueryRunner scene object:
import { SceneQueryRunner } from '@grafana/scenes';

const queryRunner = new SceneQueryRunner({
  datasource: {
    type: 'prometheus',
    uid: '<PROVIDE_GRAFANA_DS_UID>',
  },
  queries: [
    {
      refId: 'A',
      expr: 'rate(prometheus_http_requests_total{}[5m])',
    },
  ],
});
Your Grafana instance must have a specified data source configured.
For SceneQueryRunner to work, you must add a time range to a scene. Each scene object has a $timeRange property to which the SceneTimeRange scene object can be added. To specify a time range for the query runner created in the previous example, add the $timeRange property in the object passed to the constructor:
import { SceneQueryRunner, SceneTimeRange } from '@grafana/scenes';

const queryRunner = new SceneQueryRunner({
  datasource: {
    type: 'prometheus',
    uid: '<PROVIDE_GRAFANA_DS_UID>',
  },
  queries: [
    {
      refId: 'A',
      expr: 'rate(prometheus_http_requests_total{}[5m])',
    },
  ],
  $timeRange: new SceneTimeRange({ from: 'now-5m', to: 'now' }),
});
Add the created queryRunner to your scene. Each object in the scene will now be able to access the provided data:
const scene = new EmbeddedScene({
    $data: queryRunner,
    body: ...
})
Each scene object has a $data and $timeRange property that can be configured. Because a scene is an object tree, the data and time range configured through SceneQueryRunner and SceneTimeRange respectively are available to the objects they're added to and all descendant objects.
In the following example, each VizPanel uses different data. "Panel A" uses data defined on the EmbeddedScene, while "Panel B" has its own data and time range configured:
// Scene data, used by Panel A
const queryRunner1 = new SceneQueryRunner({
  datasource: {
    type: 'prometheus',
    uid: '<PROVIDE_GRAFANA_DS_UID>',
  },
  queries: [
    {
      refId: 'A',
      expr: 'rate(prometheus_http_requests_total{}[5m])',
    },
  ],
});

// Panel B data
const queryRunner2 = new SceneQueryRunner({
  datasource: {
    type: 'prometheus',
    uid: '<PROVIDE_GRAFANA_DS_UID>',
  },
  queries: [
    {
      refId: 'A',
      expr: 'avg by (job, instance, mode) (rate(node_cpu_seconds_total[5m]))',
    },
  ],
});

const scene = new EmbeddedScene({
  $data: queryRunner1,
  // Global time range. queryRunner1 will use this time range.
  $timeRange: new SceneTimeRange({ from: 'now-5m', to: 'now' }),
  body: new SceneFlexLayout({
    direction: 'row',
    children: [
      new SceneFlexItem({
        width: '50%',
        height: 300,
        body: PanelBuilders.timeseries().setTitle('Panel using global time range').build(),
      }),
      new SceneFlexItem({
        width: '50%',
        height: 300,
        body: PanelBuilders.timeseries()
          .setTitle('Panel using local time range')
          // Time range defined on VizPanel object. queryRunner2 will use this time range.
          .setTimeRange(new SceneTimeRange({ from: 'now-6h', to: 'now' }))
          .setData(queryRunner2)
          .build(),
      }),
    ],
  }),
});
References to SceneObject's and the parent reference
It's very important that you do not reuse the same instance to a scene object in multiple different scenes or locations within the same scene. A scene object's parent is automatically set when it's part of the state of another scene object. So if you want to use the same scene object instance as the part of the state of more than one scene object you have two options.
- Clone the source scene object. This will create a separate instance with no connection to the source object.
- Use
SceneObjectRefto wrap the instance. This makes sure the object's original parent is not changed while allowing you to store a reference to the instance in the state of another scene object.