Data flow
Note
Relevant starting from version 3.2.0.
The Business Forms plugin converts any Grafana dashboard into a fully functional web application. With many option parameters and interconnections, you can easily get lost.
The following schema illustrates the major parts and their roles.
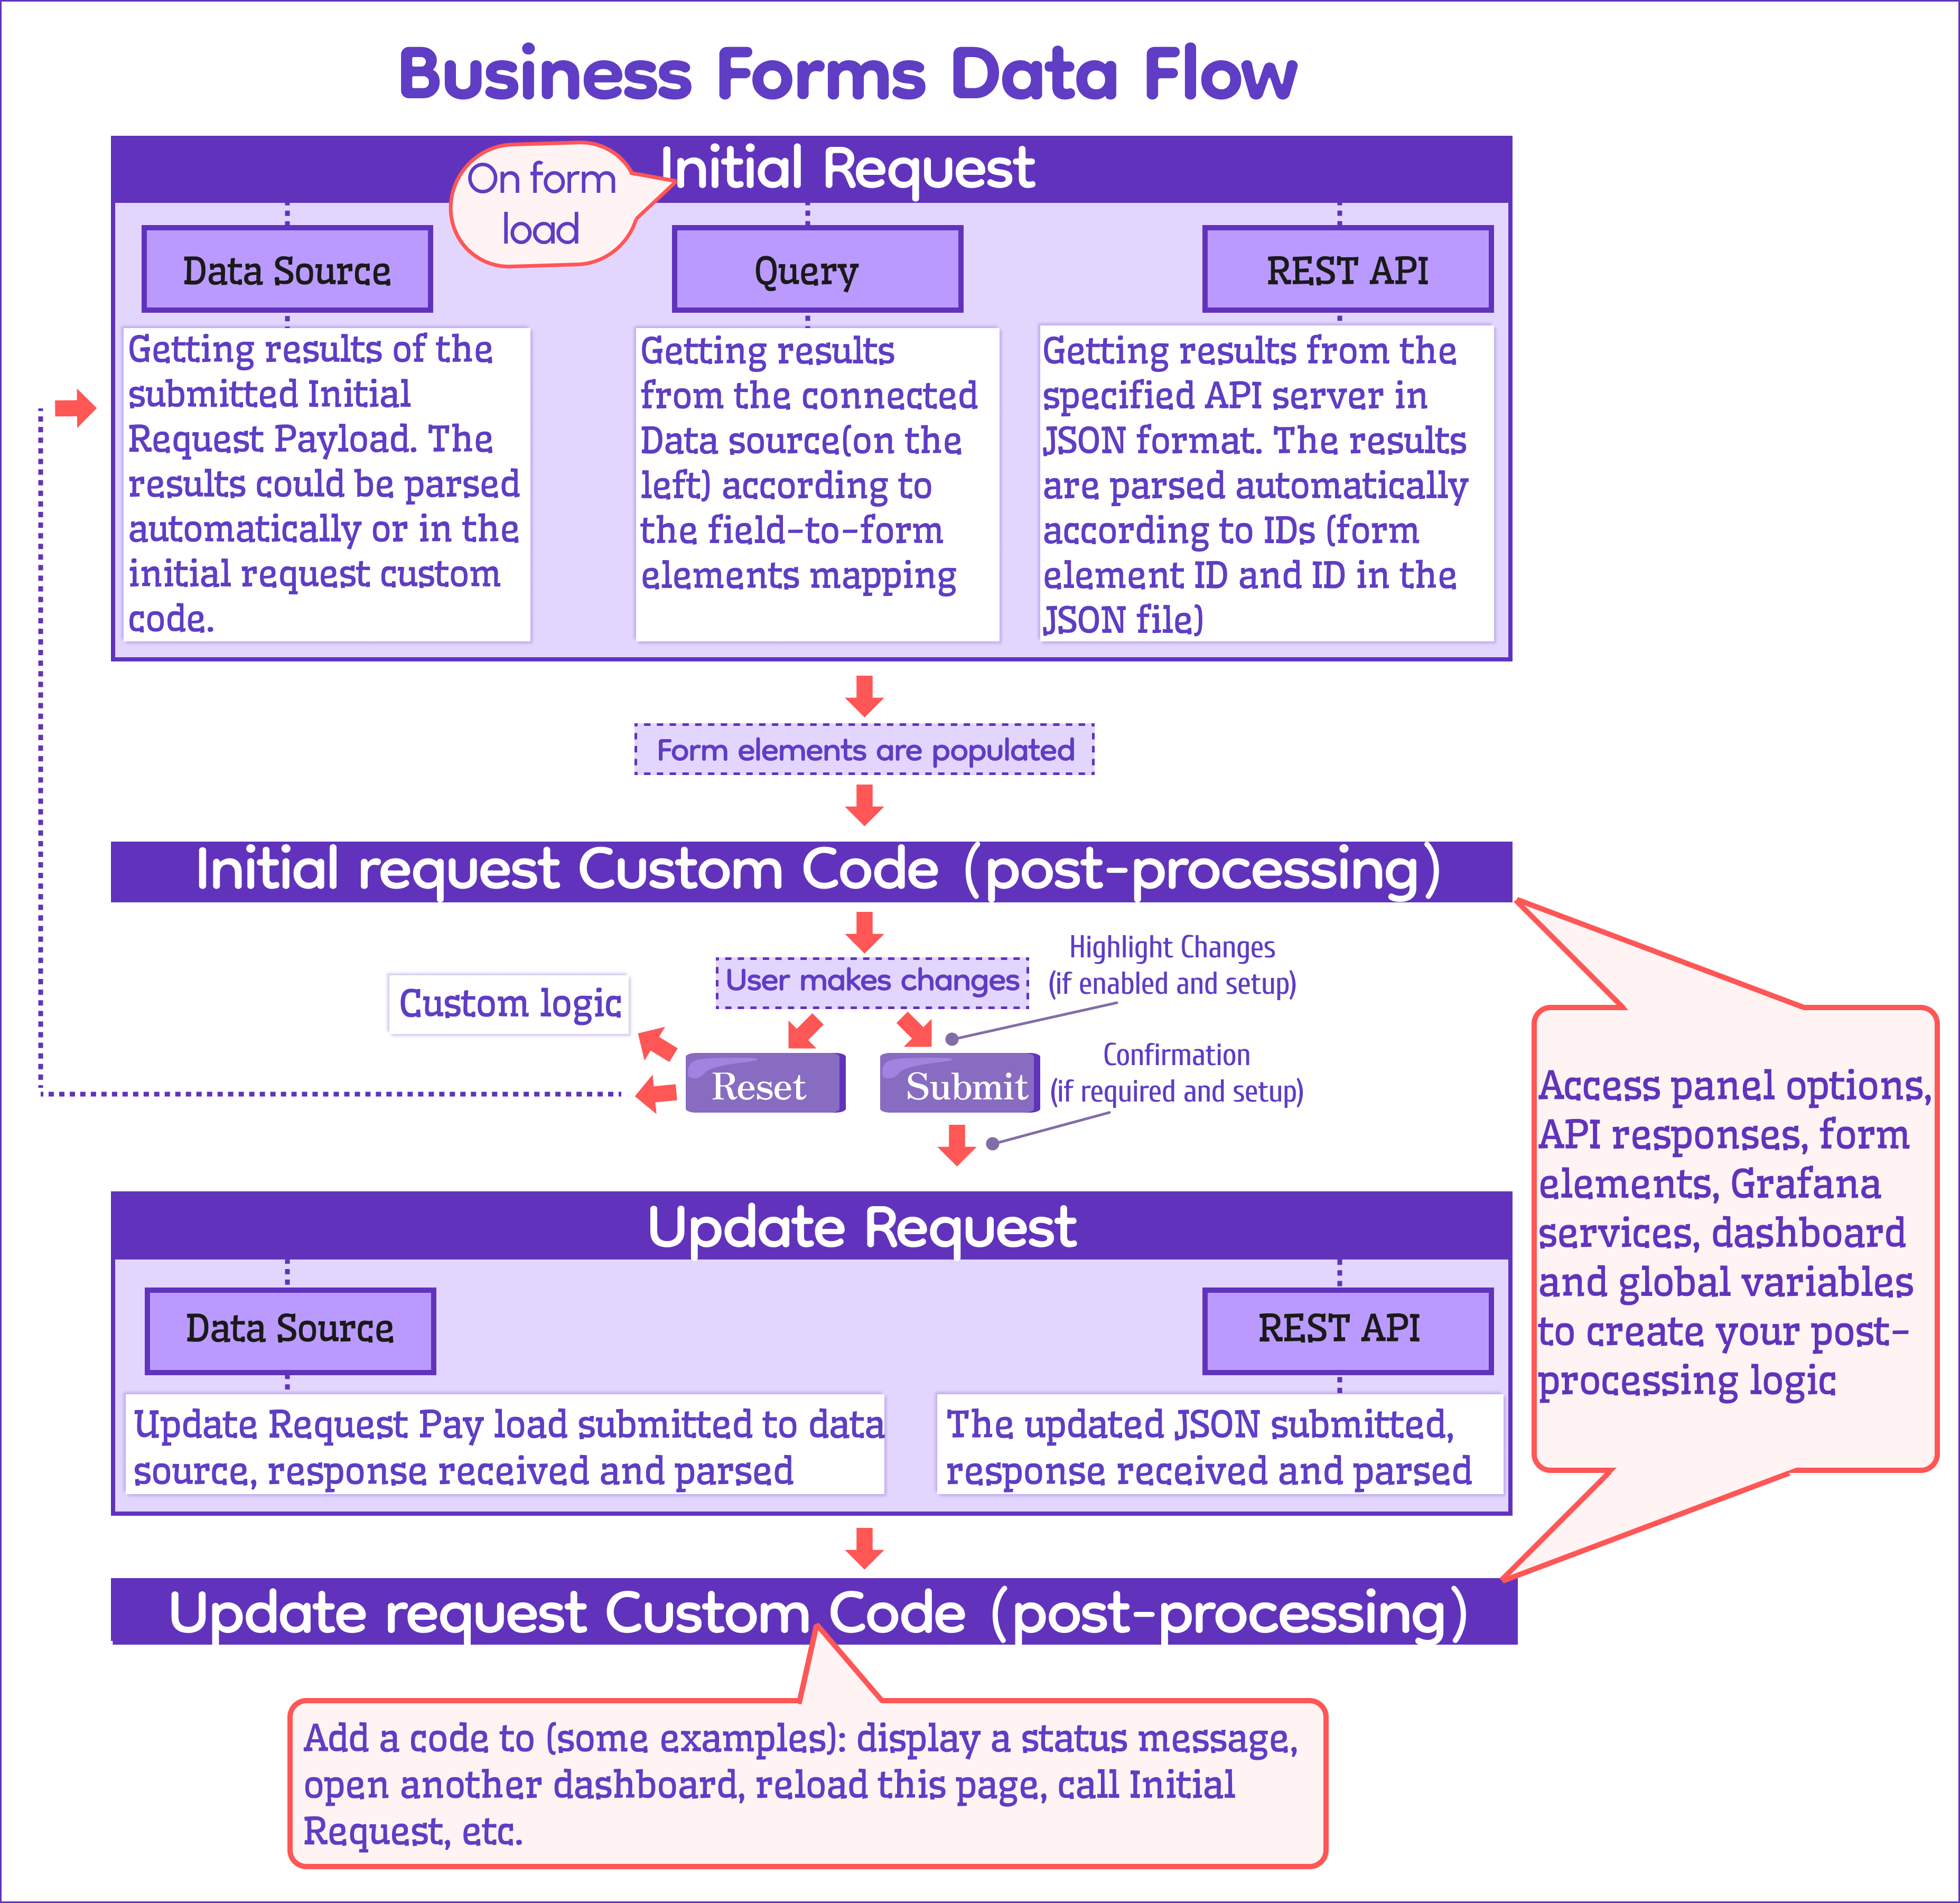
Initial Request
The initial request executes after the browser finishes loading the page. You can configure your initial request as Query, Data Source, or REST API.
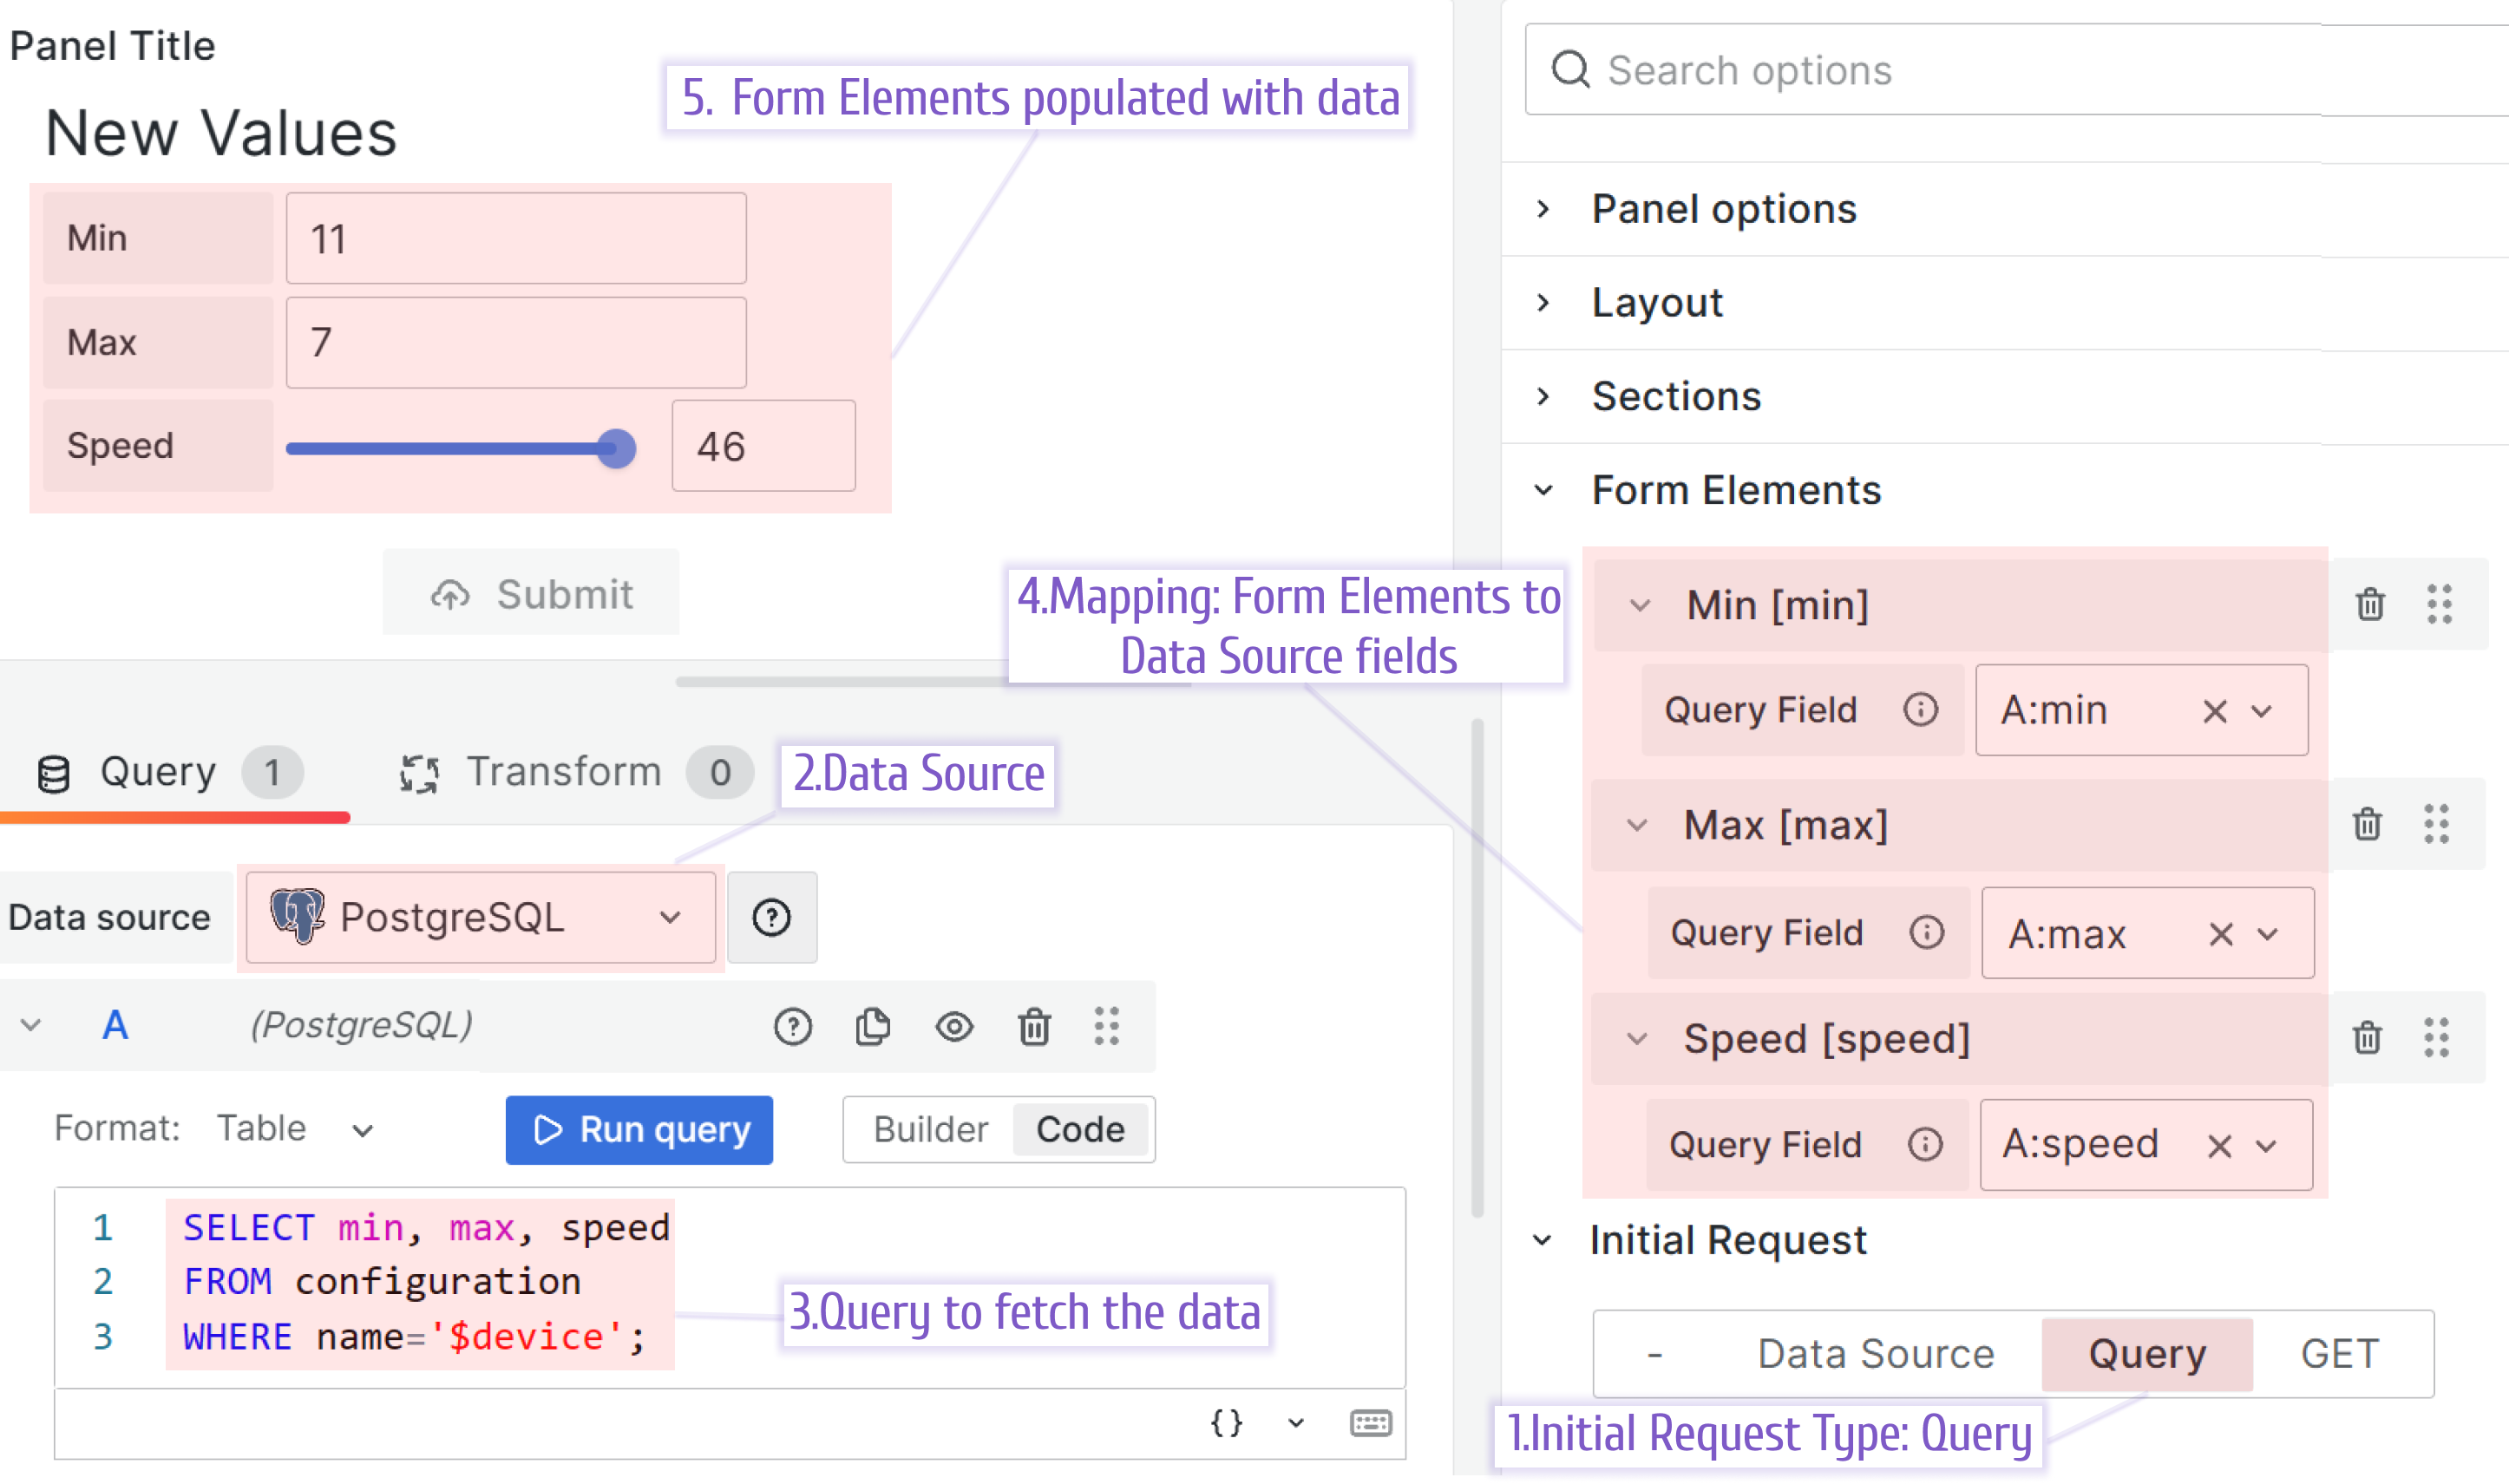
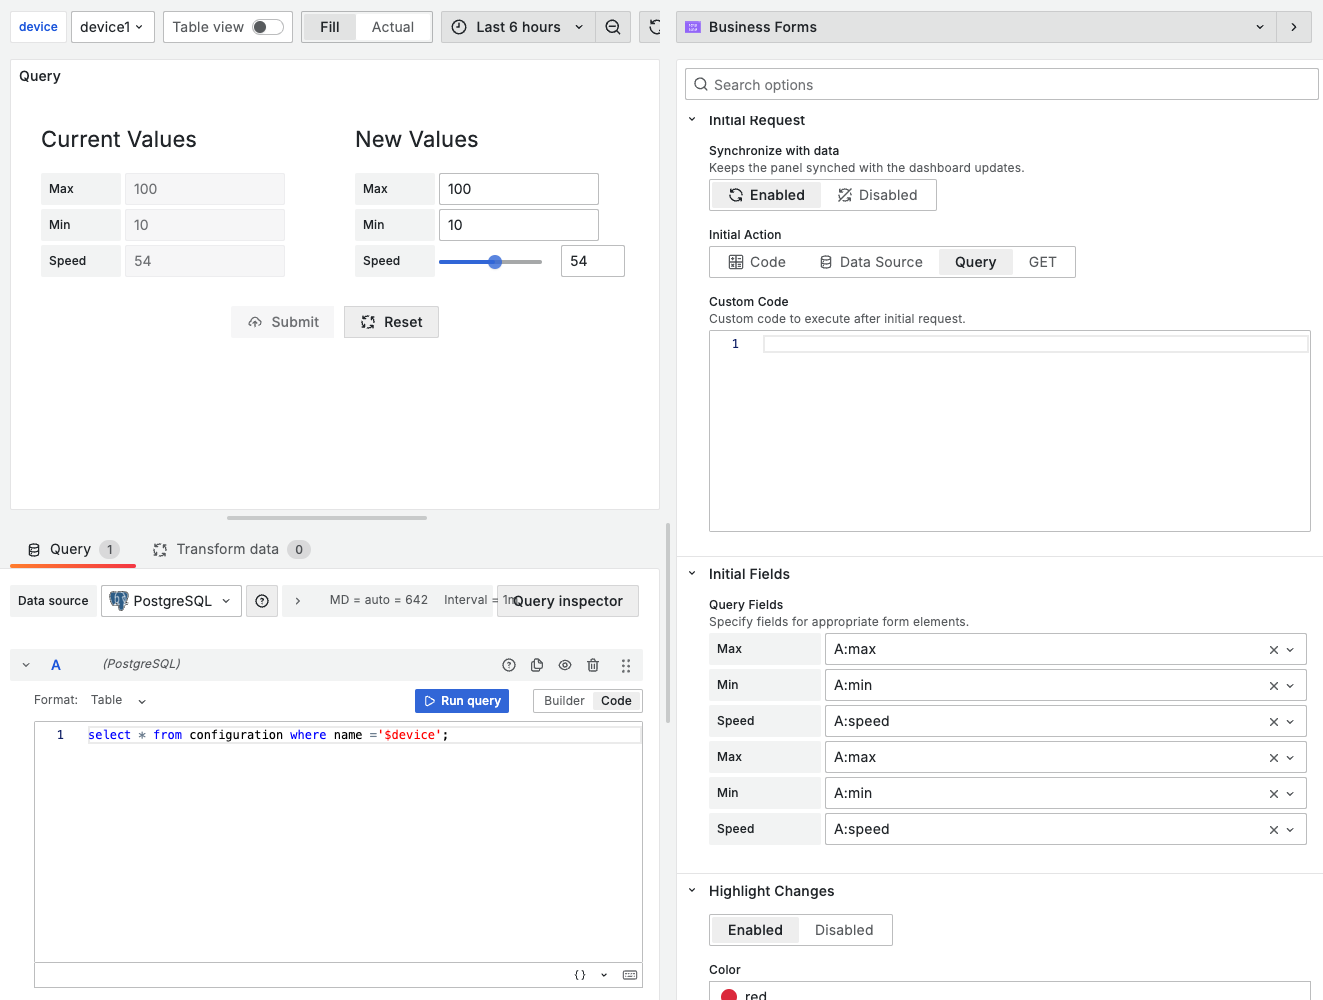
Query
The query is short for the native Grafana query. Any initial request carries data from a data source into Grafana, which is what core Grafana does well. The Query method works with the data frames prepared by the data source that you specified.
This method leverages the existing Grafana data extraction mechanism. To use this method, map every Business Forms panel form element to the appropriate data frame field.
Note
Since version 4.2.0. the
Query FieldandField Namefields have been relocated from theElementscategory to theInitial Fieldsoptions category.
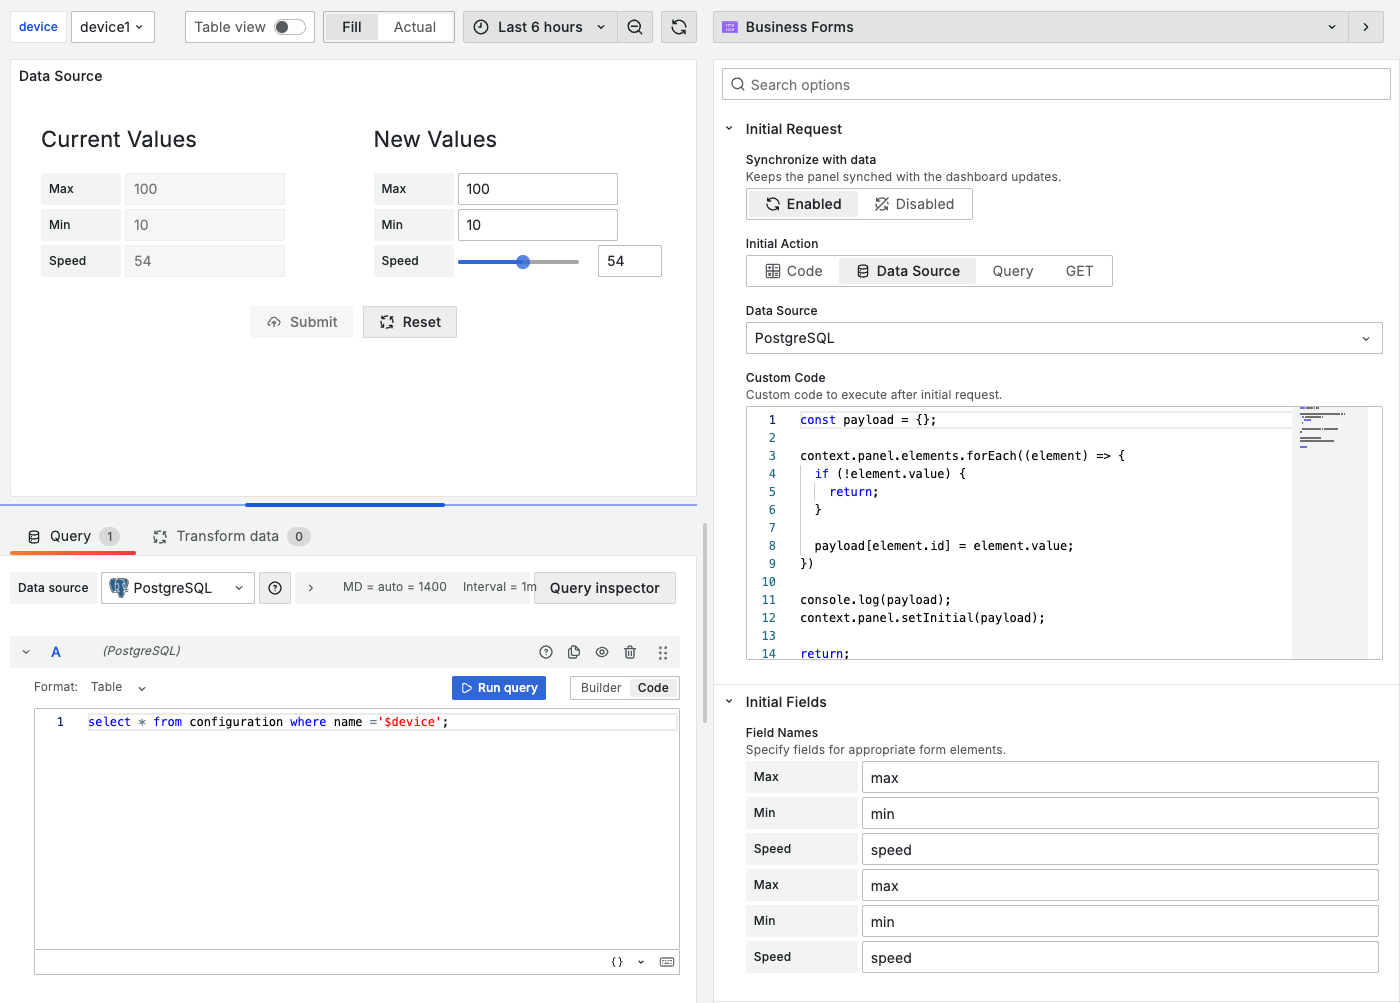
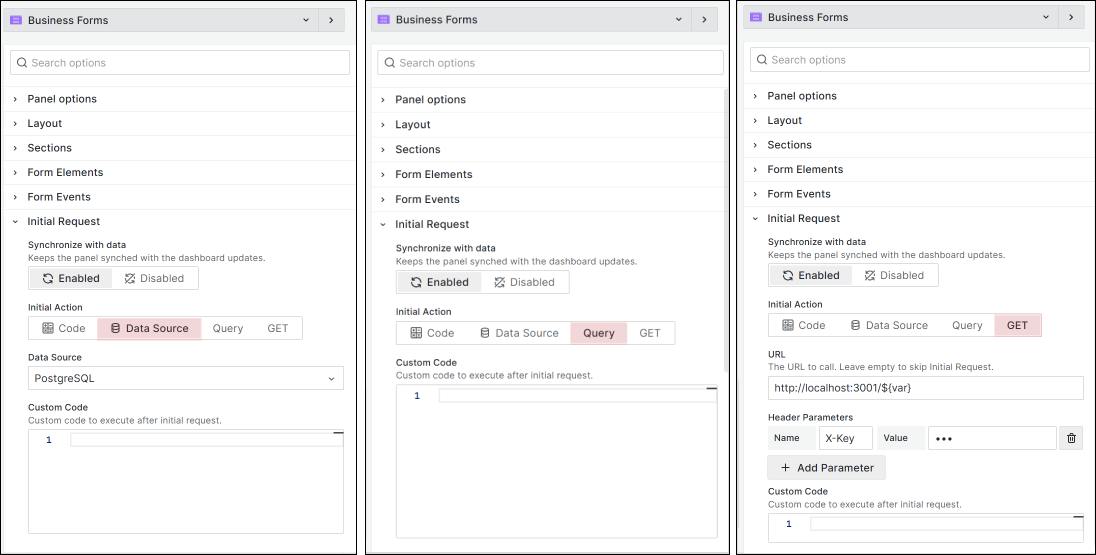
Data source
Don’t confuse this data source with the one you can select on the left-hand side. This is a different parameter located in the Update Request category and appears when you select the Data source type.
The Data source type is more flexible than the Query type. However, this means you must take more responsibility by creating the Initial Payload Request.
The Initial Payload Request is mandatory code that must contain the database request at minimum. You can add more complex data parsing functionality if required.

REST API
The REST API type works with an external API server. When specifying the API URL, you can use global and dashboard variables. Header parameters are available as separate options.

You can find ready-to-use API servers for Deno, InfluxDB, JSON API, MySQL, Node-Red, and PostgreSQL in servers section.
Find more information, tips and tricks in the documentation.
Initial Request custom code
To create post-processing logic, you can access panel options, API responses, form elements, Grafana services, dashboard, and global variables. Find the code snippet here.
Ball is on the user’s side
The panel form rests at this step, awaiting the user’s actions.
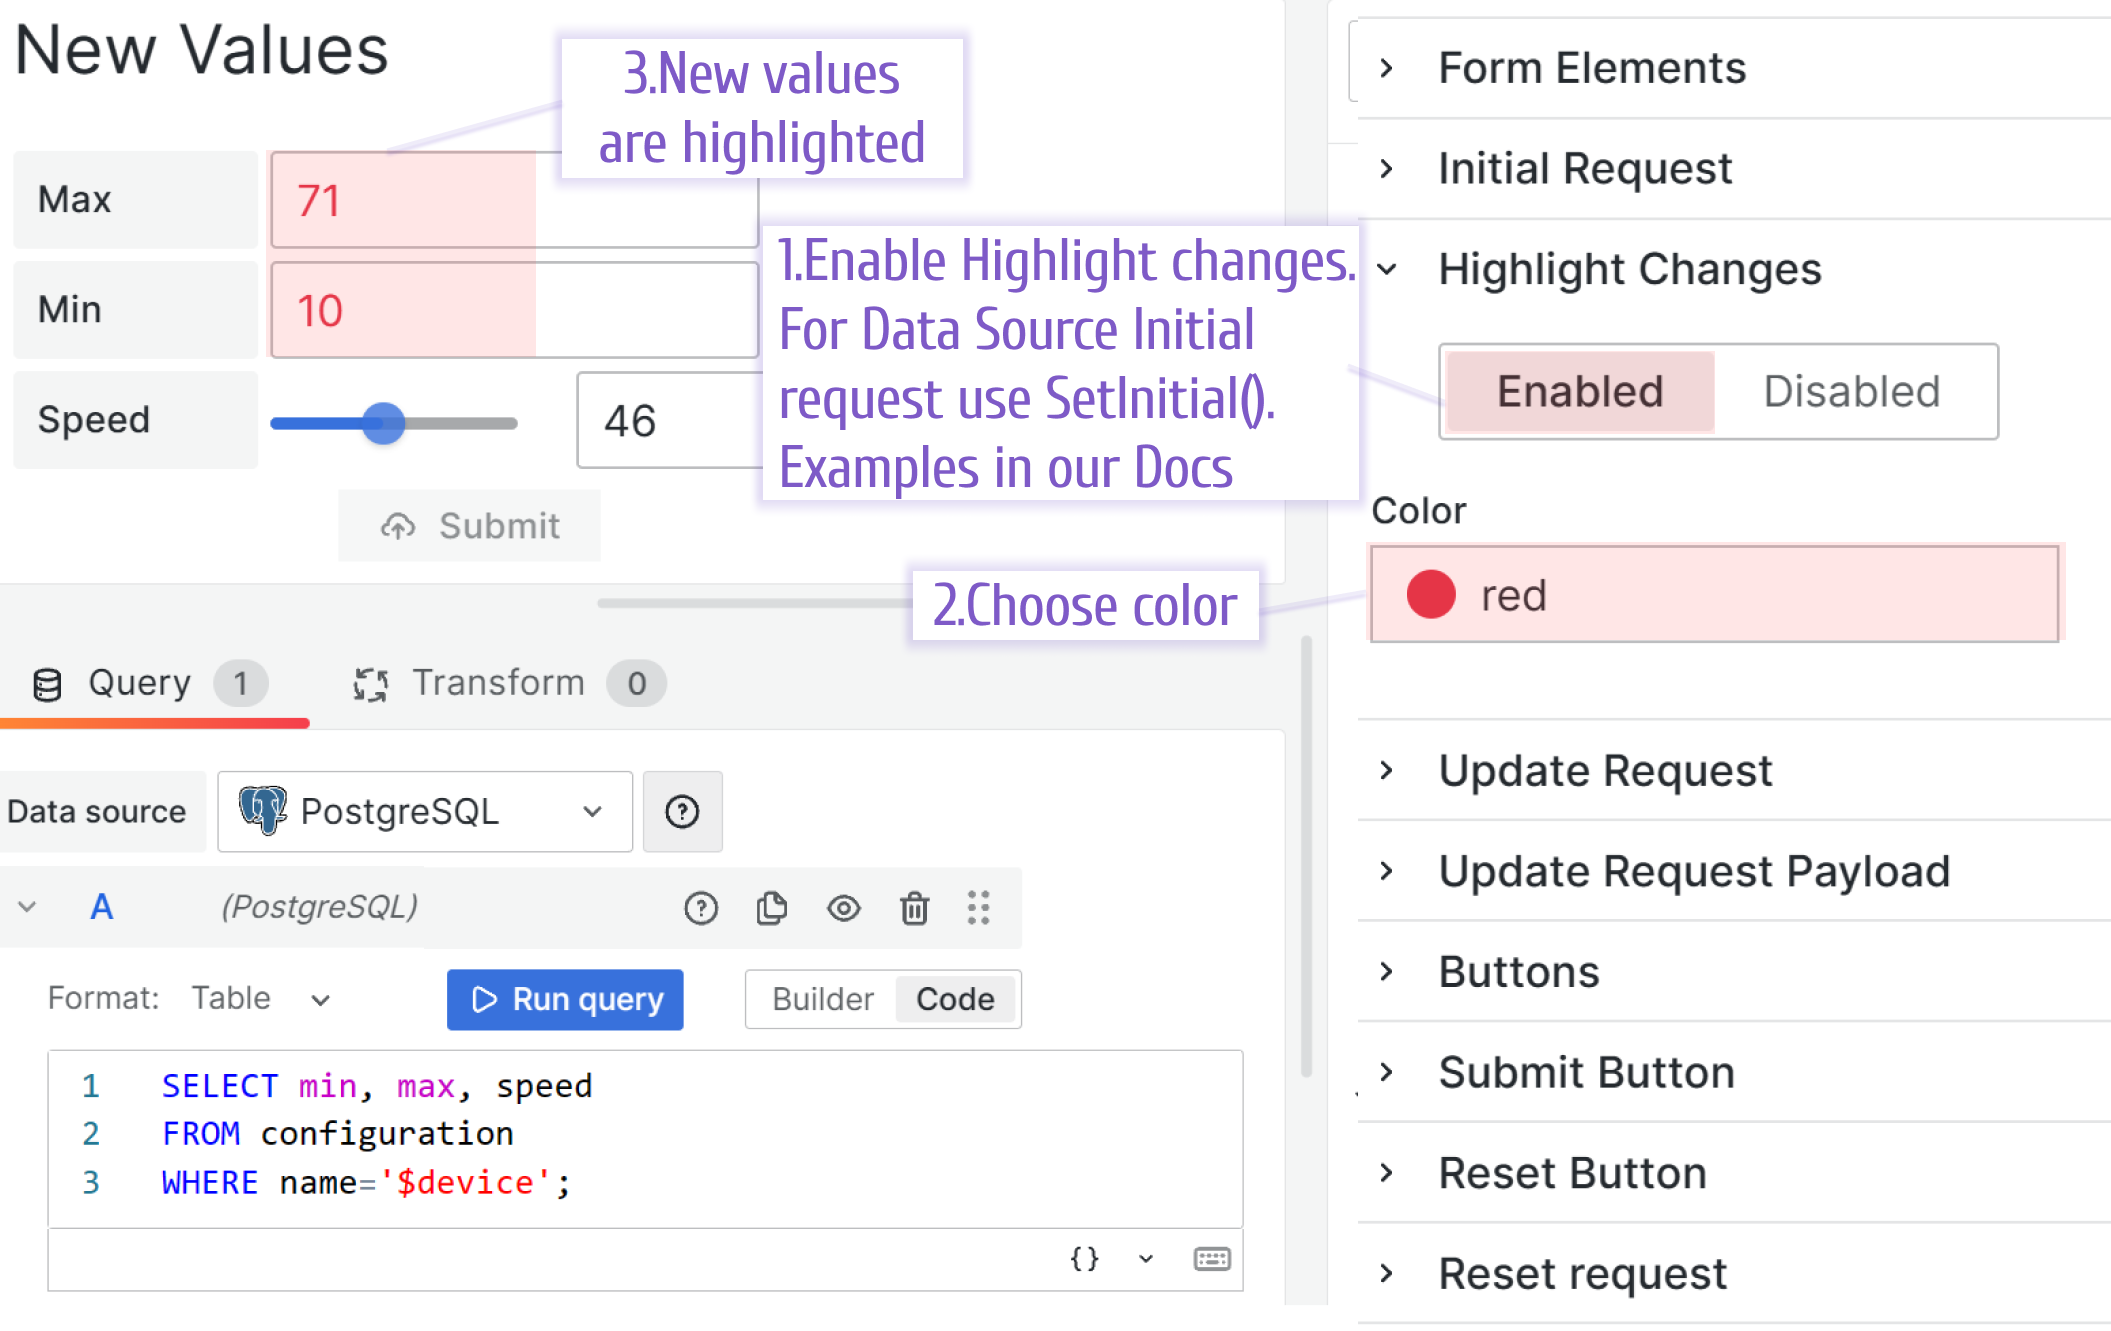
Highlight Changes
You can enable the Highlight Changes feature, which displays all modifications made by the user in a specified color. For the Query and REST API Initial request types, simply enabling the feature in the plugin edit mode is enough.
For the Data Source type, you must use the SetInitial() function in the Initial Request Custom Code. See the illustration for the Initial Request, Data Source type above (on the picture). Also, find
code examples here.
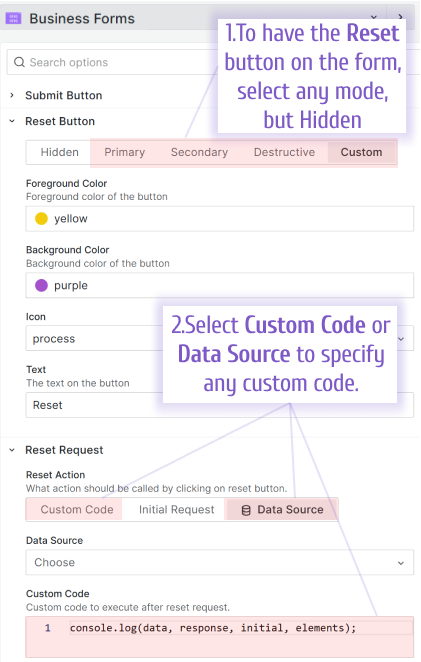
Reset Button
The reset button isn’t shown by default. To review all available options, switch the visibility parameter to anything except Hidden. Primary, Secondary, and Destructive are pre-set visualization templates. In Custom, you can specify foreground color, background color, icon, and the text to replace the Reset label if needed.
When this button isn’t hidden (any other mode is selected), the Reset Request category appears. You can choose Custom Code, Initial Request, or Data Source option.
The Initial request is selected by default. In this case, the plugin executes the Initial Request again as if the form is loading for the first time.
With the Data Source reset action, you can specify a data source for the Reset Request and set the payload in the Custom code area.
In the Custom code, you can add any custom logic required. For instance, you can set all form elements to their defaults.
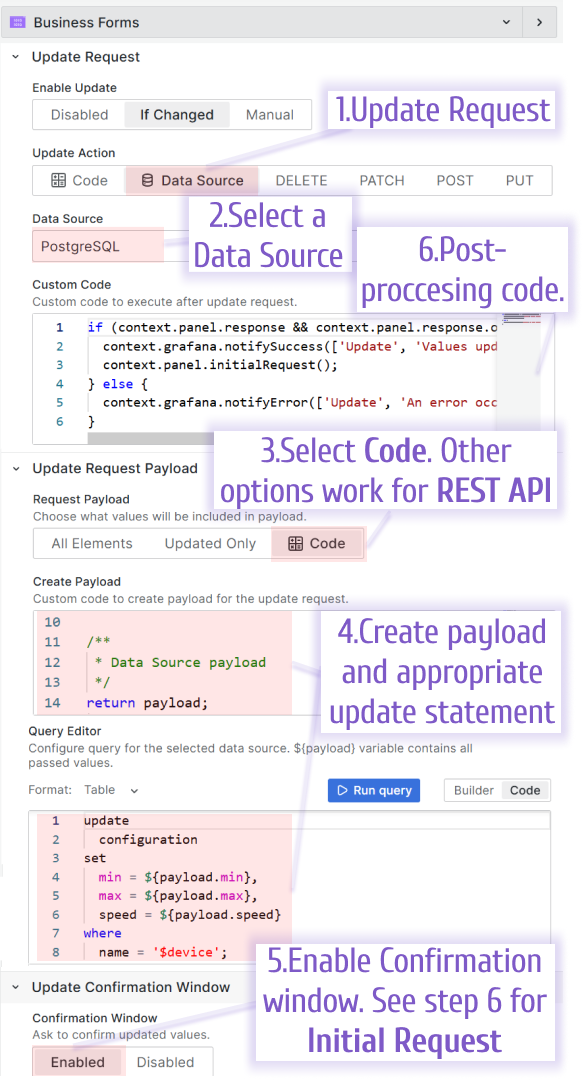
Update Request
The Update Request carries data from the Grafana dashboard to your data source. There are two ways of doing so - Data Source and Rest API. This process is independent of the Initial Request, which means you can use any combination of Initial and Update Request types.
Data Source
For the Data Source type, start with the Data Source parameter. Then go to the Update Request Payload, select Custom code and create a payload script there. Use JavaScript and the language of your data source to create a code that will update your data source data.
Use Initial Request after Update Request
You can trigger the Initial Request immediately after updating the data using Custom Code. In Initial Request mode, you can use various types, but consider one important point if you use QUERY as the initial request type.
If the type is QUERY, it accepts and sets values from data.
If you’re using it in combination with an update query of type DataSource, you need to call context.grafana.refresh() in the code that runs after a successful update.
Since this may take some time, it’s recommended to use it with setTimeout to ensure proper execution. In this case, the query will fetch the updated data from the data source.
Another possible approach is to update the variables in the data source, which will trigger a second query and retrieve the new data.

Query editor and Frontend Data Source
Note
Query editor and Frontend Data Sources are available starting from version 4.0.0.
This feature relates to the:
- Initial Request > Initial Action > Data Source
- Update Request > Update Action > Data Source
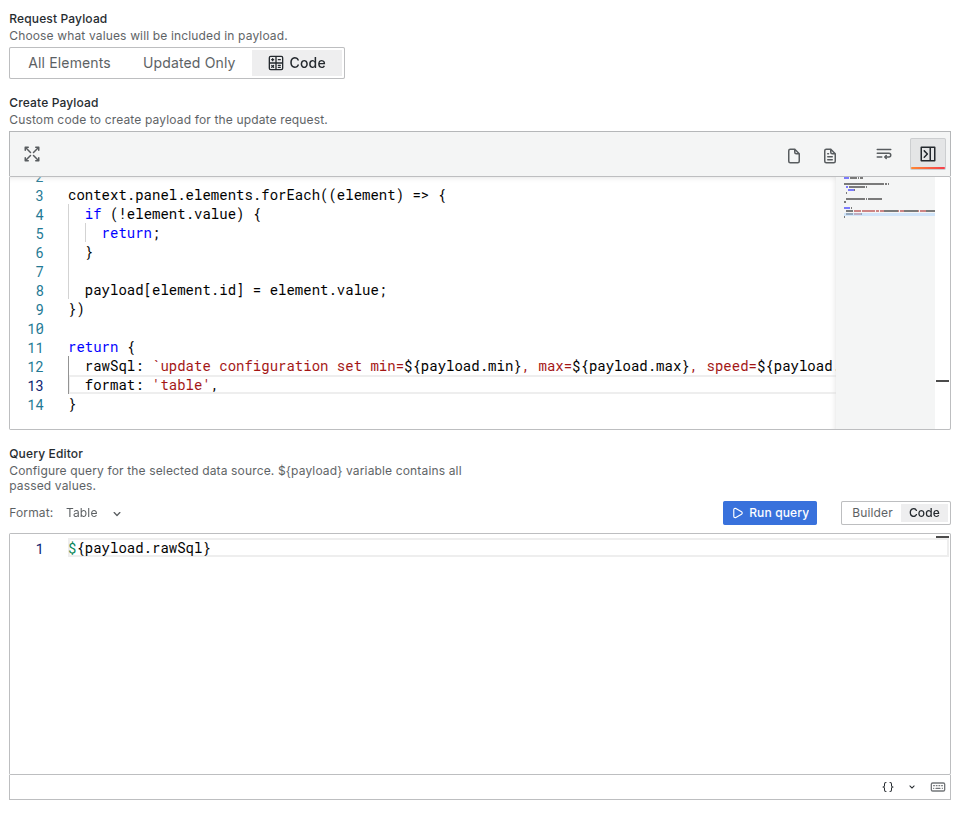
Working with the payload creation has been simplified. The Business Forms panel has a designated area to enter the payload request.

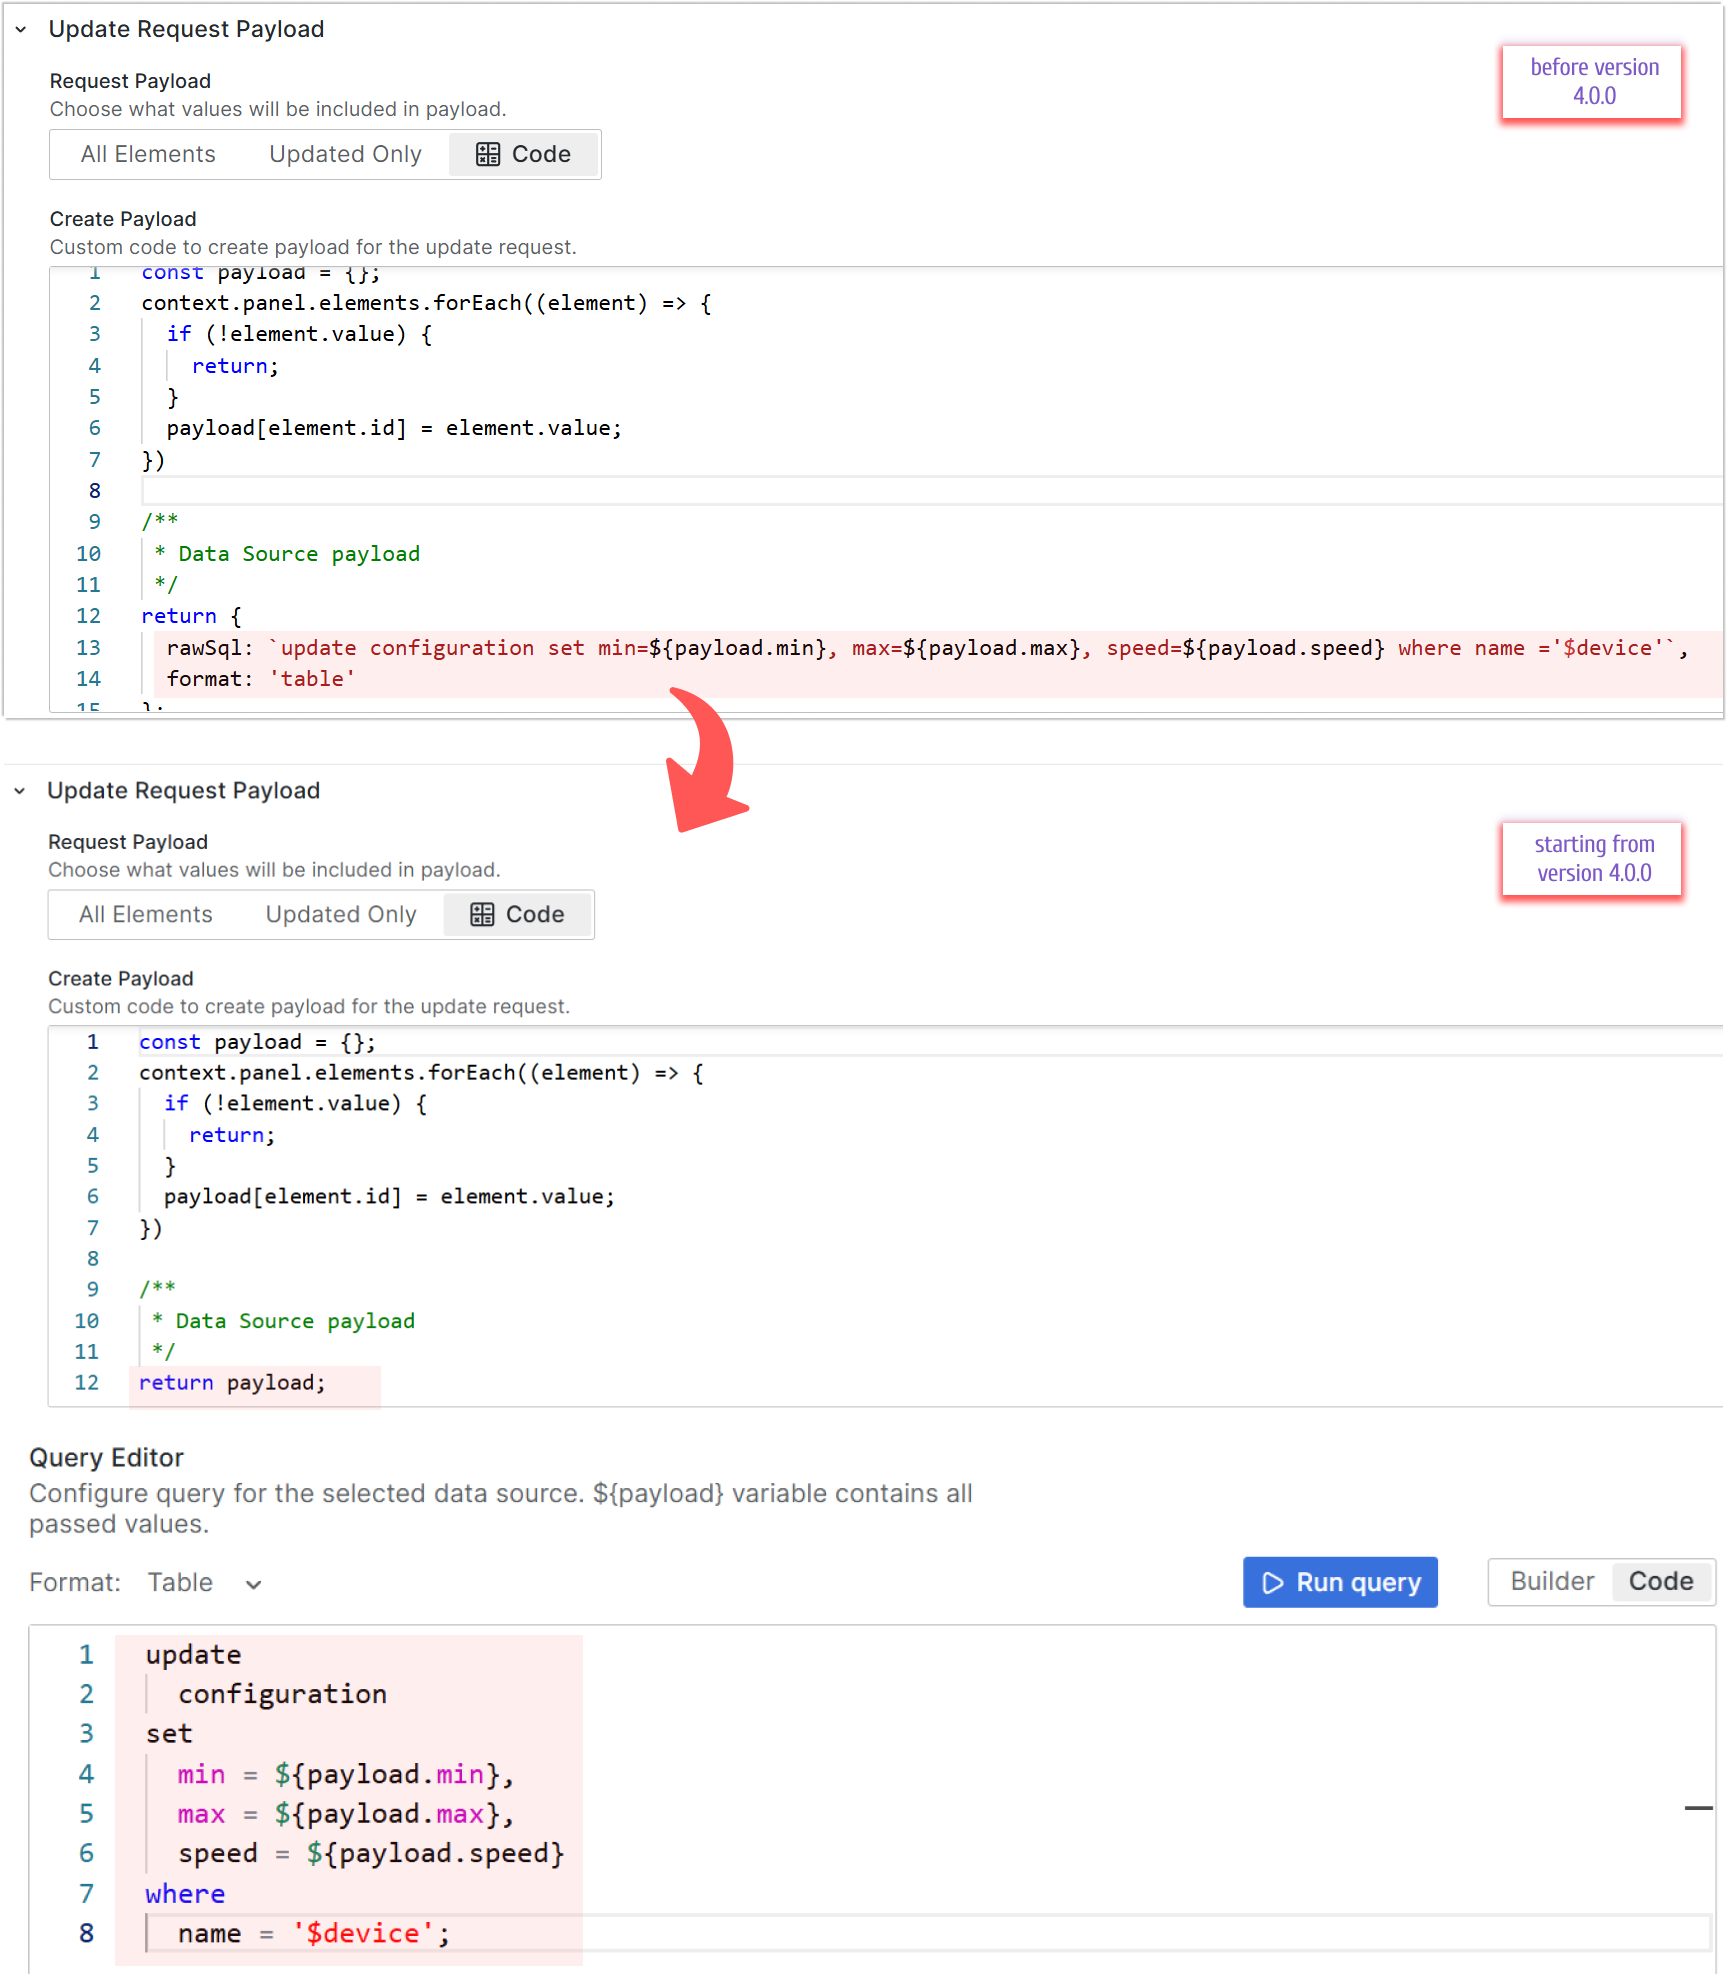
Sometimes, when migrating to a new version, you may need to convert a large number of panels. This involves creating payloads and updating queries using the new payload format.
To ensure a smoother transition, you can use a more seamless approach. For example, you can keep the old payload generation logic and simply return a static string in the query editor instead of relying on the new payload.
Use nested objects in payload
Creating a payload for the request can be configured in a variety of ways. Keys may contain various values including nested objects. Here is a simple example:
const testMatchers = [
  {
    id: "1",
    value: 1,
  },
  {
    id: "2",
    value: 2,
  },
];

let payload = {
  title: "",
  body: "",
  userId: 0,
  matchers: testMatchers,
};

context.panel.elements.forEach((element) => {
  if (element.id === "postTitle") {
    payload.title = element.value;
  }

  if (element.id === "postBody") {
    payload.body = element.value;
  }

  if (element.id === "postId") {
    payload.userId = element.value;
  }
});

return payload;
Payload example
{
  "title": "${payload.title}",
  "body": "${payload.body}",
  "userId": "${payload.userId}",
  "matchers": ${payload.matchers}
}
After calling the update request, you may get an error. In the body of the request you may see something like:
\"matchers\": [object Object],[object Object],[object Object],[object Object]The code editor provides all required tools to use interpolation and value escaping for nested objects. Use JSON.stringify and replaceAll('\"', '\\"') for nested values in the payload object.
Updated example
const testMatchers = [
{
id: "1",
value: 1,
},
{
id: "2",
value: 2,
},
];
let payload = {
title: "",
body: "",
userId: 0,
/**
* Nested value type
*/
matchers: JSON.stringify(testMatchers).replaceAll('\"', '\\"'),
};
context.panel.elements.forEach((element) => {
if (element.id === "postTitle") {
payload.title = element.value;
}
if (element.id === "postBody") {
payload.body = element.value;
}
if (element.id === "postId") {
payload.userId = element.value;
}
});
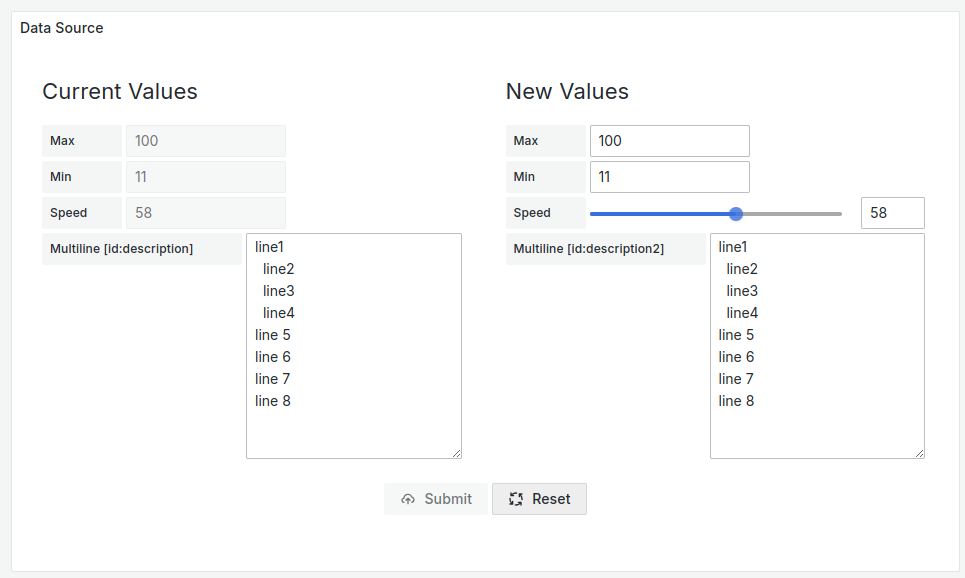
return payload;Use Text Area with multiple lines
Text Area element allows you to create text with multiple lines:
After entering the data and submitting the form, you may see a data source error. The issue is caused by not properly processing and converting multiple lines in the payload.
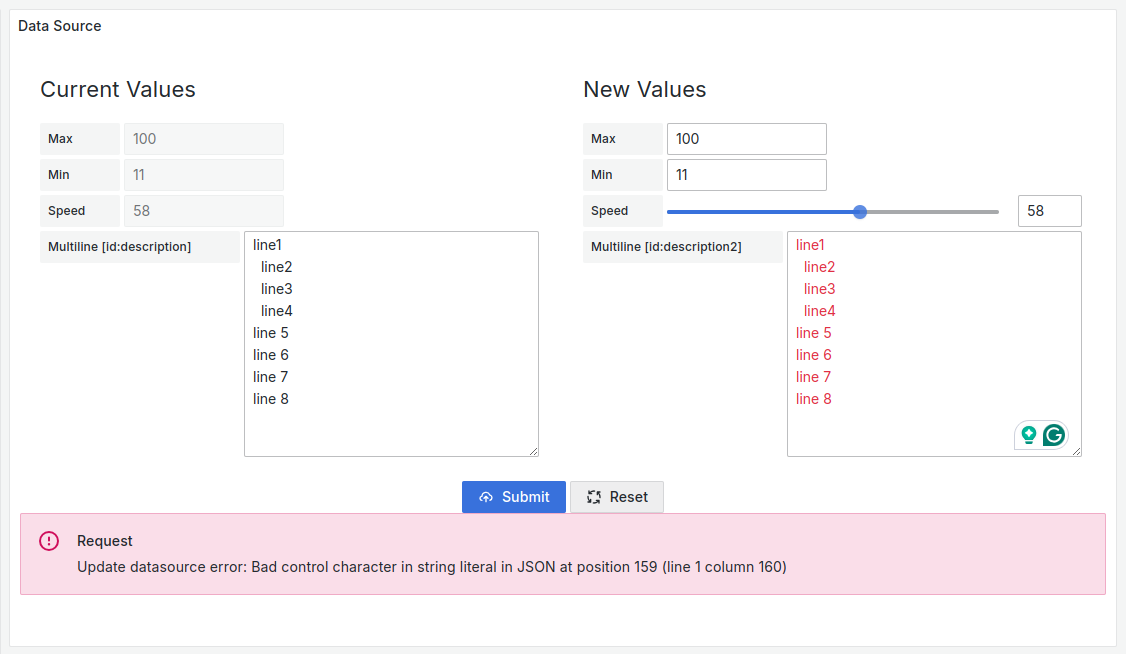
To avoid this behavior, please add following steps in the Create Payload code editor:
- Find element refer to the TextArea element.
- Add replace logic to value
payload[element.id] = element.value.replaceAll("\n", "\\n");
Code example
const payload = {};

context.panel.elements.forEach((element) => {
  if (!element.value) {
    return;
  }

  /**
   * Required logic to update the value
   */
  if (element.id === "description") {
    payload[element.id] = element.value.replaceAll("\n", "\\n");
    return;
  }

  payload[element.id] = element.value;
});

/**
 * Check payload using developer tools
 */
console.log("update payload:", payload);

/**
 * Data Source payload
 */
return payload;
REST API
See the description for the Initial Request REST API. Both Initial and Update requests have the same parameters. Also similarly, you can use global and dashboard variables in the API server call along with header parameters.
Submit button
You can enable the Confirmation step if needed. This step looks like a popup window with old and new values. For the Query and REST API Initial request types, simply enabling the feature in the plugin edit mode, Update Request category, is enough.
For the Data Source type, you must use the SetInitial() function in the Initial Request Custom Code. See the illustration for the Initial Request, Data Source type above (on the picture).
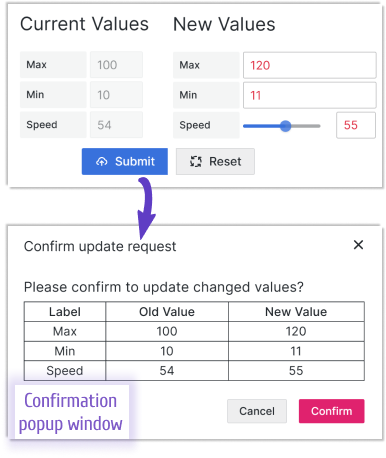
Following Confirmation, the Submit button initiates the Update Request.
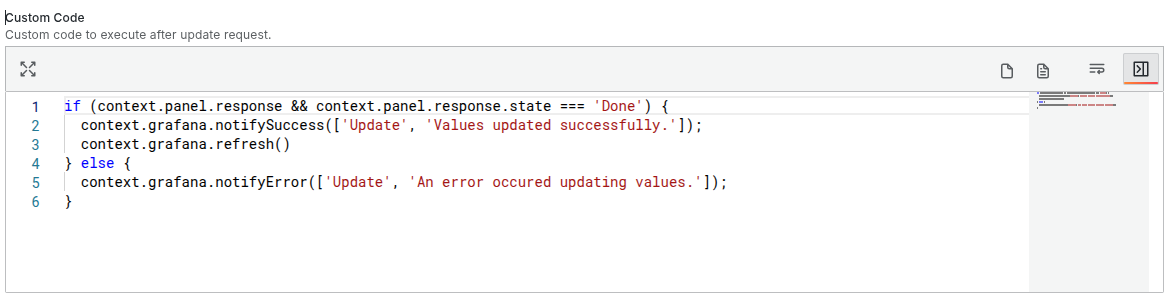
Update Request Custom Code
Or in other words, the post-processing step. Similarly to the Initial Request Custom Code, this step exists in all Update Request Custom Code types. You can access the same entities from the code: panel options, API responses, form elements, Grafana services, dashboard, and global variable. Find the code snippet here.
For example, during the post-processing, you can output a status message, transition the user to another dashboard, reload a page, call an initial request, etc.
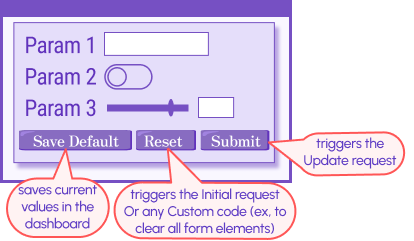
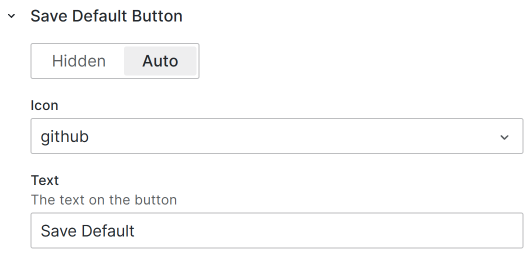
Save Default Button
In addition to the Submit and Reset button, there is a third one - Save Default. It saves the current form values in the dashboard. You can choose an icon and text instead of the pre-set ones.
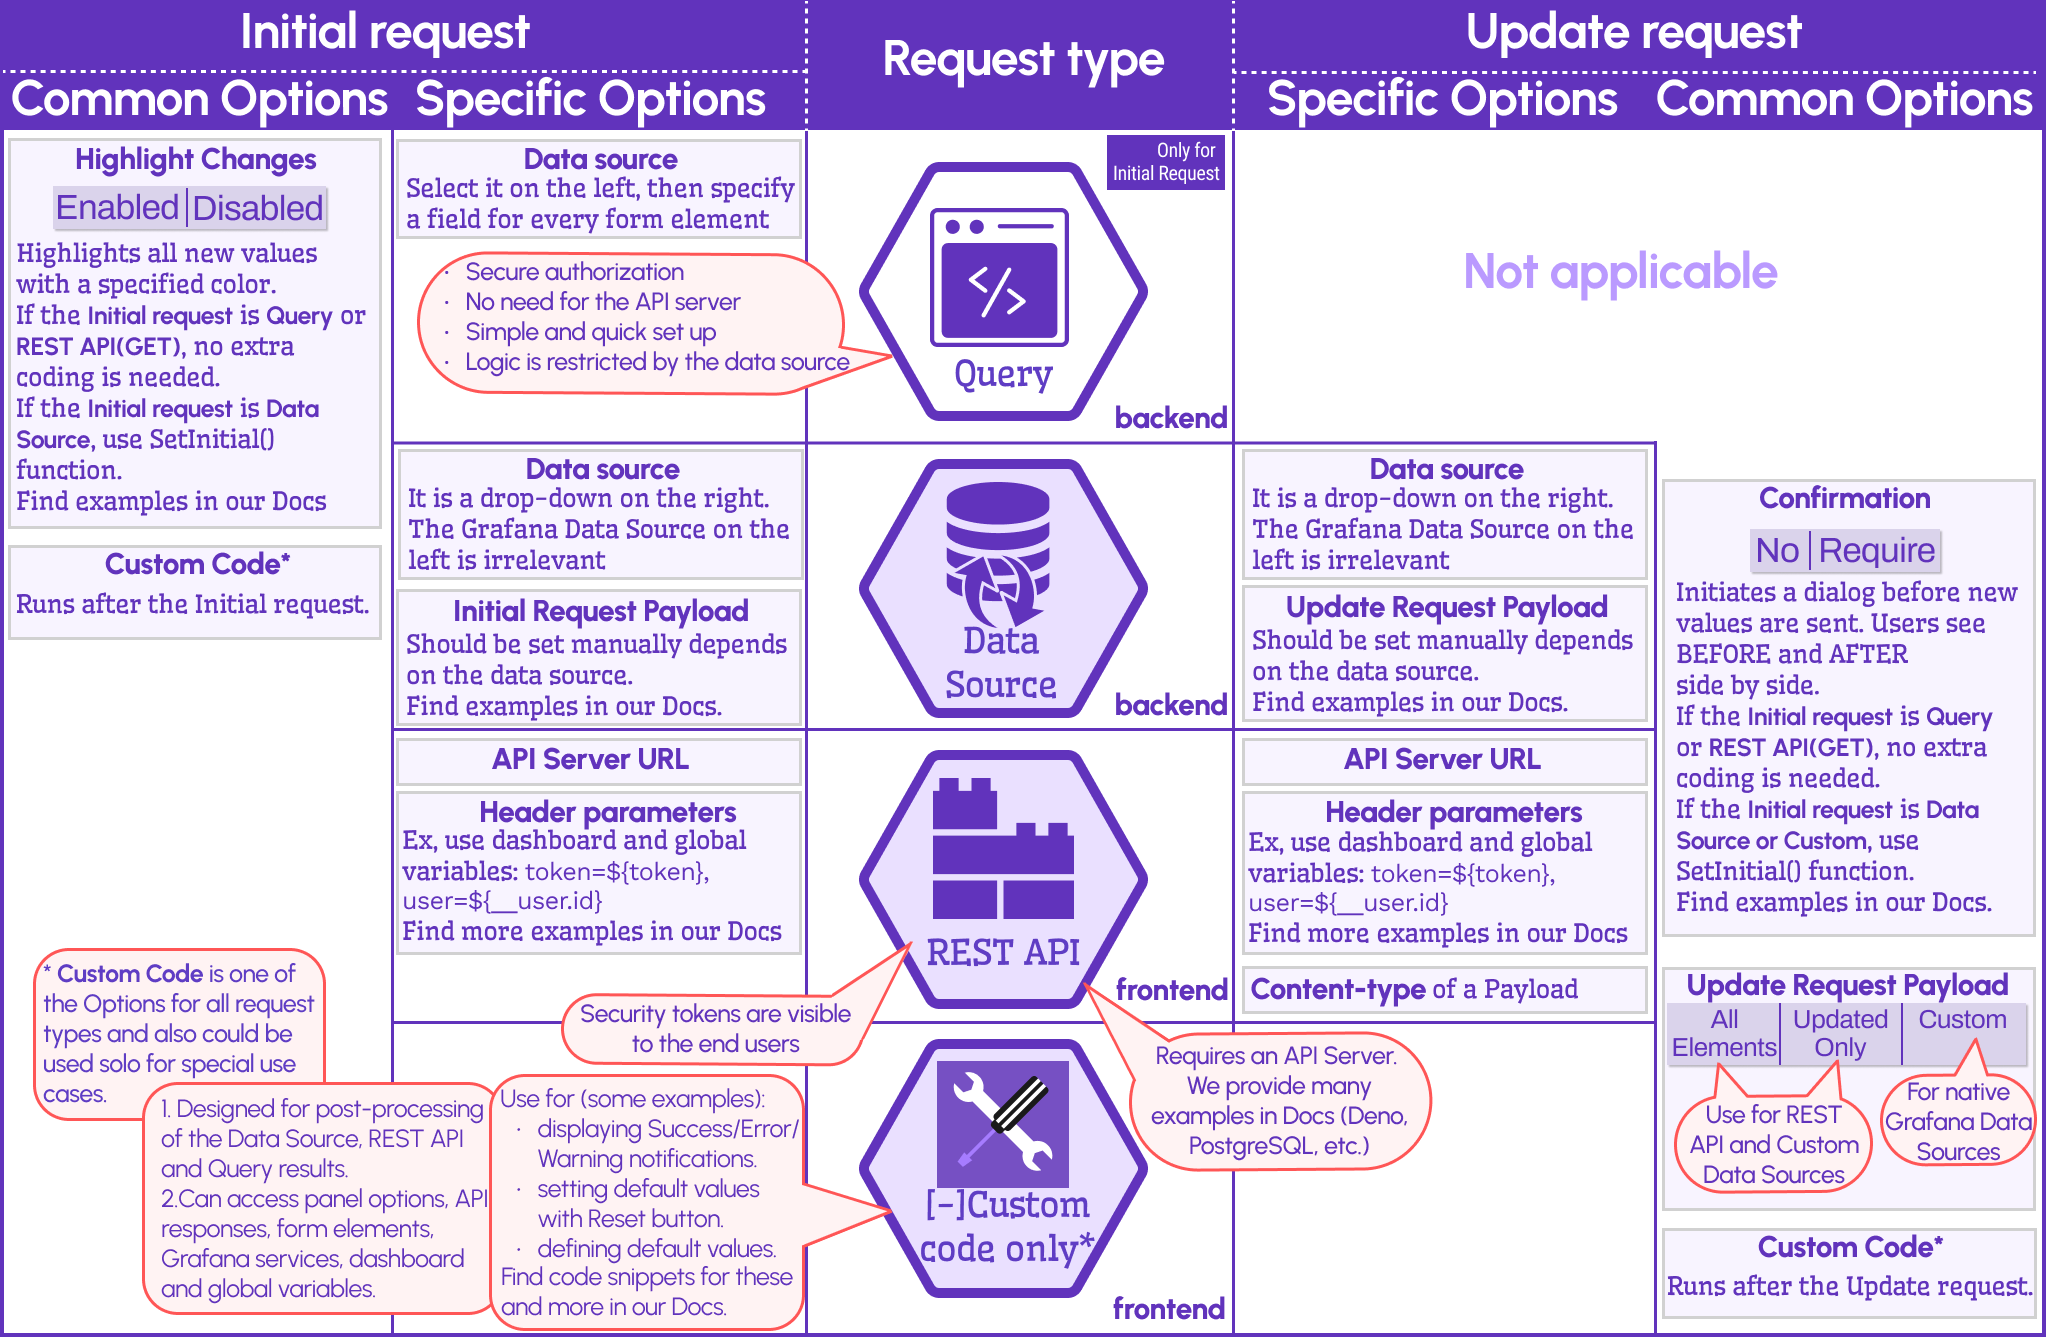
Initial Request vs Update Request
Below is the comparative table showing the similarities and differences between the initial and update requests.
Buttons
The below schema summarizes the information about buttons available in the panel form.