
Add a Cloud Access Policy and token for traces
You can create a Cloud Access Policy to set permissions for access to your tracing data in Grafana Cloud Traces. The policy establishes what information can be accessed and a token associated with that policy provides authentication.
Cloud access policies provide flexible and fine-grained control over access to your Grafana Cloud data. This procedure provides a reference for creating an access policy and a single token only for traces scopes.
Refer to the Grafana Cloud access policies documentation for more information about access policies.
Before you begin
To create an access policy, you need:
- A Grafana Cloud account (documentation)
- A Grafana Cloud stack, with active Grafana and Grafana Tempo or Grafana Cloud Traces instances (documentation)
Add an access policy for traces
You can create access policies that work across multiple stacks or a single stack. Refer to Create access policies and tokens for more information about best practices for access policies.
These procedures create an access policy with either predefined or custom tracing scopes for a single Grafana stack.
Create an access policy with predefined scopes
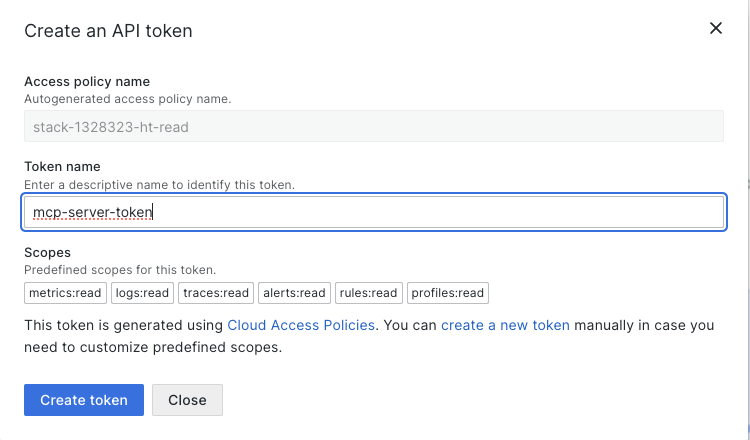
You can create a Cloud Access Policy with predefined read scopes using your Tempo instance within your Grafana Cloud stack.
The predefined scopes are metrics:read, logs:read, traces:read, alerts:read, rules:read, and profiles:read.
- Sign in to your Grafana Cloud account.
- Locate the Grafana Cloud stack you want to send traces to.
- Select Details from the Tempo section.
- In the Generate Data Source settings section:
- Locate Password and select Generate now.
- Enter a Token name.
- Select Create token. Copy the token.
![Create a token with predefined scopes]()
To create an access policy with write scopes, use the Generate now link in the Sending data to Grafana Cloud using Grafana Alloy section:
- Sign in to your Grafana Cloud account.
- Navigate to the Grafana Cloud stack you want to send traces to.
- Select Details from the Tempo section.
- In the Sending data to Grafana Cloud using Grafana Alloy section:
- Locate 3.
with a Grafana.com API token and select Generate now. - Enter a Token name.
- Select Create token. Copy the token.
- Locate 3.
This creates an access policy with traces:write scope that allows sending trace data to Grafana Cloud.
Create a custom access policy and choose scopes
This procedure creates an access policy for tracing for a single Grafana stack.
- Launch the Grafana stack.
- Select Administration from the left-hand menu.
- Select Users and access and then Cloud access policies.
- Select Create new access policy.
- Add a Display name and Name.
- In Scopes, locate the Traces line and select the desired scopes. To set
traces:readscope, for example, click the Read checkbox for Traces. - Select Create.
The access policy is listed in the Cloud access policies page.
Add a token for the custom access policy
After you’ve created an access policy, you need to generate a token for it. The access policy sets the permissions available and the token is used to authenticate the access policy.
On the Cloud access policies page in your Grafana instance, select Add token underneath the Cloud access policy and follow the prompts.
For information on how to generate a token, refer to the Create tokens for an access policy documentation.


