
Configure labels
This page explains how to configure labels on Grafana IRM integrations. Labels determine how alert groups are categorized and routed.
To create or manage labels, refer to Label management. This page covers how to configure labels on your integrations using static labels, dynamic labels, and multi-label extraction templates.
Labels are key-value pairs (for example, team_name: infrastructure).
Default label keys in IRM include service_name and team_name, but you can define any keys that fit your needs.
To configure labels on an integration:
- In Grafana IRM, go to the Integrations page and select the integration you want to configure.
- Click the three-dot menu next to the integration and select Integration settings.
- In the Label Schema section, choose between Static and Dynamic labels, then click + Add label.
- Enter a key-value pair for the label by selecting an existing key, adding a new one, or using a Jinja template.
- Click + Add, then click Update integration to save your changes.
- (Optional) Click the pencil icon next to the Multi-label Extraction Template to configure multiple labels in a single template.
Configure static labels
Static labels are tied to the integration they are configured for and applied to all alerts from that integration.
To configure static labels:
- In the Static labels section of the Label Schema, click + Add label.
- Enter a key-value pair (for example,
team_name: infrastructure). - Click + Add to save the label.
Configure dynamic labels
Dynamic labels assign values to alert groups based on data extracted from the alert payload. These labels use a static key but extract their value dynamically using Jinja templates.
To configure dynamic labels:
- In the Dynamic labels section of the Label Schema, click + Add label.
- Enter the key for the label (for example,
severity). - Define the extraction logic using a Jinja template to extract the label value from the alert payload.
- Click + Add to save the label.
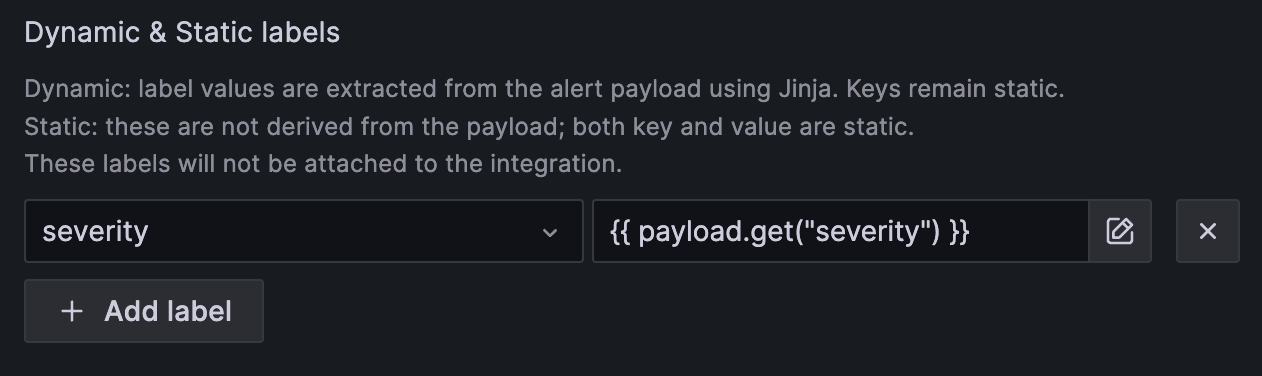
Example: Dynamic label extraction
Consider a dynamic label that extracts the severity level from the alert payload:
Template:
{{ payload.get("severity") }}The following image shows the resulting dynamic label configuration:
Given the following alert payloads:
Alert 1:
{
  "title": "critical alert",
  "severity": "critical"
}
Alert 2:
{
  "title": "warning alert",
  "severity": "warning"
}
Resulting labels:
- The first alert group receives the label:
severity: critical. - The second alert group receives the label:
severity: warning.
Multi-label extraction template
For advanced use cases, the multi-label extraction template extracts multiple labels from an alert payload using a single Jinja template. This is useful for alerts containing multiple key-value attributes.
To configure a multi-label template:
- In the Label Schema section of your integration settings, open the Multi-label Extraction Template.
- Enter a Jinja template that outputs a valid JSON dictionary.
- Click Save, then click Update integration.
Example: Multi-label extraction
Consider an alert with the following payload:
Incoming payload:
{
  ...
  "commonLabels": {
    "job": "node",
    "severity": "critical",
    "alertname": "InstanceDown"
  },
  ...
}
Template:
{{ payload.commonLabels | tojson }}Resulting labels applied to the alert group:
job: nodeseverity: criticalalertname: InstanceDown

Advanced example: Extracting and modifying labels
This example extracts multiple labels, adds a new one, and modifies another.
Template:
{%- set labels = {} -%}
{# add several labels #}
{%- set labels = dict(labels, **payload.commonLabels) -%}
{# add one label #}
{%- set labels = dict(labels, **{"status": payload.status}) -%}
{# add label not from payload #}
{%- set labels = dict(labels, **{"service": "oncall"}) -%}
{# dump labels dict to json string, so OnCall can parse it #}
{{ labels | tojson }}
This template results in the following labels:
- Extracts labels from
commonLabels. - Adds a
statuslabel from the payload. - Adds a static
service:oncalllabel.
Customize the Alert Group table
You can customize the Alert Group table to display relevant information for each user. Select which columns to show and add custom columns based on labels.
Manage default columns
By default, the Columns dropdown provides predefined columns that users can enable or disable. Use the toggle switch next to each column name to show or hide it in the table.
Add custom columns
Users with admin permissions can create custom columns based on labels.
To add a custom column:
- Click Add in the Columns dropdown. A modal appears.
- Enter the name of the label key you want to use as a column.
- Select the label from the available options.
- Click Add.
The new custom column appears in the Column Settings and is available for all users.


