Plugins 〉Apache Cassandra


Apache Cassandra
Apache Cassandra Datasource for Grafana
A Grafana data source for visualizing time-series data stored in Apache Cassandra and CQL-compatible databases. This well-established plugin with over a million downloads supports Cassandra 3.x-5.x, DataStax Enterprise, DataStax Astra, AWS Keyspaces, and more. Key features include authentication, TLS, query configurator, CQL editor, table mode, variables, annotations, alerting, and provisioning.
See the Quick Demo for a quick start, or refer to our Documentation for detailed information.
Compatibility
- Grafana
- 7.4 - 12.x are fully supported (plugin version 3.x)
- 5.x, 6.x, 7.0-7.3 are deprecated (works with plugin versions 1.x/2.x, but we recommend upgrading)
- Cassandra 3.x, 4.x, 5.x
- DataStax Enterprise 6.x
- DataStax Astra (docs)
- AWS Keyspaces (limited support) (docs)
- Linux, OSX (incl. M series), Windows
Features
- Connect to Cassandra using auth credentials and TLS
- Query Configurator
- Raw CQL query editor
- Table mode
- Variables
- Annotations
- Alerting
- Provisioning
Contacts
Configuration
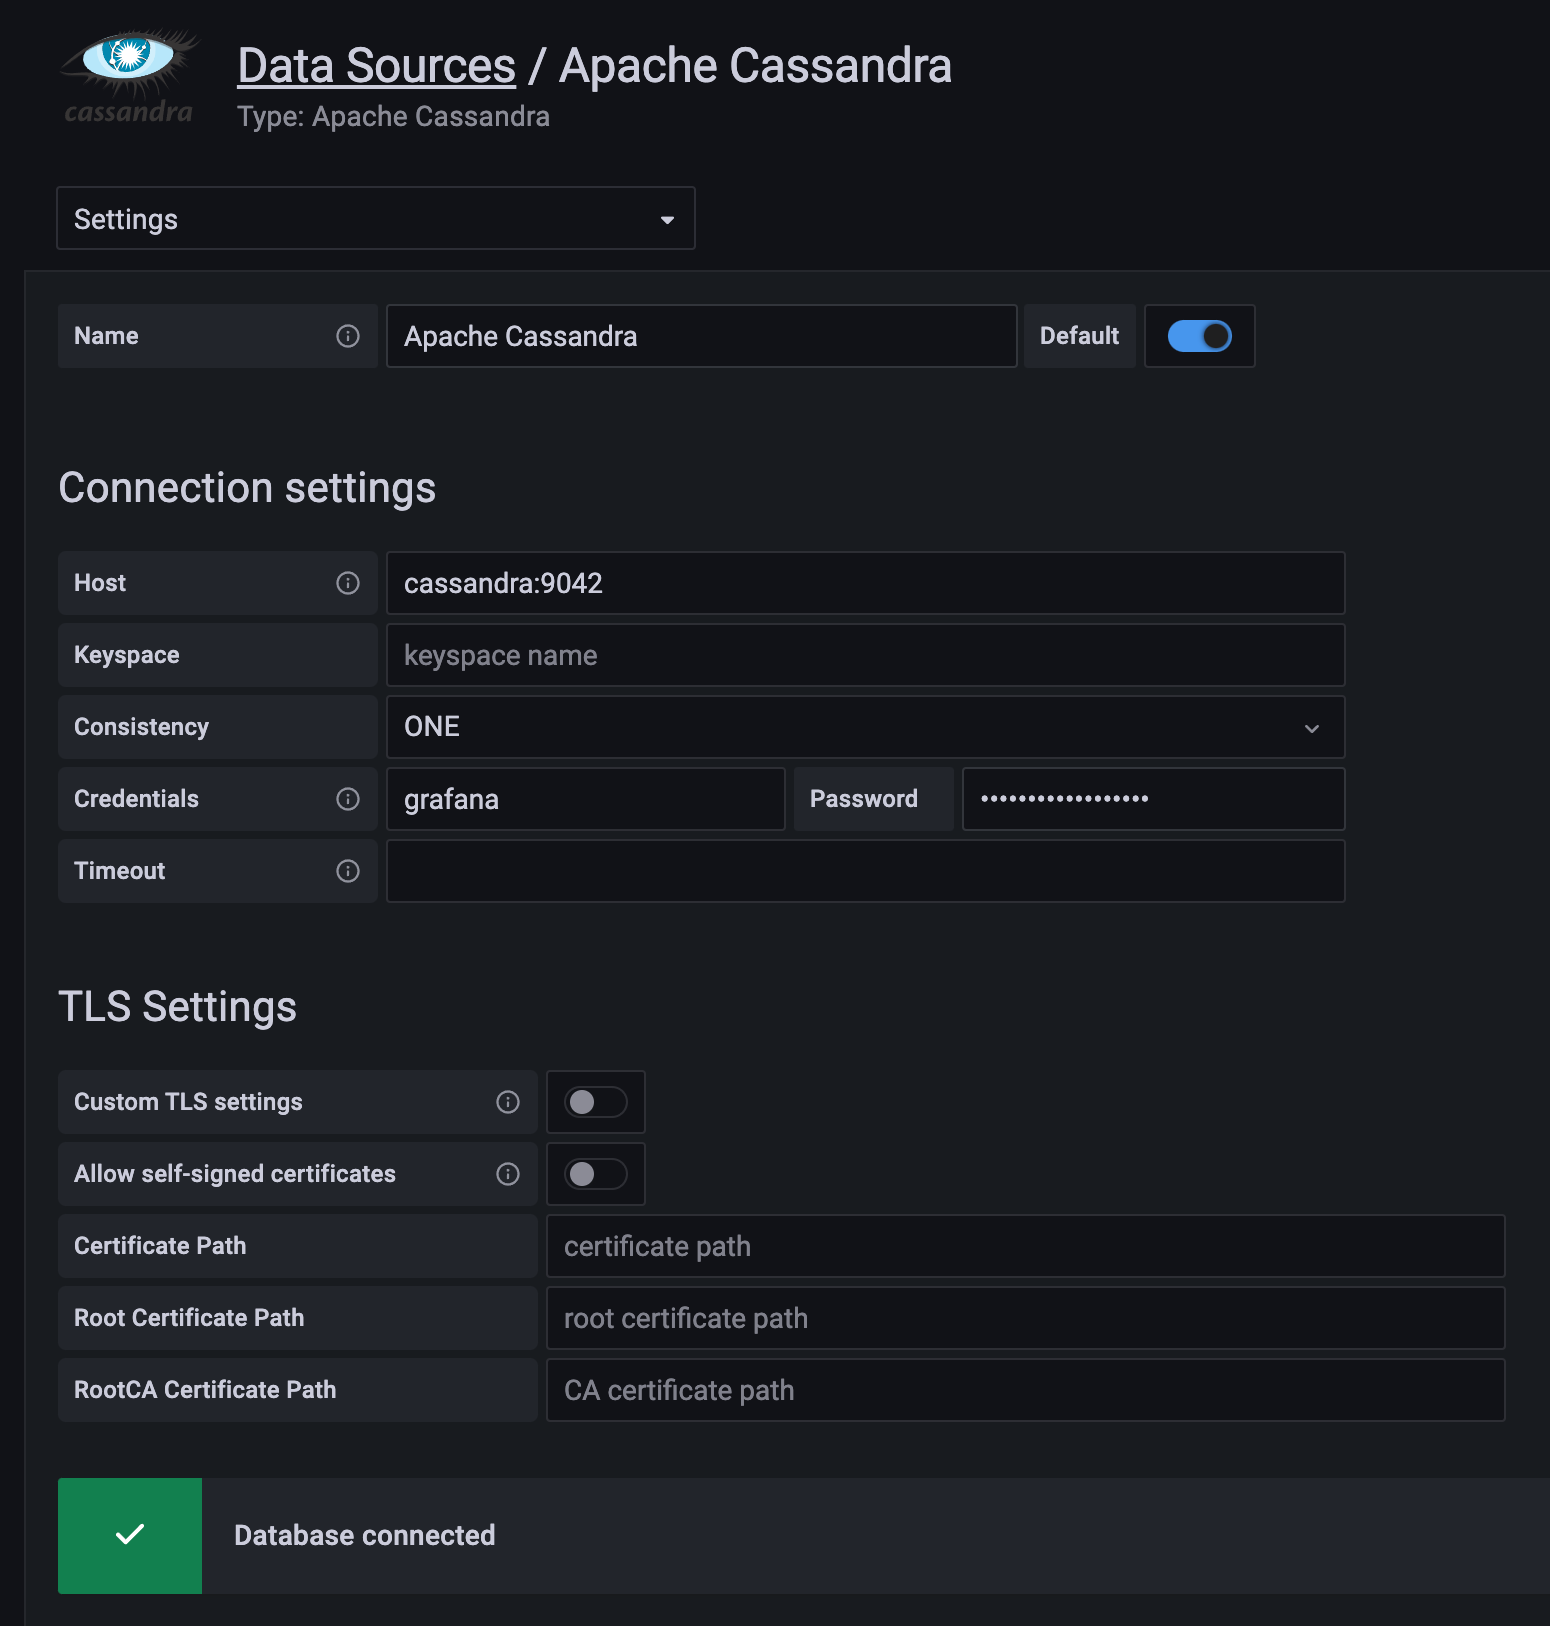
- Add the
Apache Cassandra Data Sourceas a data source at the datasource configuration page. - Configure the datasource specifying contact point and port like
10.11.12.13:9042, username and password. It's strongly recommended to use a dedicated user with read-only permissions only to the table you have to access. - Push the "Save and Test" button, if there is an error message, check the credentials and connection.
For a quick setup with Grafana automatic provisioning, see docs/provisioning.md.

Usage
There are two ways to query data from Cassandra/DSE, Query Configurator and Query Editor. Configurator is easier to use but has limited capabilities, Editor is more powerful but requires understanding of CQL.
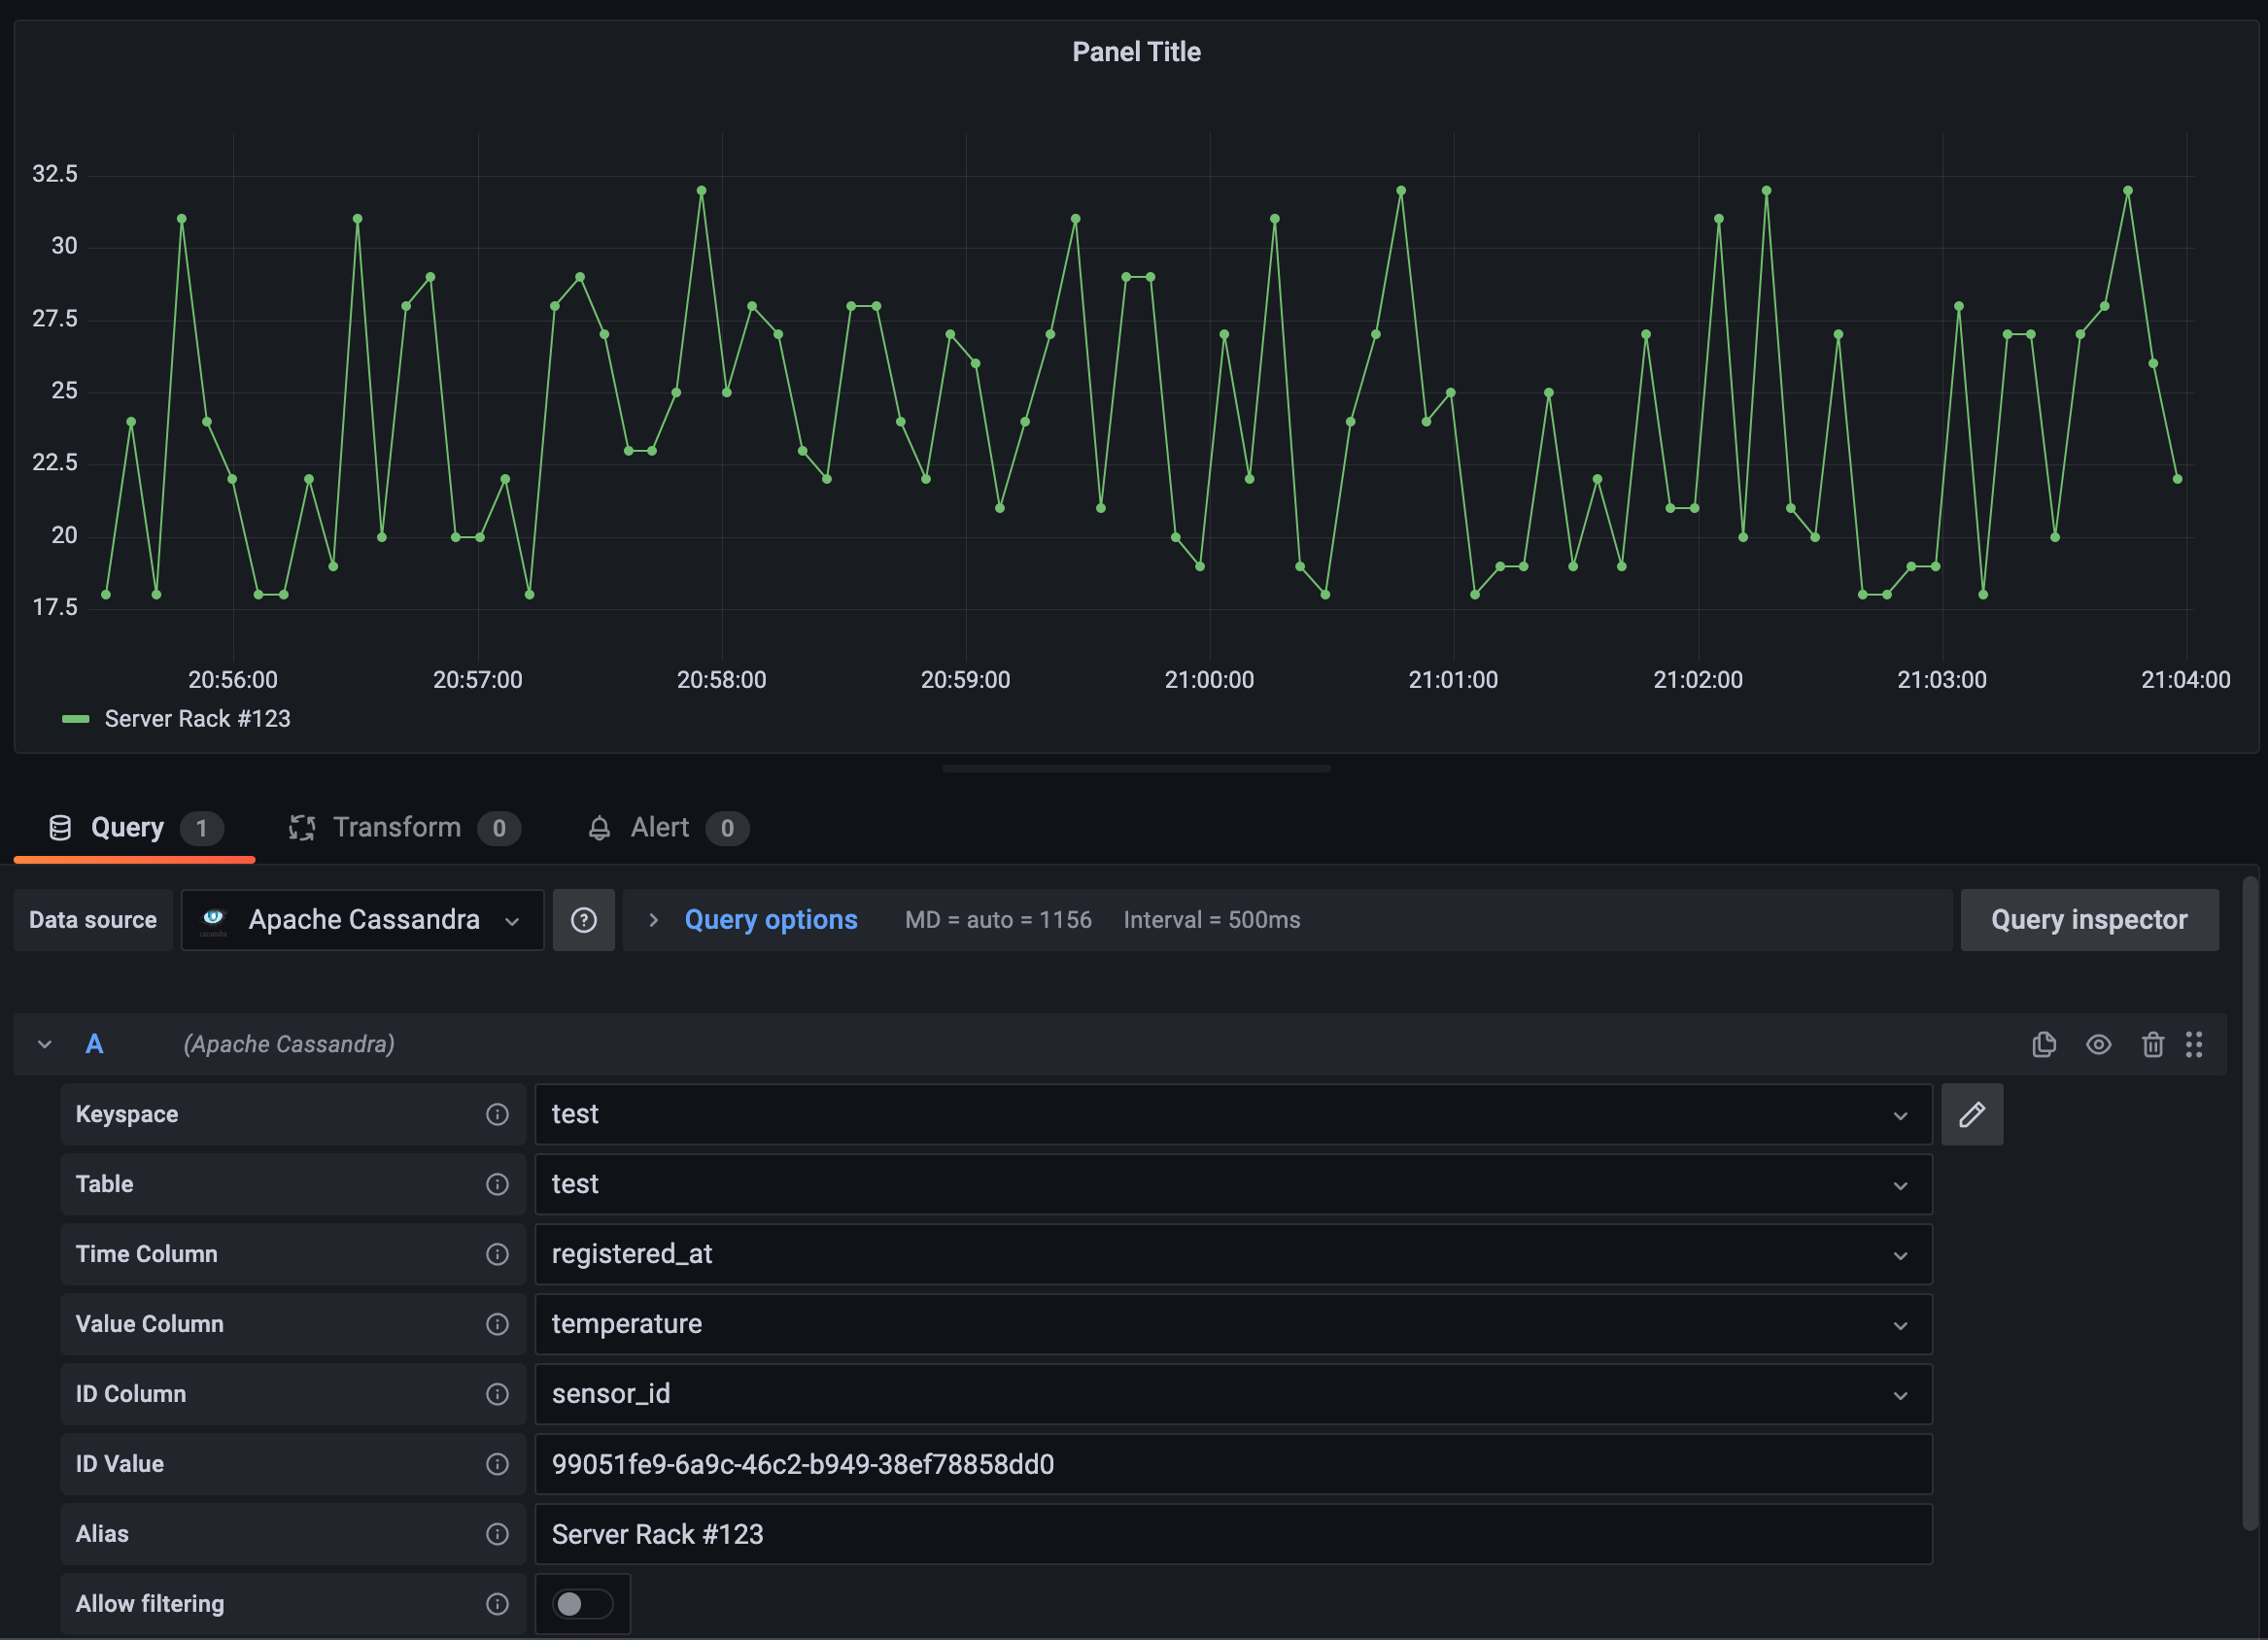
Query Configurator

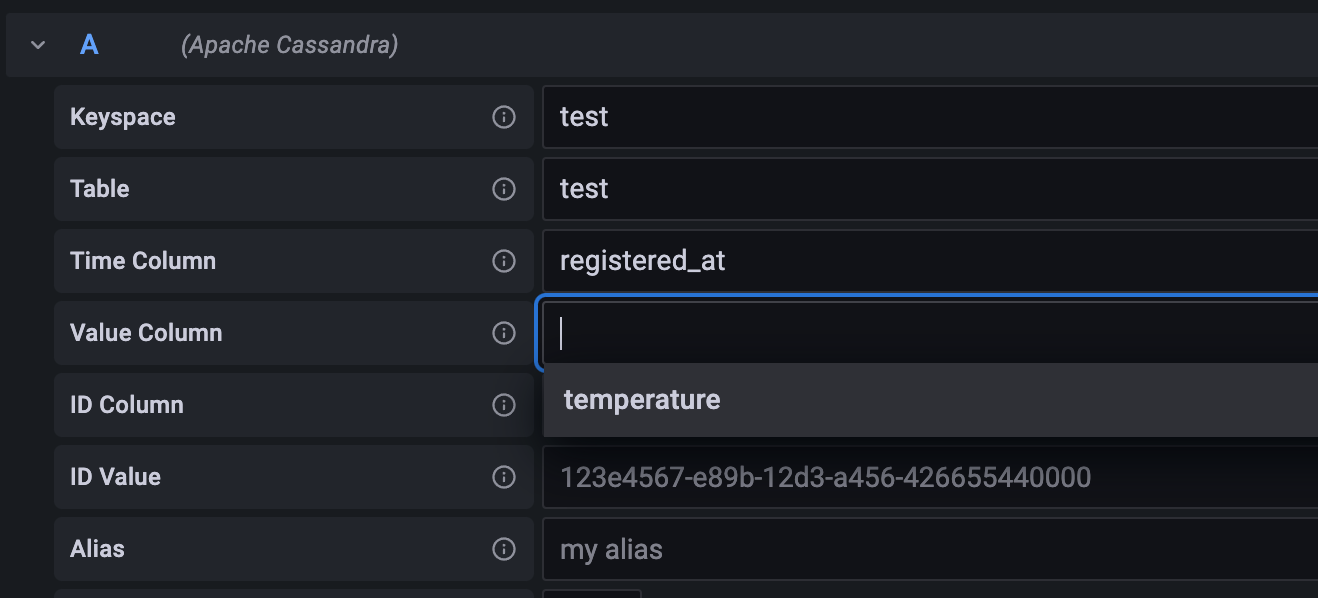
Query Configurator is the easiest way to query data. At first, enter the keyspace and table name, then pick proper columns. If keyspace and table names are given correctly, the datasource will suggest the column names automatically.
- Time Column - the column storing the timestamp value, it's used to answer "when" question.
- Value Column - the column storing the value you'd like to show. It can be the
value,temperatureor whatever property you need. - ID Column - the column to uniquely identify the source of the data, e.g.
sensor_id,shop_idor whatever allows you to identify the origin of data.
After that, you have to specify the ID Value, the particular ID of the data origin you want to show. You may need to enable "ALLOW FILTERING" although we recommend to avoid it.
More information on Query Configurator.
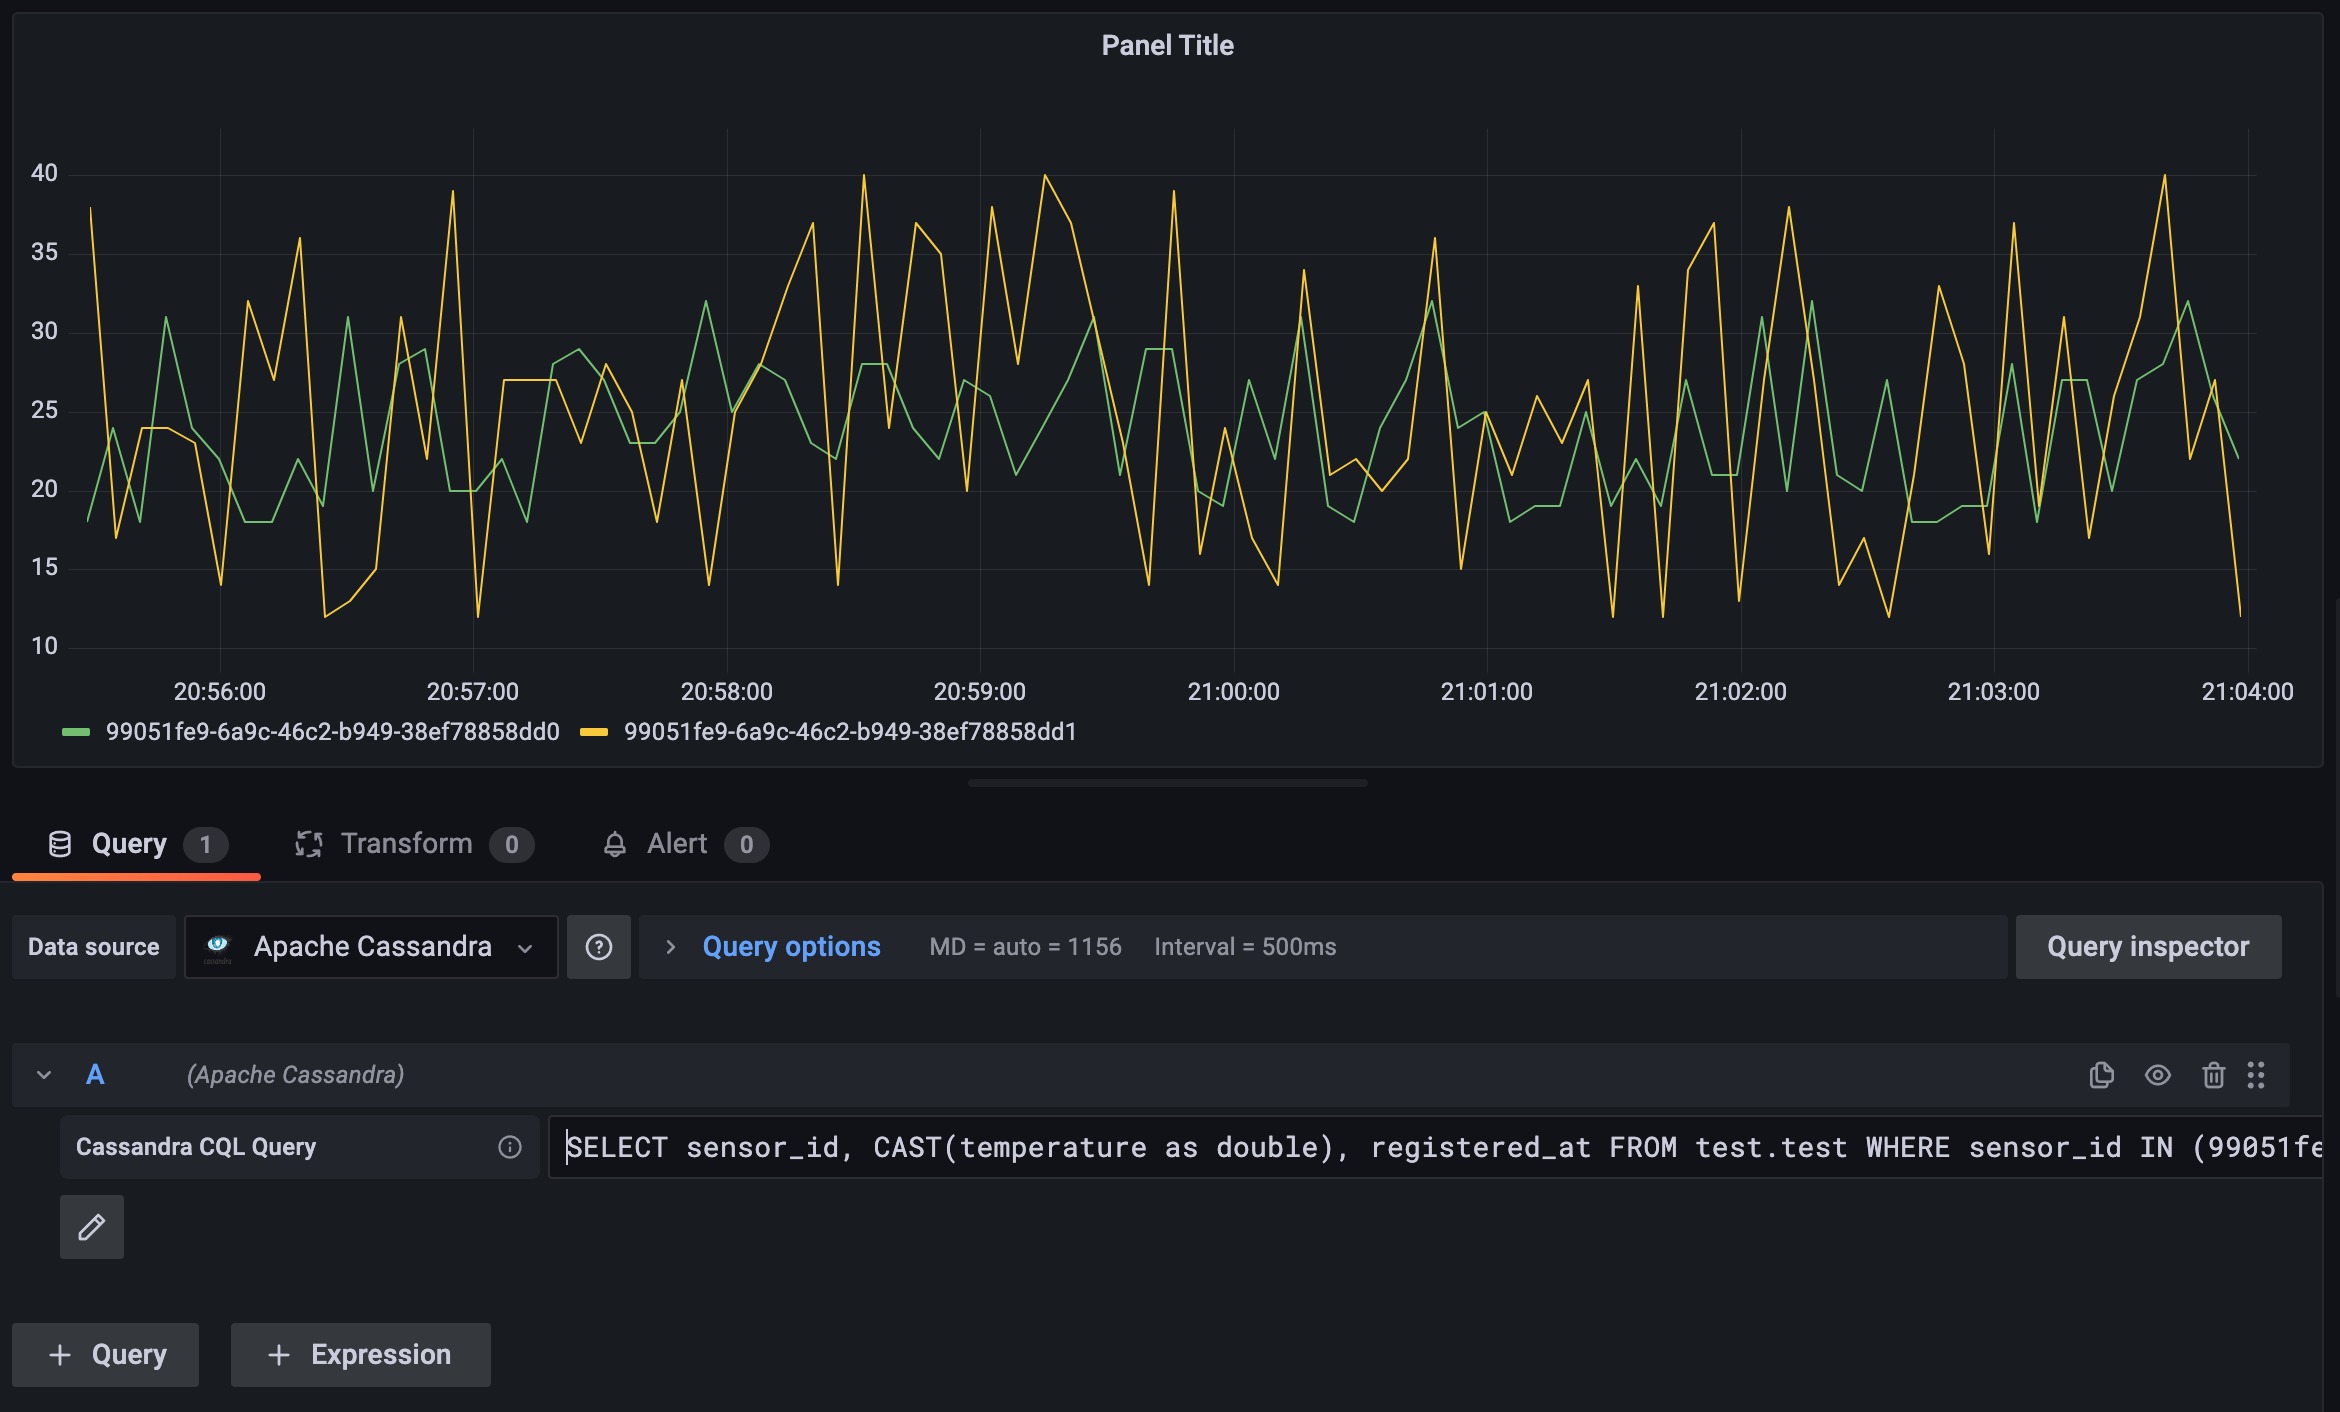
Query Editor
Query Editor unlocks all possibilities of CQL including Used-Defined Functions, aggregations etc. To enable query editor, press 'toggle editor mode' button.
Example (using the sample table from the Query Configurator case):
SELECT sensor_id, temperature, registered_at, location FROM test.test WHERE sensor_id IN (99051fe9-6a9c-46c2-b949-38ef78858dd1, 99051fe9-6a9c-46c2-b949-38ef78858dd0) AND registered_at > $__timeFrom and registered_at < $__timeTo
Order of fields in the SELECT expression doesn't matter except ID field. This field used to distinguish different time series, so it is important to keep it or any other column with low cardinality on the first position.
- Identifier - the first property in the SELECT expression should be the ID, something that uniquely identifies the data (e.g.
sensor_id) - Value - There should be at least one numeric value among returned fields, if query result will be used to draw graph.
- Timestamp - There should be one timestamp value, if query result will be used to draw graph.
- There could be any number of additional fields, however be cautious when using multiple numeric fields as they are interpreted as values by grafana and therefore are drawn on TimeSeries graph.

More information on Query Editor.
Table Mode
In addition to TimeSeries mode datasource supports Table mode to draw tables using Cassandra query results. Use Merge, Sort by, Organize fields and other transformations to shape the table in any desirable way.
There are two ways to plot not a whole timeseries but only last(most rescent) values.
More information on Table Mode.
Variables
Aliases
Using aliases explained in documentation
Annotations
Grafana Annotations documentation
Alerting
Alerting is supported, however it has some limitations. Grafana does not support long(narrow) series in alerting, so query result must be converted to wide series before handing it over to grafana. Datasource performs it in pretty simple way - it creates labels using all the non-timeseries field and then removes that fields from response.
Basically, this query (using example table) will produce two wide series for alerting
SELECT sensor_id, temperature, registered_at, location
FROM test.test
WHERE sensor_id IN (99051fe9-6a9c-46c2-b949-38ef78858dd0, 99051fe9-6a9c-46c2-b949-38ef78858dd0)
AND registered_at > $__timeFrom AND registered_at < $__timeTo
99051fe9-6a9c-46c2-b949-38ef78858dd0 {location=“kitchen”, sensor_id=“99051fe9-6a9c-46c2-b949-38ef78858dd0”}
99051fe9-6a9c-46c2-b949-38ef78858dd1 {location=“bedroom”, sensor_id=“99051fe9-6a9c-46c2-b949-38ef78858dd1”}
- More information on series types in grafana developers documentation.
- Grafana Alerting documentation
Tips and tricks
Development
- Developer documentation (migrates to the docs folder for better accessibility for agents)
- Release Process
Grafana Cloud Free
- Free tier: Limited to 3 users
- Paid plans: $55 / user / month above included usage
- Access to all Enterprise Plugins
- Fully managed service (not available to self-manage)
Self-hosted Grafana Enterprise
- Access to all Enterprise plugins
- All Grafana Enterprise features
- Self-manage on your own infrastructure
Install on Grafana Cloud
Plugins can be installed directly from within your Grafana instance or automated using the Cloud API or Terraform.
Learn more about plugin installationMarketplace plugins
This is a paid plugin developed by a marketplace partner. To purchase an entitlement, sign in first, then fill out the contact form.
Get this plugin
This is a paid for plugin developed by a marketplace partner. To purchase entitlement please fill out the contact us form.
What to expect:
- Grafana Labs will reach out to discuss your needs
- Payment will be taken by Grafana Labs
- Once purchased the plugin will be available for you to install (cloud) or a signed version will be provided (on-premise)
Thank you! We will be in touch.
For more information, visit the docs on plugin installation.
Installing on a local Grafana:
For local instances, plugins are installed and updated via a simple CLI command. Plugins are not updated automatically, however you will be notified when updates are available right within your Grafana.
1. Install the Data Source
Use the grafana-cli tool to install Apache Cassandra from the commandline:
grafana-cli plugins install The plugin will be installed into your grafana plugins directory; the default is /var/lib/grafana/plugins. More information on the cli tool.
Alternatively, you can manually download the .zip file for your architecture below and unpack it into your grafana plugins directory.
Alternatively, you can manually download the .zip file and unpack it into your grafana plugins directory.
2. Configure the Data Source
Accessed from the Grafana main menu, newly installed data sources can be added immediately within the Data Sources section.
Next, click the Add data source button in the upper right. The data source will be available for selection in the Type select box.
To see a list of installed data sources, click the Plugins item in the main menu. Both core data sources and installed data sources will appear.
v3.0.0
3.3.0
Minor Changes
066f577: Added support for Cassandra clusters that use non-standard authenticators (e.g. LDAP). Previously, connecting to such clusters would fail during the initial handshake with an
unexpected authenticatorerror.A new Allowed authenticators field in the connection settings lets you specify which authenticator class names the driver should accept, as a semicolon-separated list. Leaving it empty preserves the original behaviour, so existing data sources are unaffected.
3.2.0 (2026.02.22)
Minor Changes
- Added variable interpolation support for chained/dependent variables - Variable queries now support template variable interpolation using
${variable}syntax, enabling powerful cascading variable dependencies. Users can now create hierarchical variable relationships (e.g., Zone → Location → Sensor) where selecting a value in one variable automatically filters options in dependent variables (see Variables documentation). (issue #182) - Thanks @HadesArchitect
Patch Changes
- Improved UI with query mode switcher and contextual documentation links - Replaced the plain "Toggle editor mode" button with a
RadioButtonGroup(Configurator / Query Editor) for a clearer mode-switching experience and linked relevant docs page (configurator or editor) and GitHub Discussions. - Added support for Cassandra VARINT columns (#235) - Querying a table with a
varintcolumn caused the plugin to crash withfield value has unsupported type *big.Int. Cassandra'svarinttype is an arbitrary-precision integer backed by Go's*big.Int, which was not handled during row normalisation. The fix adds explicit conversion of*big.Intvalues so thatvarintcolumns are returned as numeric data instead of producing an error. (issue #235) - Thanks @HadesArchitect and @arturngomes - Fix ConfigEditor - stop mutating React props directly instead of using proper state updates (issue #230) - Thanks @hugohaggmark
3.1.0
Minor Changes
- d96a689: Added keyspace, table, column caching for faster GUI(@HadesArchitect)
- 532f4e3: Added support for TLS certificate configuration via direct content input alongside existing file path support (#210)
- Made 'toggle editor mode' button more visible to improve UI
Patch Changes
- d96a689: Fixed #198 (@HadesArchitect)
- bcb51f2: Added frontend tests (@HadesArchitect)
- 74366e7: Added changesets
- Fixed TLS certificate fields names
- Updated frontend dependencies to latest compatible versions:
- @grafana/data, @grafana/runtime, @grafana/ui remain at 10.4.19 (latest 10.x)
- Updated backend dependencies to latest compatible versions:
- Updated Go version from 1.21 to 1.24.1
- Compatibility fixes:
- Downgraded tablewriter from v1.0.6 to v0.0.5 for SDK compatibility
- Updated datasource factory function to include context parameter
v3.0.0
IMPORTANT v3 supports Grafana versions 7.4+ through 10.x
- Added support for Grafana 10.x
- Enhanced security features including TLS support
- Support for various Cassandra implementations (Apache Cassandra, DataStax Enterprise, DataStax Astra, AWS Keyspaces)
- Modernized plugin architecture with backend and frontend components
v2.0.0
IMPORTANT v2 does NOT support older grafana versions (any version older than 7.0)
- Added support for Grafana 8.x (#89)
- Added Alerting (#91)
- Added table format support (#66)
- Added aliases (#92)
- UX Query Editor Improvements (#93)
All credits to @futuarmo
v1.1.4
- Configurable connection timeout
- Configurable TLS setting (allow/disallow self-signed certs)
- UI configuration improvements
- Fronted dependencies update
v1.0.1
- Supports linux ARM64 platform
- Updated dependencies
v1.0.0 Initial
- First implementation