Plugins 〉Jira
Jira
How to configure the JIRA plugin
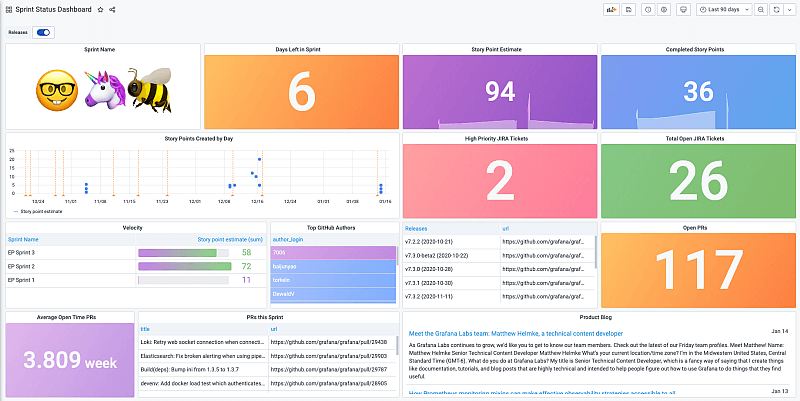
Instantly visualize Jira data in Grafana
The Jira data source plugin is the easiest way to pull Jira data directly into Grafana dashboards.
- Visualize it either in isolation (one database) or blend it with other data sources.
- Discover correlations and covariances across all your data in minutes.
Grafana Cloud Free
- Free tier: Limited to 3 users
- Paid plans: $55 / user / month above included usage
- Access to all Enterprise Plugins
- Fully managed service (not available to self-manage)
Self-hosted Grafana Enterprise
- Access to all Enterprise plugins
- All Grafana Enterprise features
- Self-manage on your own infrastructure
Grafana Cloud Free
.h4 . .mb-0 }
- Free tier: Limited to 3 users
- Paid plans: $55 / user / month above included usage
- Access to all Enterprise Plugins
- Fully managed service (not available to self-manage)
Self-hosted Grafana Enterprise
- Access to all Enterprise plugins
- All Grafana Enterprise features
- Self-manage on your own infrastructure
Grafana Cloud Free
- Free tier: Limited to 3 users
- Paid plans: $55 / user / month above included usage
- Access to all Enterprise Plugins
- Fully managed service (not available to self-manage)
Self-hosted Grafana Enterprise
- Access to all Enterprise plugins
- All Grafana Enterprise features
- Self-manage on your own infrastructure
Installing Jira on Grafana Cloud:
Installing plugins on a Grafana Cloud instance is a one-click install; same with updates. Cool, right?
Note that it could take up to 1 minute to see the plugin show up in your Grafana.
Installing plugins on a Grafana Cloud instance is a one-click install; same with updates. Cool, right?
Note that it could take up to 1 minute to see the plugin show up in your Grafana.
Installing plugins on a Grafana Cloud instance is a one-click install; same with updates. Cool, right?
Note that it could take up to 1 minute to see the plugin show up in your Grafana.
Installing plugins on a Grafana Cloud instance is a one-click install; same with updates. Cool, right?
Note that it could take up to 1 minute to see the plugin show up in your Grafana.
Installing plugins on a Grafana Cloud instance is a one-click install; same with updates. Cool, right?
Note that it could take up to 1 minute to see the plugin show up in your Grafana.
Installing plugins on a Grafana Cloud instance is a one-click install; same with updates. Cool, right?
Note that it could take up to 1 minute to see the plugin show up in your Grafana.
Installing plugins on a Grafana Cloud instance is a one-click install; same with updates. Cool, right?
Note that it could take up to 1 minute to see the plugin show up in your Grafana.
For more information, visit the docs on plugin installation.
Installing on a local Grafana:
For local instances, plugins are installed and updated via a simple CLI command. Plugins are not updated automatically, however you will be notified when updates are available right within your Grafana.
1. Install the Data Source
Use the grafana-cli tool to install Jira from the commandline:
grafana-cli plugins install The plugin will be installed into your grafana plugins directory; the default is /var/lib/grafana/plugins. More information on the cli tool.
Alternatively, you can manually download the .zip file for your architecture below and unpack it into your grafana plugins directory.
Alternatively, you can manually download the .zip file and unpack it into your grafana plugins directory.
2. Configure the Data Source
Accessed from the Grafana main menu, newly installed data sources can be added immediately within the Data Sources section.
Next, click the Add data source button in the upper right. The data source will be available for selection in the Type select box.
To see a list of installed data sources, click the Plugins item in the main menu. Both core data sources and installed data sources will appear.
Change Log
v1.10.5 - 2024-10-10
- 🐛 Fix: Fix health check error messages
v1.10.4 - 2024-10-03
- ⚙️ Chore: Update frontend dependencies
- ⚙️ Chore: Minimal supported Grafana version is now
10.4.8
v1.10.3 - 2024-09-23
- ⚙️ Chore: Update dependencies
v1.10.2 - 2024-09-02
- 🐛 Fix: Fix enterprise query caching not working
v1.10.1 - 2024-08-30
- ⚙️ Chore: update backend dependencies
v1.10.0 - 2024-08-21
- handle html responses gracefully + update backend dependencies
v1.9.8 - 2024-08-19
- ⚙️ Chore: handle 401 error source correctly
v1.9.7 - 2024-07-24
- ⚙️ Chore: add errorsource to jira plugin
v1.9.6 - 2024-07-01
- ⚙️ Chore: update backend dependencies
v1.9.5 - 2024-05-29
- ⚙️ Chore: update backend dependencies
v1.9.4 - 2024-04-12
- 🐛 Fix: fix status category field to populate correctly in results
v1.9.3 - 2024-04-05
- 🐛 Fix: Fix broken PDC
v1.9.2 - 2024-03-25
- 🐛 Fix: Fix issue with plugin failing when querying "Key" field only
- ⚙️ Chore: Update backend dependencies
v1.9.1 - 2024-03-13
- ⚙️ Chore: Backend binaries are now compiled with Go version
1.22.1
v1.9.0 - 2024-02-20
- ⚙️ Chore: Add error source to responses
v1.8.1 - 2023-11-21
- 📝 Documentation: Update documentation
v1.8.0 - 2023-10-26
- ⚙️ Chore: Update backend and frontend dependencies
- ⚙️ Chore: Minimum required Grafana runtime version is now 9.5.13
v1.7.2 - 2023-08-24
- ⚙️ Chore: grafana backend plugin sdk updated to
v0.171.0
v1.7.1 - 2023-07-27
- ⚙️ Chore: grafana backend plugin sdk updated to
v0.170.0
v1.7.0 - 2023-06-29
- 🚀 Feature: Added support for selecting additional fields (including JSON fields). Use transformations to extract values from JSON fields.
v1.6.1 - 2023-06-08
- ⚙️ Chore: backend libs updated with golang:1.20.5
v1.6.0 - 2023-05-22
- 🚀 Feature: UI improvements to configuration page
v1.5.0 - 2023-05-10
- 🚀 Feature: Secure socks proxy support added
v1.4.1 - 2023-05-05
- 🐛 Fix: Fixed bug where query parameters were ignored when running query (bug appeared in
1.4.0)
v1.4.0 - 2023-05-03
BROKEN, USE 1.4.1+ INSTEAD
- 🚀 Feature: Made internal improvements to reduce request time (re-adding of the selected fields needed to see the improvement)
- ⚙️ Chore: Backend binaries are now compiled with Go 1.20.4
v1.3.0 - 2023-04-18
- 🚀 Feature: Small improvements to the config page (fixed tooltip, UI improvements, etc.)
v1.2.0 - 2023-03-22
- 🚀 Feature: Made improvements to the config page usability
- 🚀 Feature: Updated "Run query" button style and position in the query editor
- 🚀 Feature: Started showing JQL errors in the query editor
v1.1.0 - 2023-02-01
- ⚙️ Chore: Internal frontend dependencies updated
- ⚙️ Chore: Minimum required Grafana runtime version is now 8.4.7
v1.0.11 - 2022-12-13
- ⚙️ Chore: Backend binaries are now compiled with Go 1.19.4
- ⚙️ Chore: Grafana backend plugin SDK updated to v0.145.0
- ⚙️ Chore: Backend third party dependencies updated
v1.0.10 - 2022-11-04
- ⚙️ Chore: Backend binaries compiled with latest go version 1.19.3
v1.0.9 - 2022-09-26
- Fixed an issue with logger
v1.0.8 - 2022-07-19
- Over 100 issues can be queried now
v1.0.7 - 2022-03-20
- Entering a user in settings is now optional
v1.0.6 - 2022-03-15
- Updated documentation
v1.0.5 - 2022-01-06
- Update sdk: individual license, instance manager, debugger
v1.0.4 - 2021-12-10
- Add debug logger
v1.0.3 - 2021-11-18
- Fixes for inconsistent run query button behavior
v1.0.2 - 2021-06-08
- Fixes Grafana v8 field loading issue
v1.0.1 - 2021-04-07
- Update grafana-enterprise-sdk
v1.0.0 - 2021-03-31
- Official plugin release
v0.9.7 - 2021-03-11
- Query type is now being set when selecting the Jira data source
v0.9.6 - 2021-02-26
- 🚀 Feature: Add Jira Server support
- 🚀 Feature: Add Limit setting for Issues query
v0.9.5 - 2021-01-15
<nil>and[]are no longer displayed when there is no data to display in a field- Fields that do not have a converter no longer show up in list of selectable fields
- Added tooltips
- User Display Name will not just be User Name
- Added support for more fields
- Status
- Labels
- Components
- Resolution
- Priority
- Due Date
- Votes
- User (not in arrays)
- Version
- Parent
- Sub Tasks
- All options fields
- Any
- FixVersions
- AffectsVersions
- Rank
- Epic Link
- Epic Status
v0.9.4 - 2021-01-11
- Added supported Jira types
- Any
- Approval
- Array
- Date
- Feed Back
- Number
- Option
- Project
- Sprint
- String
- User
- Added support for expanding Jira types so they can be selected in the field selector, for example Sprint object becomes Sprint Name, Sprint Start Date and so on
v0.9.0 - 2021-01-06
- Beta release


