Important: This documentation is about an older version. It's relevant only to the release noted, many of the features and functions have been updated or replaced. Please view the current version.
Set up monitoring for Tempo
You can set up monitoring for Tempo using an existing or new cluster. If you don’t have a cluster available, you can use the linked documentation to set up the Tempo, Mimir, and Grafana using Helm or you can use Grafana Cloud.
To set up monitoring, you need to:
- Use Grafana Agent Flow or Grafana Alloy to remote-write to Tempo and set up Grafana to visualize the tracing data by following Set up a test app.
- Update your Grafana Agent Flow configuration to scrape metrics to monitor for your Tempo data.
This procedure assumes that you have set up Tempo using the Helm chart and with Grafana Agent or Grafana Alloy.
Caution
Grafana Alloy is the new name for our distribution of the OTel collector. Grafana Agent has been deprecated and is in Long-Term Support (LTS) through October 31, 2025. Grafana Agent will reach an End-of-Life (EOL) on November 1, 2025. Read more about why we recommend migrating to Grafana Alloy.
The steps outlined below use the Grafana Agent Flow configurations described in Set up a test application for a Tempo cluster.
Note
Update any instructions in this document for your own deployment.
If you use the Kubernetes integration Grafana Agent Helm chart, you’ll be able to use the Kubernetes scrape annotations to automatically scrape Tempo. You’ll need to add the labels to all of the deployed components.
Before you begin
To configure monitoring using the examples on this page, you’ll need the following running in your Kubernetes environment:
- Tempo instance - For storing traces and emitting metrics (install using the
tempo-distributedHelm chart) - Mimir - For storing metrics emitted from Tempo (install using the
mimir-distributedHelm chart) - Grafana - For visualizing traces and metrics (install on Kubernetes)
You can use Grafana Agent or the OpenTelemetry Collector. This procedure provides examples only for Grafana Agent Flow.
The rest of this documentation assumes that the Tempo, Grafana, and Mimir instances use the same Kubernetes cluster.
If you are using Grafana Cloud, you can skip the installation sections and set up the Mimir (Prometheus) and Tempo data sources in your Grafana instance.
Use a test app for Tempo to send data to Grafana
Before you can monitor Tempo data, you need to configure the Grafana Agent to send traces to Tempo.
Use these instructions to create a test application in your Tempo cluster. These steps configure Grafana Agent Flow to remote-write to Tempo. In addition, the test app instructions explain how to configure a Tempo data source in Grafana and view the tracing data.
Note
If you already have a Tempo environment, then you do not need to create a test app. This guide assumes that the Tempo and Grafana Agent configurations are the same as or based on these instructions to create a test application, as you’ll augment those configurations to enable Tempo metrics monitoring.
In these examples, Tempo is installed in a namespace called tempo.
Change this namespace name in the examples as needed to fit your own environment.
Configure Grafana
In your Grafana instance, you’ll need:
- A Tempo data source (created in the previous section)
- A Mimir (Prometheus) data source
Enable Tempo metrics scraping
Tempo exposes Prometheus metrics from all of its components to allow meta-monitoring. To retrieve these metrics, a suitable scraper needs to be configured. Grafana Agent can collect traces and act as a Prometheus scraper. To use this capability, you need to configure the Agent to scrape from all of the components.
Grafana Agent lets you discover targets to scrape in a cluster via a variety of ways.
Usually for Prometheus metrics scraping, you would annotate the pods, services, and others, to signal that Grafana Agent should scrape metrics from those objects using annotations such as prometheus/scrape: true as well as a port and path.
However, the Tempo objects already have some convenient annotations supplied under the app.kubernetes.io prefixes.
The Helm deployment includes these annotations.
For example, the label annotations for Tempo’s distributor component contain:
app.kubernetes.io/component=distributor
app.kubernetes.io/instance=tempo
app.kubernetes.io/managed-by=Helm
app.kubernetes.io/name=tempo
app.kubernetes.io/part-of=memberlist
app.kubernetes.io/version=2.4.1
Because of this, you can use Kubernetes service discovery in Grafana Agent using these annotations to ensure that metrics are scraped from each Tempo component.
Using the discovery.kubernetes Flow component, you can include selectors to scrape from targets based on labels, for example.
As there are Tempo-specific component labels, you can specify a rule that covers all of the Tempo components.
discovery.kubernetes "k8s_pods" {
  role = "pod"
  selectors {
    // Only scrape pods with a particular selector.
    role = "pod"
    // The selector is any component that belongs to Tempo.
    label = "app.kubernetes.io/name=tempo"
  }
}
This rule lets Grafana Agent know that only pods that include an annotation of app.kubernetes.io/name=tempo should have their metrics scraped.
Something to note is that the dashboards for Tempo expect the specific namespace, cluster name, and job name for labels included with the scraped Tempo metrics, where the job nomenclature is <namespace>>app.kubernetes.io/component>.
The latter expands to distributor, compactor, ingester, and so on.
For example: tempo/compactor, where tempo is the namespace and compactor replaces <app.kubernetes.io/component>.
You can acquire all three labels from the annotations that are included as Kubernetes metadata from each components scrape data.
Because this metadata is a string with a prefix of __meta_kubernetes, Grafana Agent must be configured not to discard these labels during the metrics pipeline.
To do this, you can use the discover.relabel component to add rules to keep any required metadata labels.
In the following example, the specific Tempo component name (for example, __meta_kubernetes_app_kubernetes_io_component) is replaced by a more useful label name and kept for future pipeline operations.
rule {
  source_labels = ["__meta_kubernetes_pod_label_app_kubernetes_io_component"]
  action = "replace"
  regex = "(.*)"
  replacement = "$1"
  target_label = "k8s_component_name"
}
By adding rules to keep the __meta_kubernetes_namespace label for namespace and __meta_kubernetes_app_kubernetes_io_instance label for cluster name, you can also attach these labels to written metrics for dashboard use later.
Finally, including a Prometheus relabel component to the Flow configuration allows the use of the kept metadata labels to create the correct nomenclature for the job:
rule {
  source_labels = ["namespace", "k8s_component_name"]
  action = "replace"
  regex = "(.*?);(.*?)"
  replacement = "$1/$2"
  target_label = "job"
}
This lets you create a configuration that scrapes metrics from Tempo components and writes the data to a Mimir instance of your choice.
Here’s a complete configuration for a Grafana Agent Helm values file for Flow, to scrape a running instance of Tempo.
// Scrape Prometheus metrics for Tempo.
prometheus.scrape "tempo" {
  // Use Kubernetes discovery to find the relevant pods to scrape.
  targets    = discovery.relabel.k8s_pods.output
  // Forward to the Prometheus relabeling component.
  forward_to = [prometheus.relabel.tempo.receiver]
}

// Determine how to select pods to scrape.
discovery.kubernetes "k8s_pods" {
  // Only scrape pods.
  role = "pod"
  selectors {
    // Only scrape pods with a particular selector.
    role = "pod"
    // The selector is any component that belongs to Tempo.
    label = "app.kubernetes.io/name=tempo"
  }
}

// Relabel data from Kubernetes discovery.
discovery.relabel "k8s_pods" {
  // Relabel from targets scraped by the discovery selection.
  targets = discovery.kubernetes.k8s_pods.targets

  // Create new namespace label based on the discovered kubernetes namespace.
  rule {
    source_labels = ["__meta_kubernetes_namespace"]
    action = "replace"
    regex = "(.*)"
    replacement = "$1"
    target_label = "namespace"
  }

  // Create new component label based on the discovered kubernetes component.
  rule {
    source_labels = ["__meta_kubernetes_pod_label_app_kubernetes_io_component"]
    action = "replace"
    regex = "(.*)"
    replacement = "$1"
    target_label = "k8s_component_name"
  }

  // Create new cluster label based on the discovered kubernetes instance.
  rule {
    source_labels = ["__meta_kubernetes_pod_label_app_kubernetes_io_instance"]
    action = "replace"
    regex = "(.*)"
    replacement = "$1"
    target_label = "cluster"
  }
}

// Relabel data from Prometheus scraping.
prometheus.relabel "tempo" {
  // Replace the existing job label with one comprised of the namespace and component.
  rule {
    source_labels = ["namespace", "k8s_component_name"]
    action = "replace"
    regex = "(.*?);(.*?)"
    replacement = "$1/$2"
    target_label = "job"
  }


  // Send the metrics to the Prometheus remote write component.
  forward_to = [prometheus.remote_write.tempo.receiver]
}

// Remote write the metrics to a Prometheus compatible endpoint (in this case Mimir).
prometheus.remote_write "tempo" {
  endpoint {
    url = "https://mimir-cluster.distributor.mimir.svc.cluster.local:9001/api/v1/push"
  }
}
This example doesn’t include ingestion for any other data such as traces for sending to Tempo, but can be included with some configuration updates. Refer to Configure Grafana Agent Flow to remote-write to Tempo for more information.
Install Tempo dashboards in Grafana
After metrics from Tempo are scraped by Grafana Agent and stored in Mimir or another Prometheus compatible time-series database, you can monitor Tempo’s operation using the mixin.
Tempo ships with a mixin that includes:
- Relevant dashboards for overseeing the health of Tempo as a whole, as well as its individual components
- Recording rules that simplify the generation of metrics for dashboards and free-form queries
- Alerts that trigger when Tempo falls out of operational parameters
To install the mixins in Grafana, you need to:
Download the mixin dashboards from the Tempo repository.
Import the dashboards in your Grafana instance.
Upload
alerts.yamlandrules.yamlfiles for Mimir or Prometheus
Download the tempo-mixin dashboards
First, clone the Tempo repository from Github:
git clone git+ssh://github.com/grafana/tempoOnce you have a local copy of the repository, navigate to the
operations/tempo-mixin-compileddirectory.cd operations/tempo-mixin-compiled
This contains a compiled version of the alert and recording rules, as well as the dashboards.
Note
If you want to change any of the mixins, make your updates in the
operations/tempo-mixindirectory. Use the instructions in the README in that directory to regenerate the files. The mixins are generated in theoperations/tempo-mixin-compileddirectory.
Import the dashboards to Grafana
The dashboards directory includes the six monitoring dashboards that can be installed into your Grafana instance.
Refer to Import a dashboard in the Grafana documentation.
Tip
Install all six dashboards. You can only import one dashboard at a time. Create a new folder in the Dashboards area, for example “Tempo Monitoring”, as an easy location to save the imported dashboards.
To create a folder:
- Open your Grafana instance and select Dashboards.
- Select New in the right corner.
- Select New folder from the New drop-down.
- Name your folder, for example, “Tempo Monitoring”.
- Select Create.
To import a dashboard:
- Open your Grafana instance and select Dashboards.
- Select New in the right corner.
- Select Import.
- On the Import dashboard screen, select Upload.
- Browse to
operations/tempo-mixin-compiled/dashboardsand select the dashboard to import. - Drag the dashboard file, for example,
tempo-operational.json, onto the Upload area of the Import dashboard screen. Alternatively, you can browse to and select a file. - Select a folder in the Folder drop-down where you want to save the imported dashboard. For example, select Tempo Monitoring created in the earlier steps.
- Select Import.
The imported files are listed in the Tempo Monitoring dashboard folder.
To view the dashboards in Grafana:
- Select Dashboards in your Grafana instance.
- Select Tempo Monitoring, or the folder where you uploaded the imported dashboards.
- Select any files in the folder to view it.
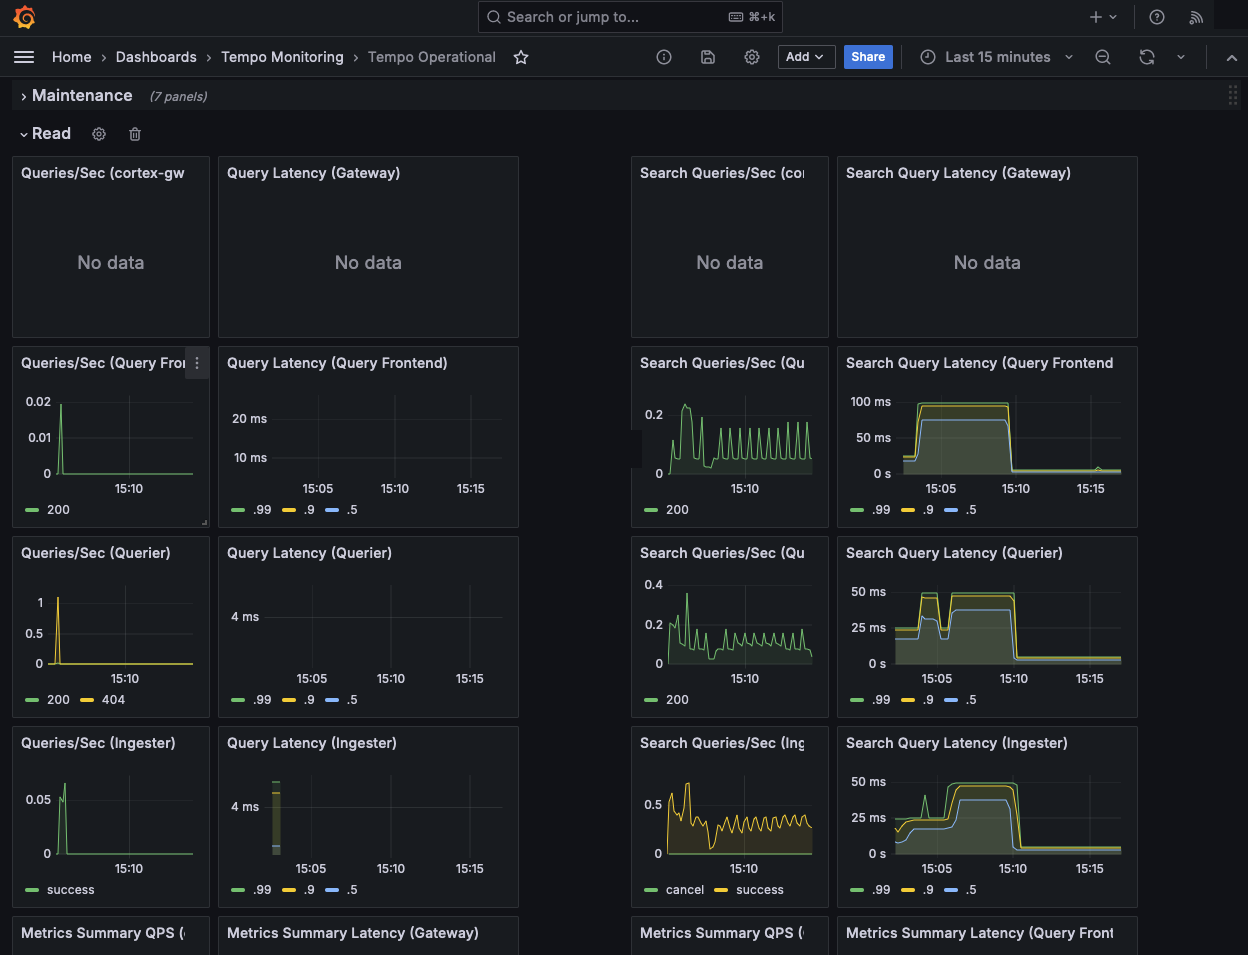
The ‘Tempo Operational’ dashboard shows read (query) information:
Add alerts and rules to Prometheus or Mimir
The rules and alerts need to be installed into your Mimir or Prometheus instance. To do this in Prometheus, refer to the recording rules and alerting rules documentation.
For Mimir, you can use [mimirtool](https://grafana.com/docs/mimir/latest/manage/tools/mimirtool/) to upload rule and alert configuration.
Using a default installation of Mimir used as the metrics store for the Agent configuration, you might run the following:
mimirtool rules load operations/tempo-mixin-compiles/rules.yml --address=https://mimir-cluster.distributor.mimir.svc.cluster.local:9001

mimirtool alertmanager load operations/tempo-mixin-compiles/alerts.yml --address=https://mimir-cluster.distributor.mimir.svc.cluster.local:9001
For Grafana Cloud, you need to add the username and API key as well. Refer to the mimirtool documentation for more information.