Caution
As of 2025-03-11, Grafana OnCall OSS has entered maintenance mode, and will be archived on 2026-03-24. No further feature development will occur; however, we will still provide fixes for critical bugs and for valid CVEs with a CVSS score of 7.0 or higher. For more information, refer to our blog post.
Important: This documentation is about an older version. It's relevant only to the release noted, many of the features and functions have been updated or replaced. Please view the current version.
Get started with Grafana OnCall
Grafana OnCall is an incident response tool built to help DevOps and SRE teams improve their collaboration and resolve incidents faster.
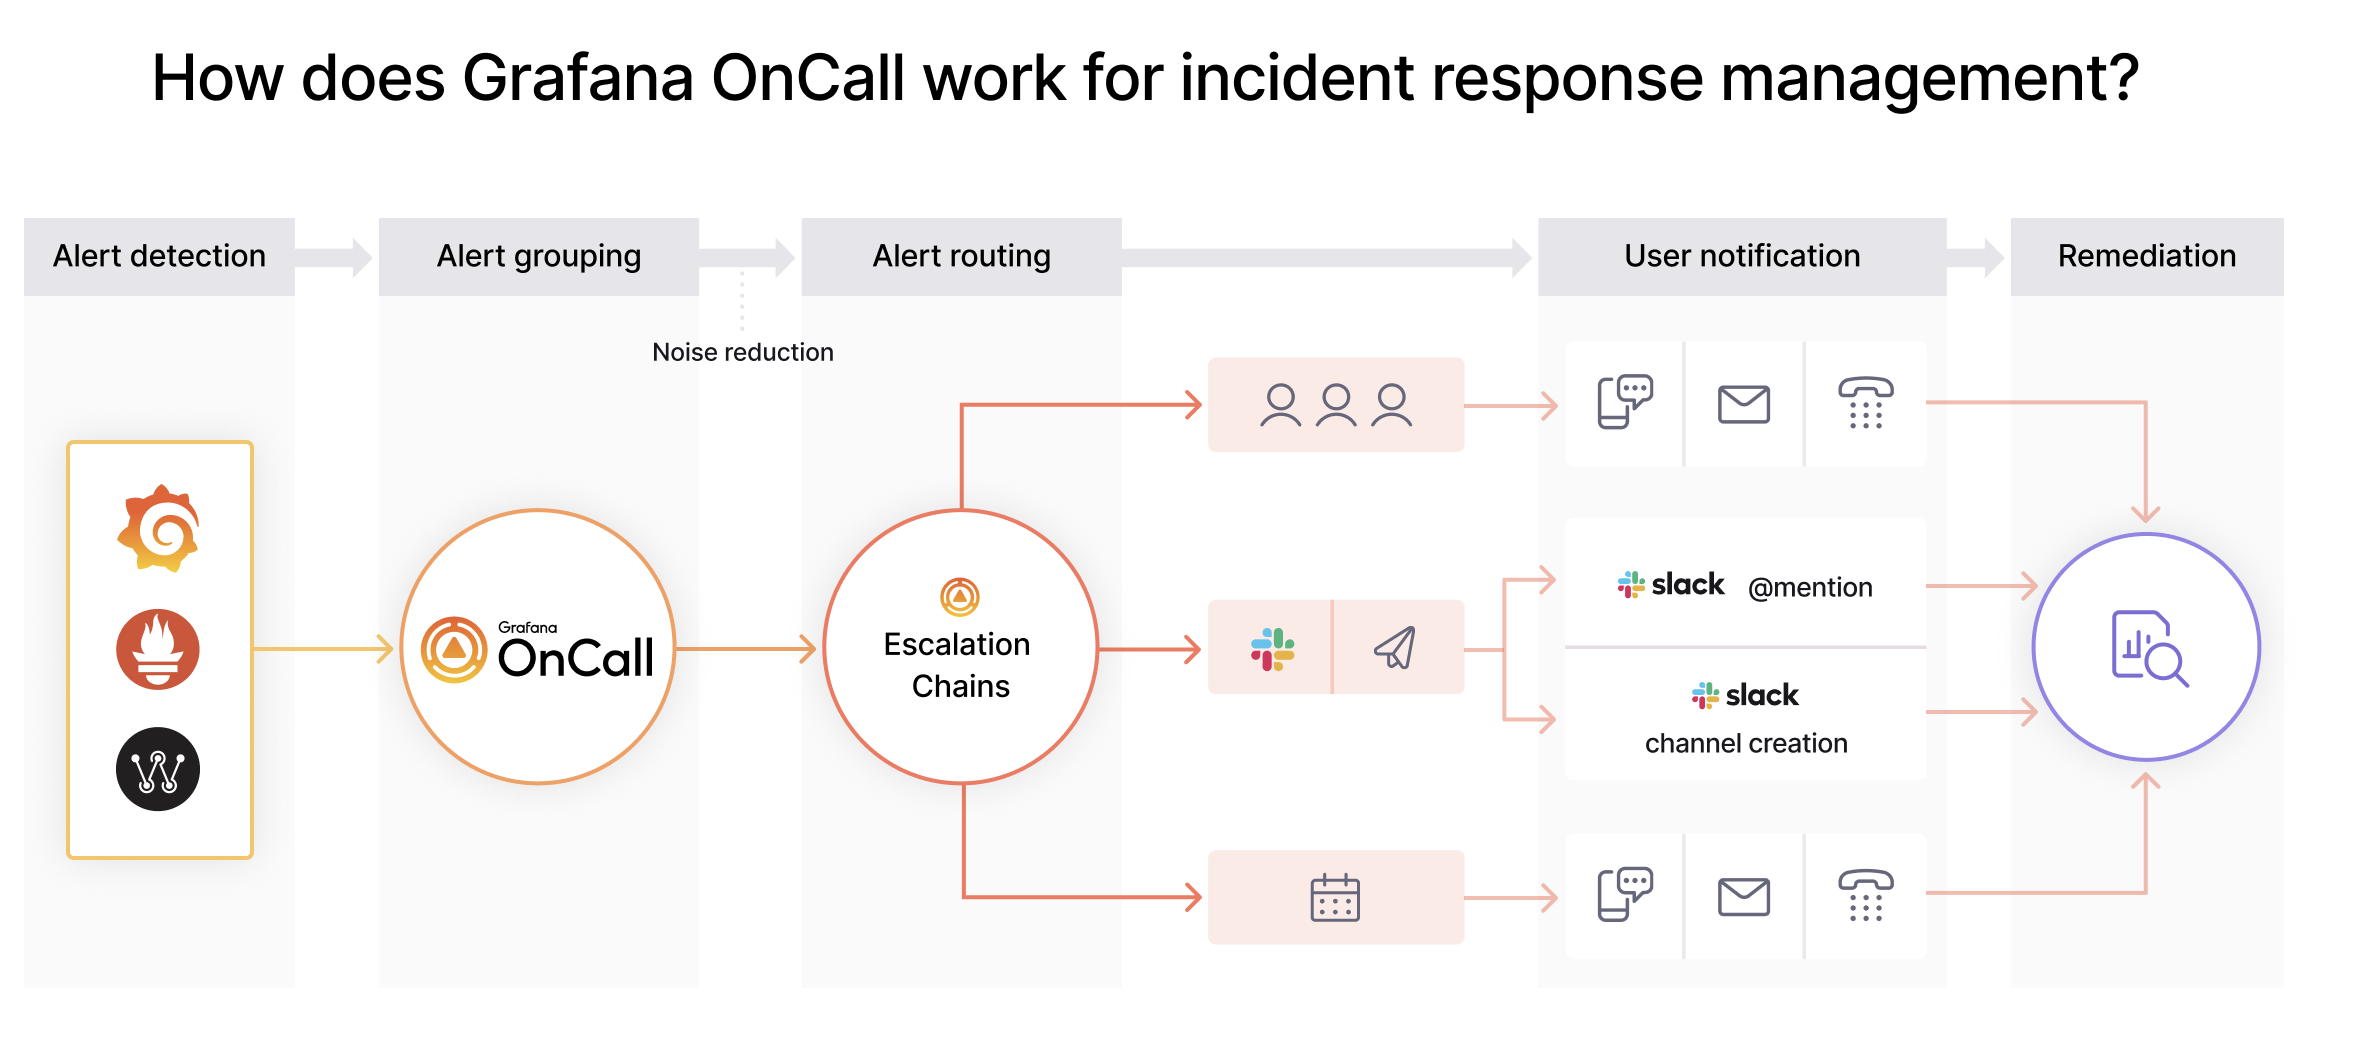
With a centralized view of all your alerts, automated alert escalation and grouping, and on-call scheduling, Grafana OnCall helps ensure that alert notifications reach the right people, at the right time using the right notification method.
The following diagram details an example alert workflow with Grafana OnCall:
These procedures introduce you to initial Grafana OnCall configuration steps, including monitoring system integration, how to set up escalation chains, and how to use your calendar service for on-call scheduling.
Before you begin
Grafana OnCall is available for Grafana Cloud as well as Grafana open source users. You must have a Grafana Cloud account or use Open Source Grafana OnCall
Install Open Source Grafana OnCall
For Open Source Grafana OnCall installation guidance, refer to Open Source Grafana OnCall
Note: If you are using Grafana OnCall with your Grafana Cloud instance there are no install steps. Access Grafana OnCall from your Grafana Cloud account and skip ahead to “Get alerts into Grafana OnCall”
Get alerts into Grafana OnCall
Once you’ve installed Grafana OnCall or accessed it from your Grafana Cloud instance, you can begin integrating with monitoring systems, configuring escalation chains, and get alerts into Grafana OnCall.
Integrate with a monitoring system
Regardless of where your alerts originate, you can send them to Grafana OnCall via available integrations or customizable webhooks. To start receiving alerts in Grafana OnCall, use the following steps to configure your first integration and send a demo alert.
Configure your first integration:
- In Grafana OnCall, navigate to the Integrations tab and click + New integration for receiving alerts.
- Select an integration from the provided options, if the integration you’re looking for isn’t listed, then select Webhook.
- Follow the configuration steps on the integration settings page.
- Complete any necessary configurations in your monitoring system to send alerts to Grafana OnCall.
Send a demo alert
- In the integration tab, click Send demo alert then navigate to the Alert Groups tab to see your test alert firing.
- Explore the alert by clicking on the title of the alert.
- Acknowledge and resolve the test alert.
For more information on Grafana OnCall integrations and further configuration guidance, refer to, Grafana OnCall integrations
Configure Escalation Chains
Escalation Chains are customizable automated alert routing steps that enable you to specify who is notified for a certain alert. In addition to escalation chains, you can configure Routes to send alerts to different escalation chains depending on the alert details.
Once your integration is configured, you can set up an escalation chain to determine how alerts from your integration are handled. Multi-step escalation chains help ensure thorough alert escalation to prevent alerts from being missed.
To configure Escalation Chains:
- Navigate to the Escalation Chains tab and click + New Escalation Chain
- Give your Escalation Chain a useful name and click Create
- Add a series of escalation steps from the available dropdown options.
- To link your Escalation Chain to your integration, navigate back to the Integrations tab, Select your newly created Escalation Chain from the “Escalate to” dropdown.
Alerts from this integration will now follow the escalation steps configured in your Escalation Chain.
For more information on Escalation Chains and more ways to customize them, refer to Configure and manage Escalation Chains
Get notified of an alert
In order for Grafana OnCall to notify you of an alert, you must configure how you want to be notified. Personal notification policies, chatops integrations, and on-call schedules allow you to automate how users are notified of alerts.
Configure personal notification policies
Personal notification policies determine how a user is notified for a certain type of alert. Get notified by SMS, phone call, or Slack mentions. Administrators can configure how users receive notification for certain types of alerts. For more information on personal notification policies, refer to Manage users and teams for Grafana OnCall
To configure users personal notification policies:
- Navigate to the Users tab in Grafana OnCall
- Select a user from the user list and click Edit
- Configure Default Notifications and Important Notification
Configure Slack for Grafana OnCall
Grafana OnCall integrates closely with your Slack workspace to deliver alert notifications to individuals, user groups, and channels. Slack notifications can be triggered by steps in an escalation chain or as a step in users personal notification policies.
To configure Slack for Grafana OnCall:
- In OnCall, click on the ChatOps tab and select Slack in the side menu.
- Click Install Slack integration.
- Read the notice and confirm to proceed to the Slack website.
- Sign in to your organization’s Slack workspace.
- Click Allow to allow Grafana OnCall to access Slack.
- Ensure users verify their Slack accounts in their user profile in Grafana OnCall.
For further instruction on connecting to your Slack workspace, refer to Slack integration for Grafana OnCall
Add your on-call schedule
Grafana OnCall allows you to manage your on-call schedule in your preferred calendar app such as Google Calendar or Microsoft Outlook.
To integrate your on-call calendar with Grafana OnCall:
- In the Schedules tab of Grafana OnCall, click + Add team schedule for on-call rotation.
- Provide a schedule name.
- Copy the iCal URL associated with your on-call calendar from your calendar integration settings.
- Configure the rest of the schedule settings and click Create Schedule
For more information on on-call schedules, refer to Configure and manage on-call schedules