Create an HTTP test
This guide shows how to generate a k6 test script from a test recording, set up rules to handle dynamic data, and validate the resulting script.
In this guide, you will:
- Use the Generator to create a test script from a recording.
- Use the Generator to create a correlation, parameterization, and a custom code rule.
- Validate your test script from the Generator.
- Export your test script.
Before you begin
- Complete Record a browser session to create a test recording. This guide continues from the “generate pizza” recording created in that step.
Generate a script from a test recording
To generate a script from a test recording:
- If you still have the test recording open from the last step, click Create test > HTTP test on the top-right. k6 Studio asks how you want to configure the test. This tutorial configures everything manually, so click Open generator. If you’d like Grafana Assistant to propose the configuration for you instead, refer to Configure a test with Grafana Assistant.
- You can also click New test next to Tests in the sidebar, select HTTP test, and then select your recording on the top-right.
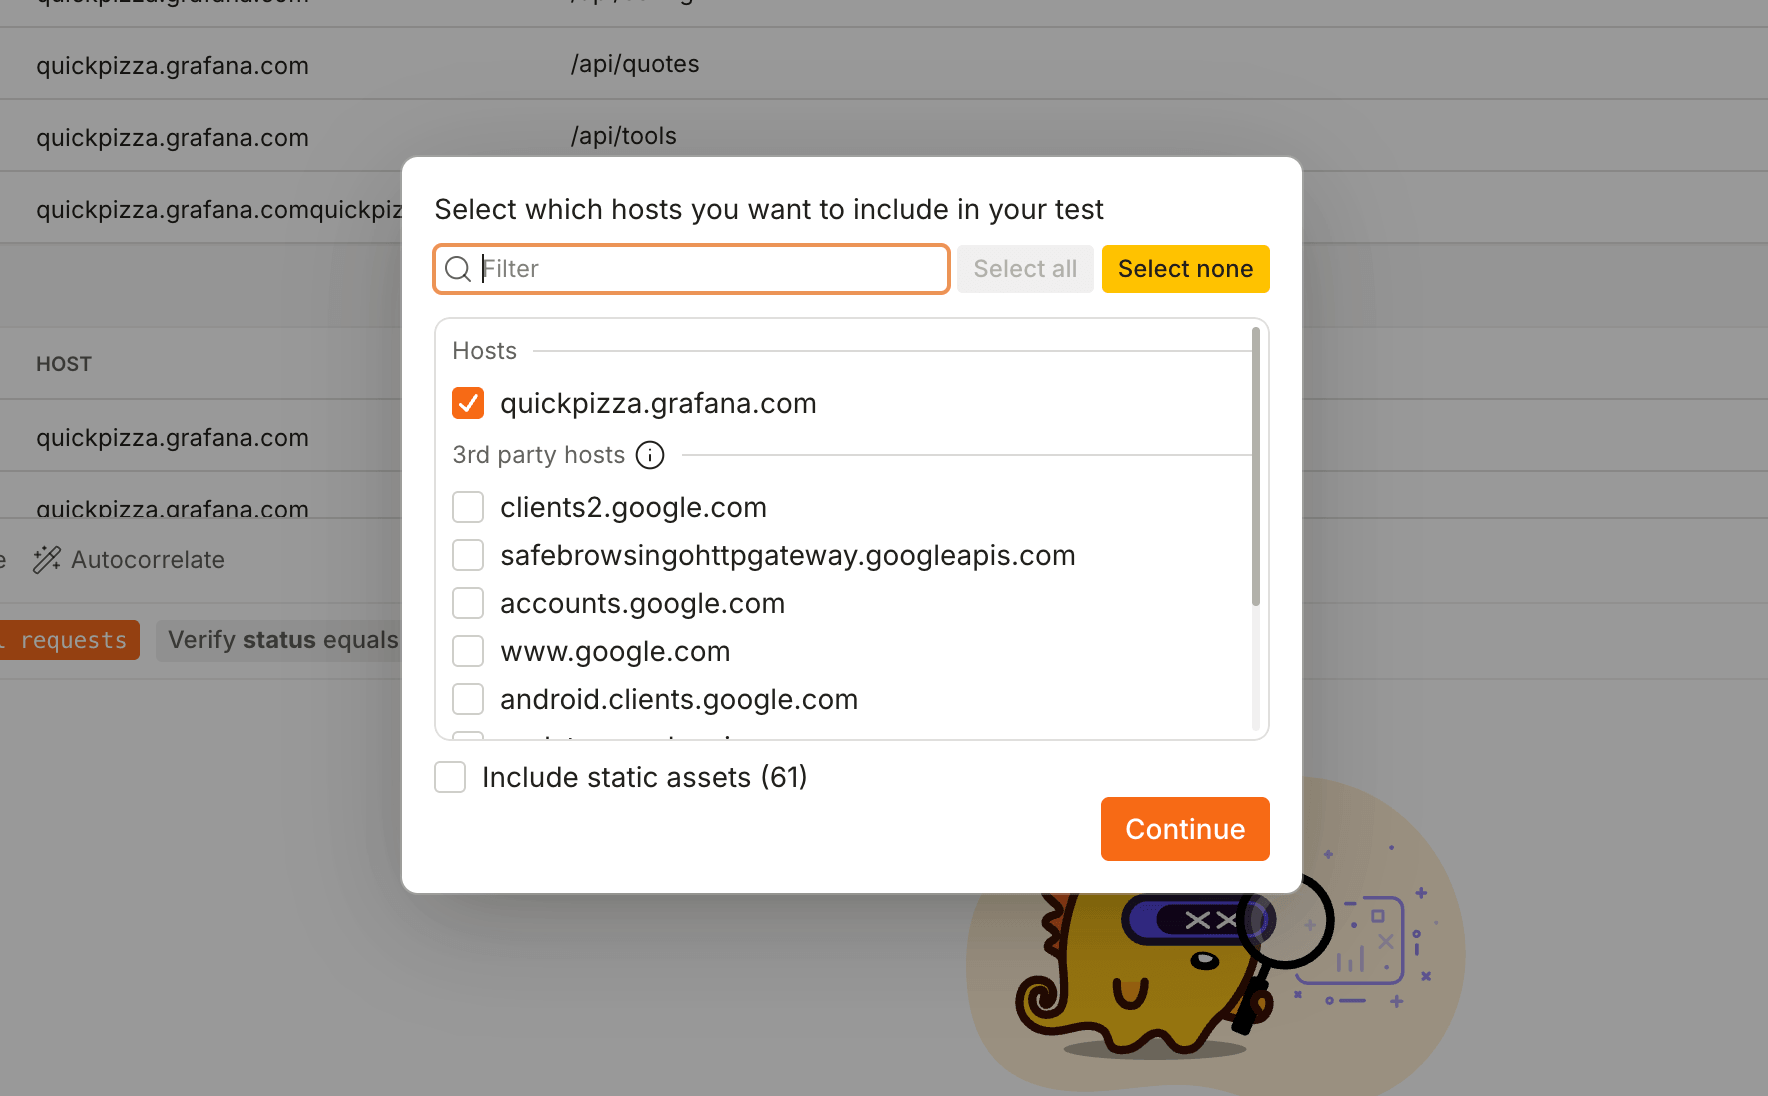
A dialog box shows up that lets you select the hosts to use from the recording for generating the script. Select quickpizza.grafana.com and press Continue.
The Generator lets you generate and modify a k6 test script via the user interface, without having to write JavaScript code.
On the top, you can inspect the recording from this view, similar to the Recorder. On the bottom, you can see the list of Test rules, with a Verification rule already added.
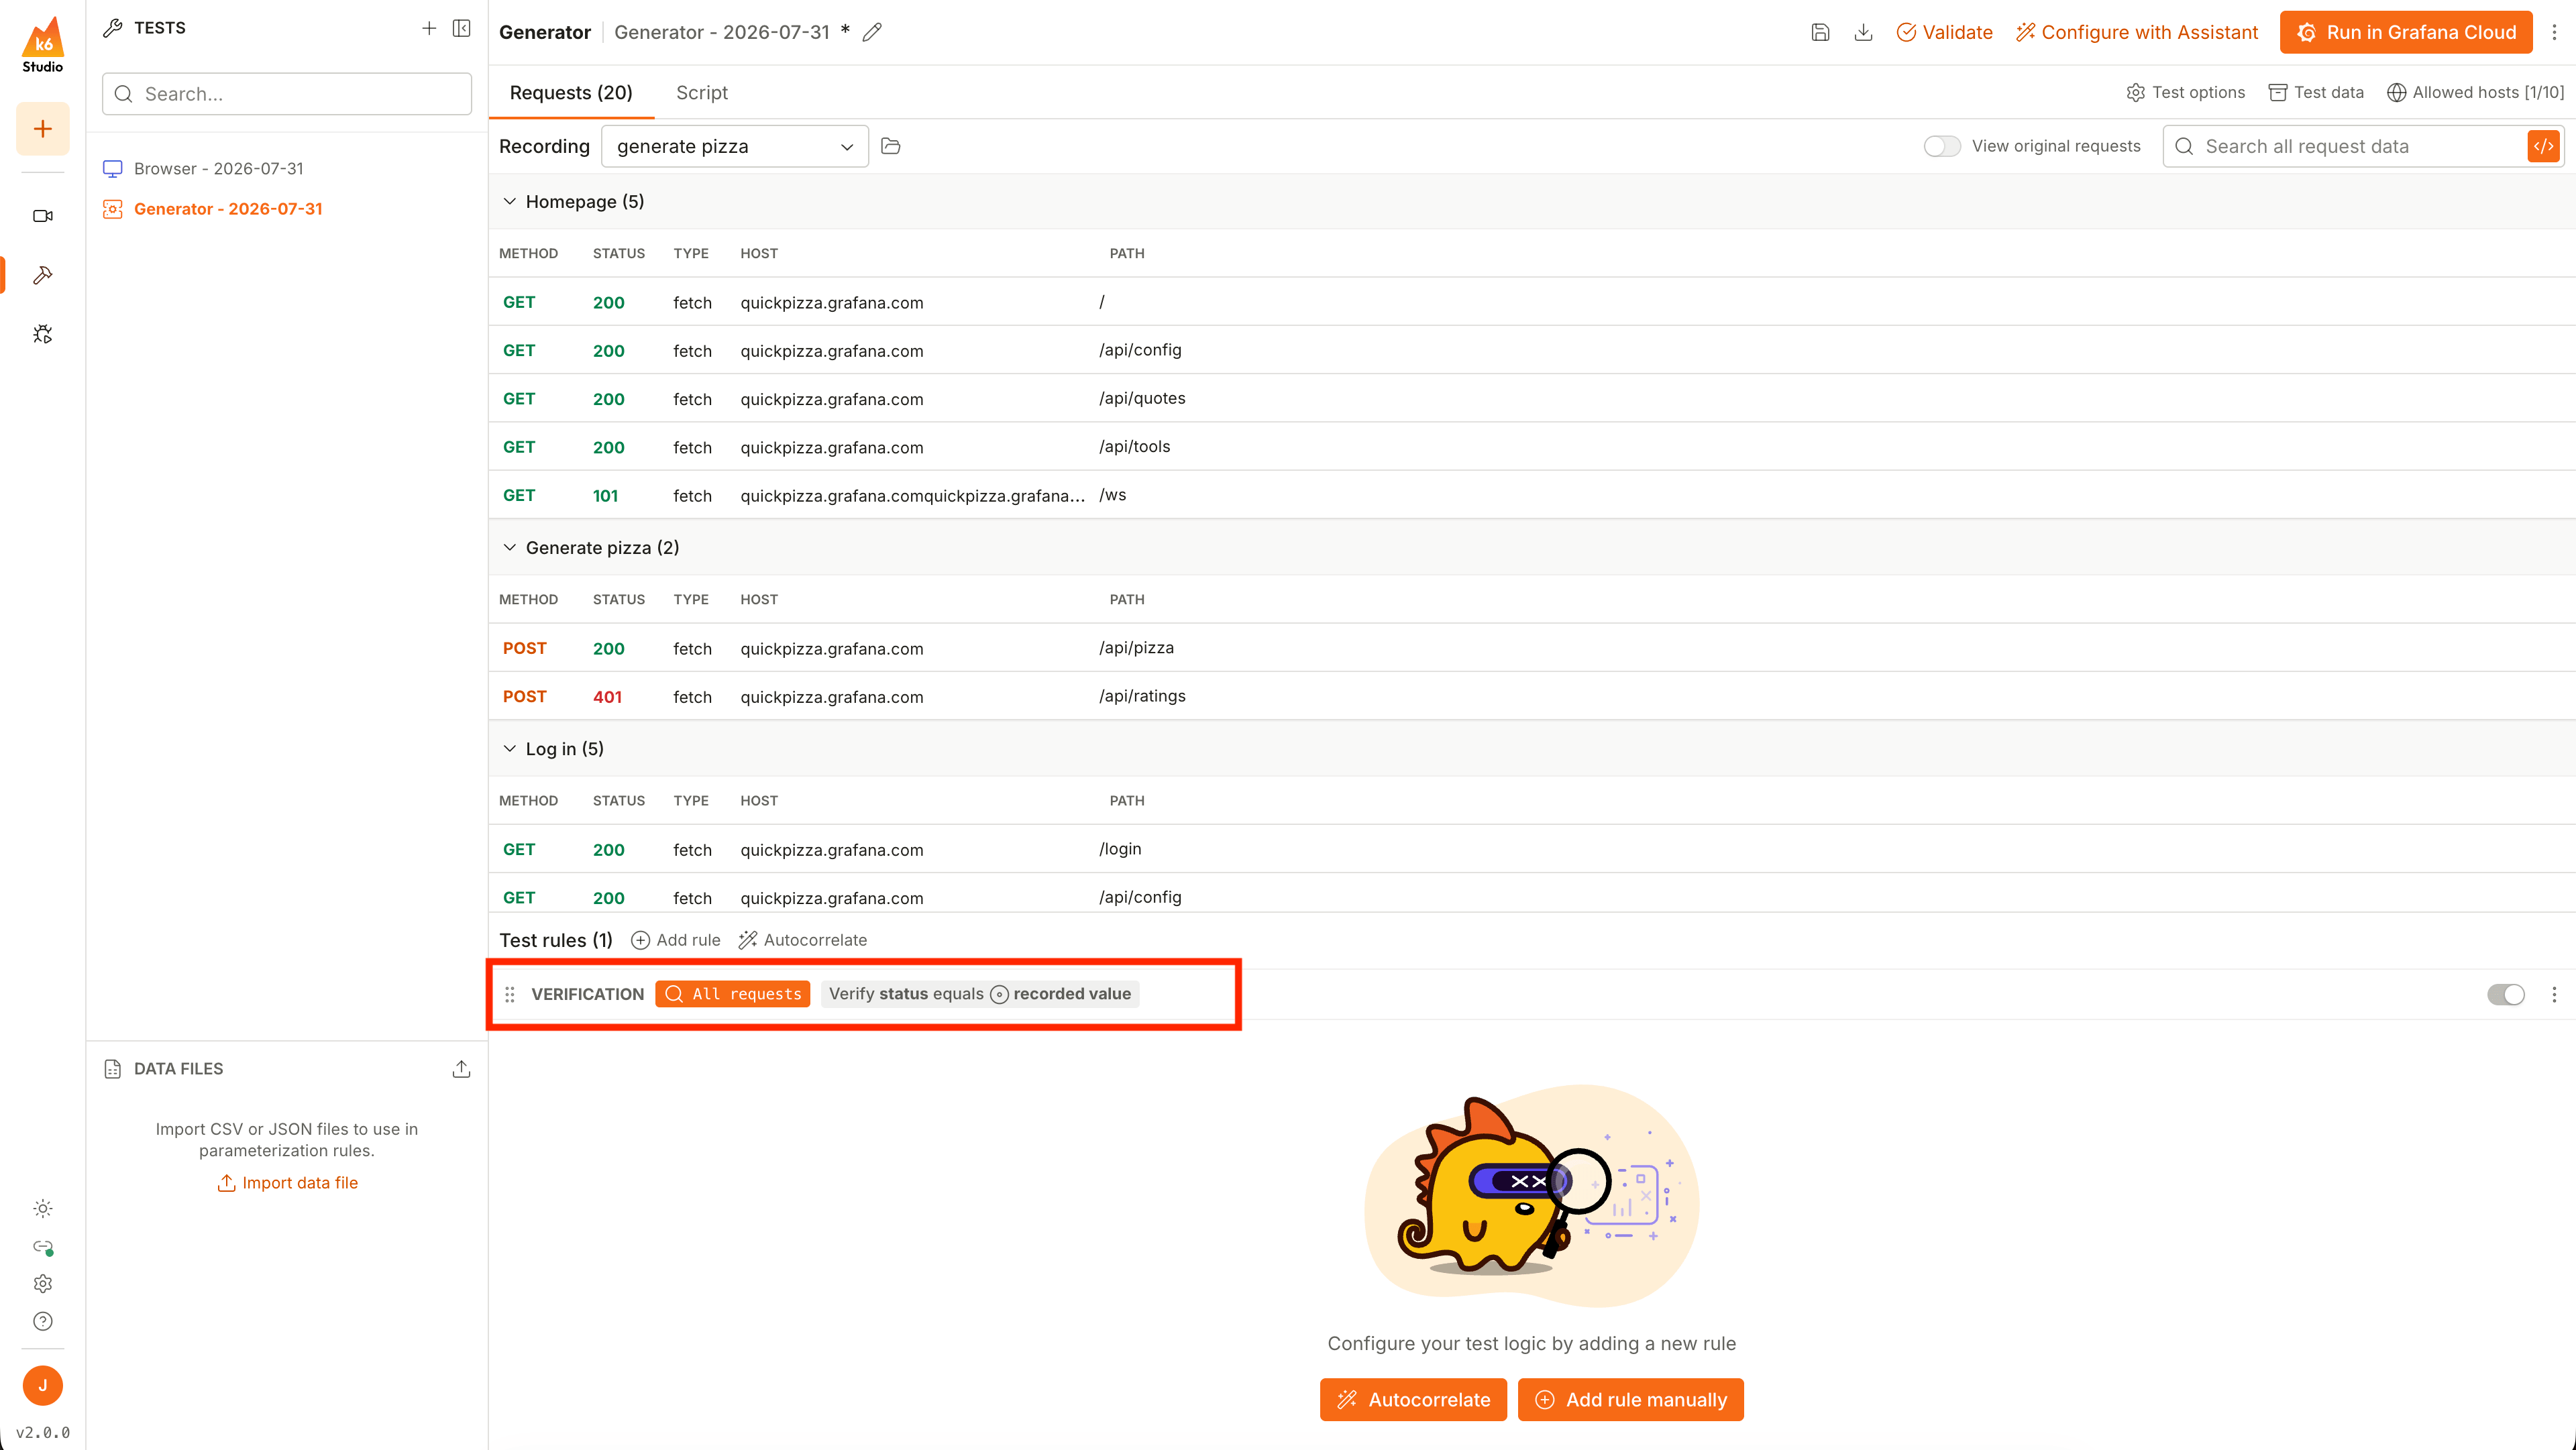
Test rules are objects that you can add to your generator file to modify the script generated from the recording. The Verification rule that’s created by default modifies the script to add Checks. These checks verify that when you run your script, the status codes you receive from responses are the same as the one you previously recorded. That can be a good starting point to verify your application is working as expected.
You can also inspect the script that would be generated by selecting the Script tab in the top panel.
Validate a test script
In this next step, you can validate the test script that was created from the recording to check if your script is working correctly. To validate a test script, click Validate on the top-right.
The Debugger runs your script in a single iteration and lets you inspect the requests and responses sent, and see any logs and checks from k6.
For this guide, running the script that was created by the previous steps will result in a couple of requests that should be returning a 200 status code, returning a 401 status code instead.
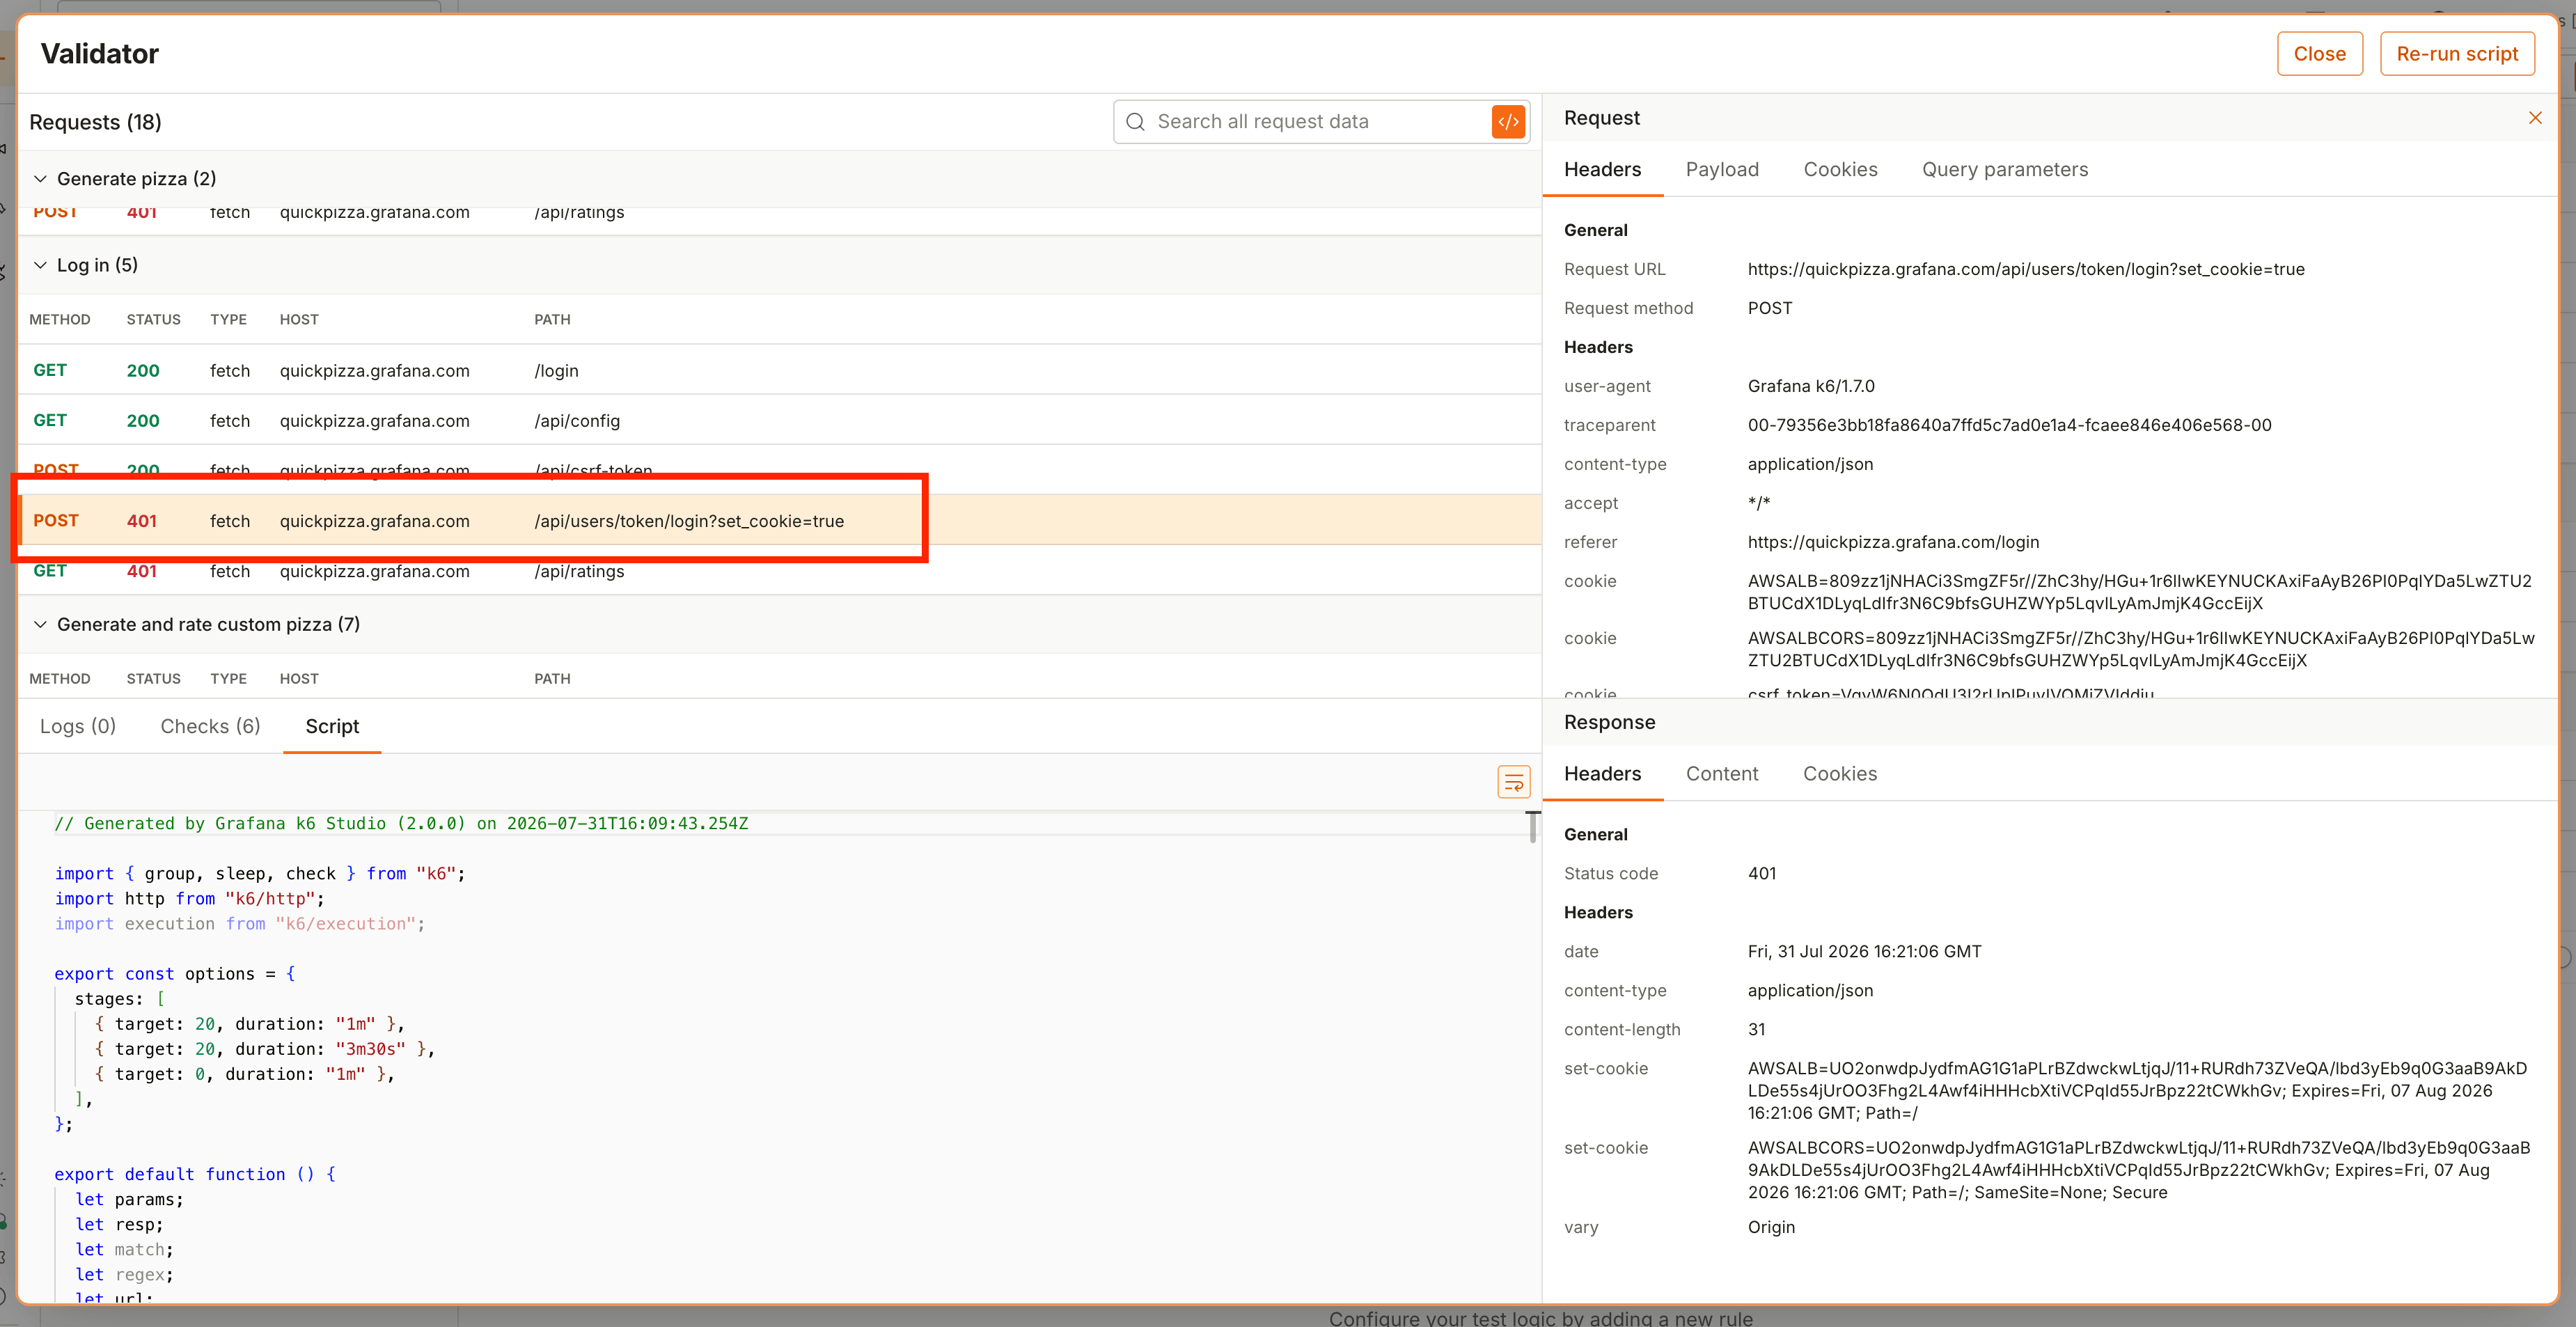
That happens because of two reasons:
- The log in endpoints use a CSRF token to validate the request.
- The pizza rating endpoint uses a
pizza.idproperty to rate the pizza that was randomly generated.
For both cases, these are common scenarios where APIs or services require information to be retrieved from an endpoint, and then used in subsequent requests.
In the next steps, you’ll learn how to use rules to customize your script and make it work correctly.
Correlate dynamic data
If you inspect the data of the POST request /api/csrf-token, you can see that it generates a csrf token.
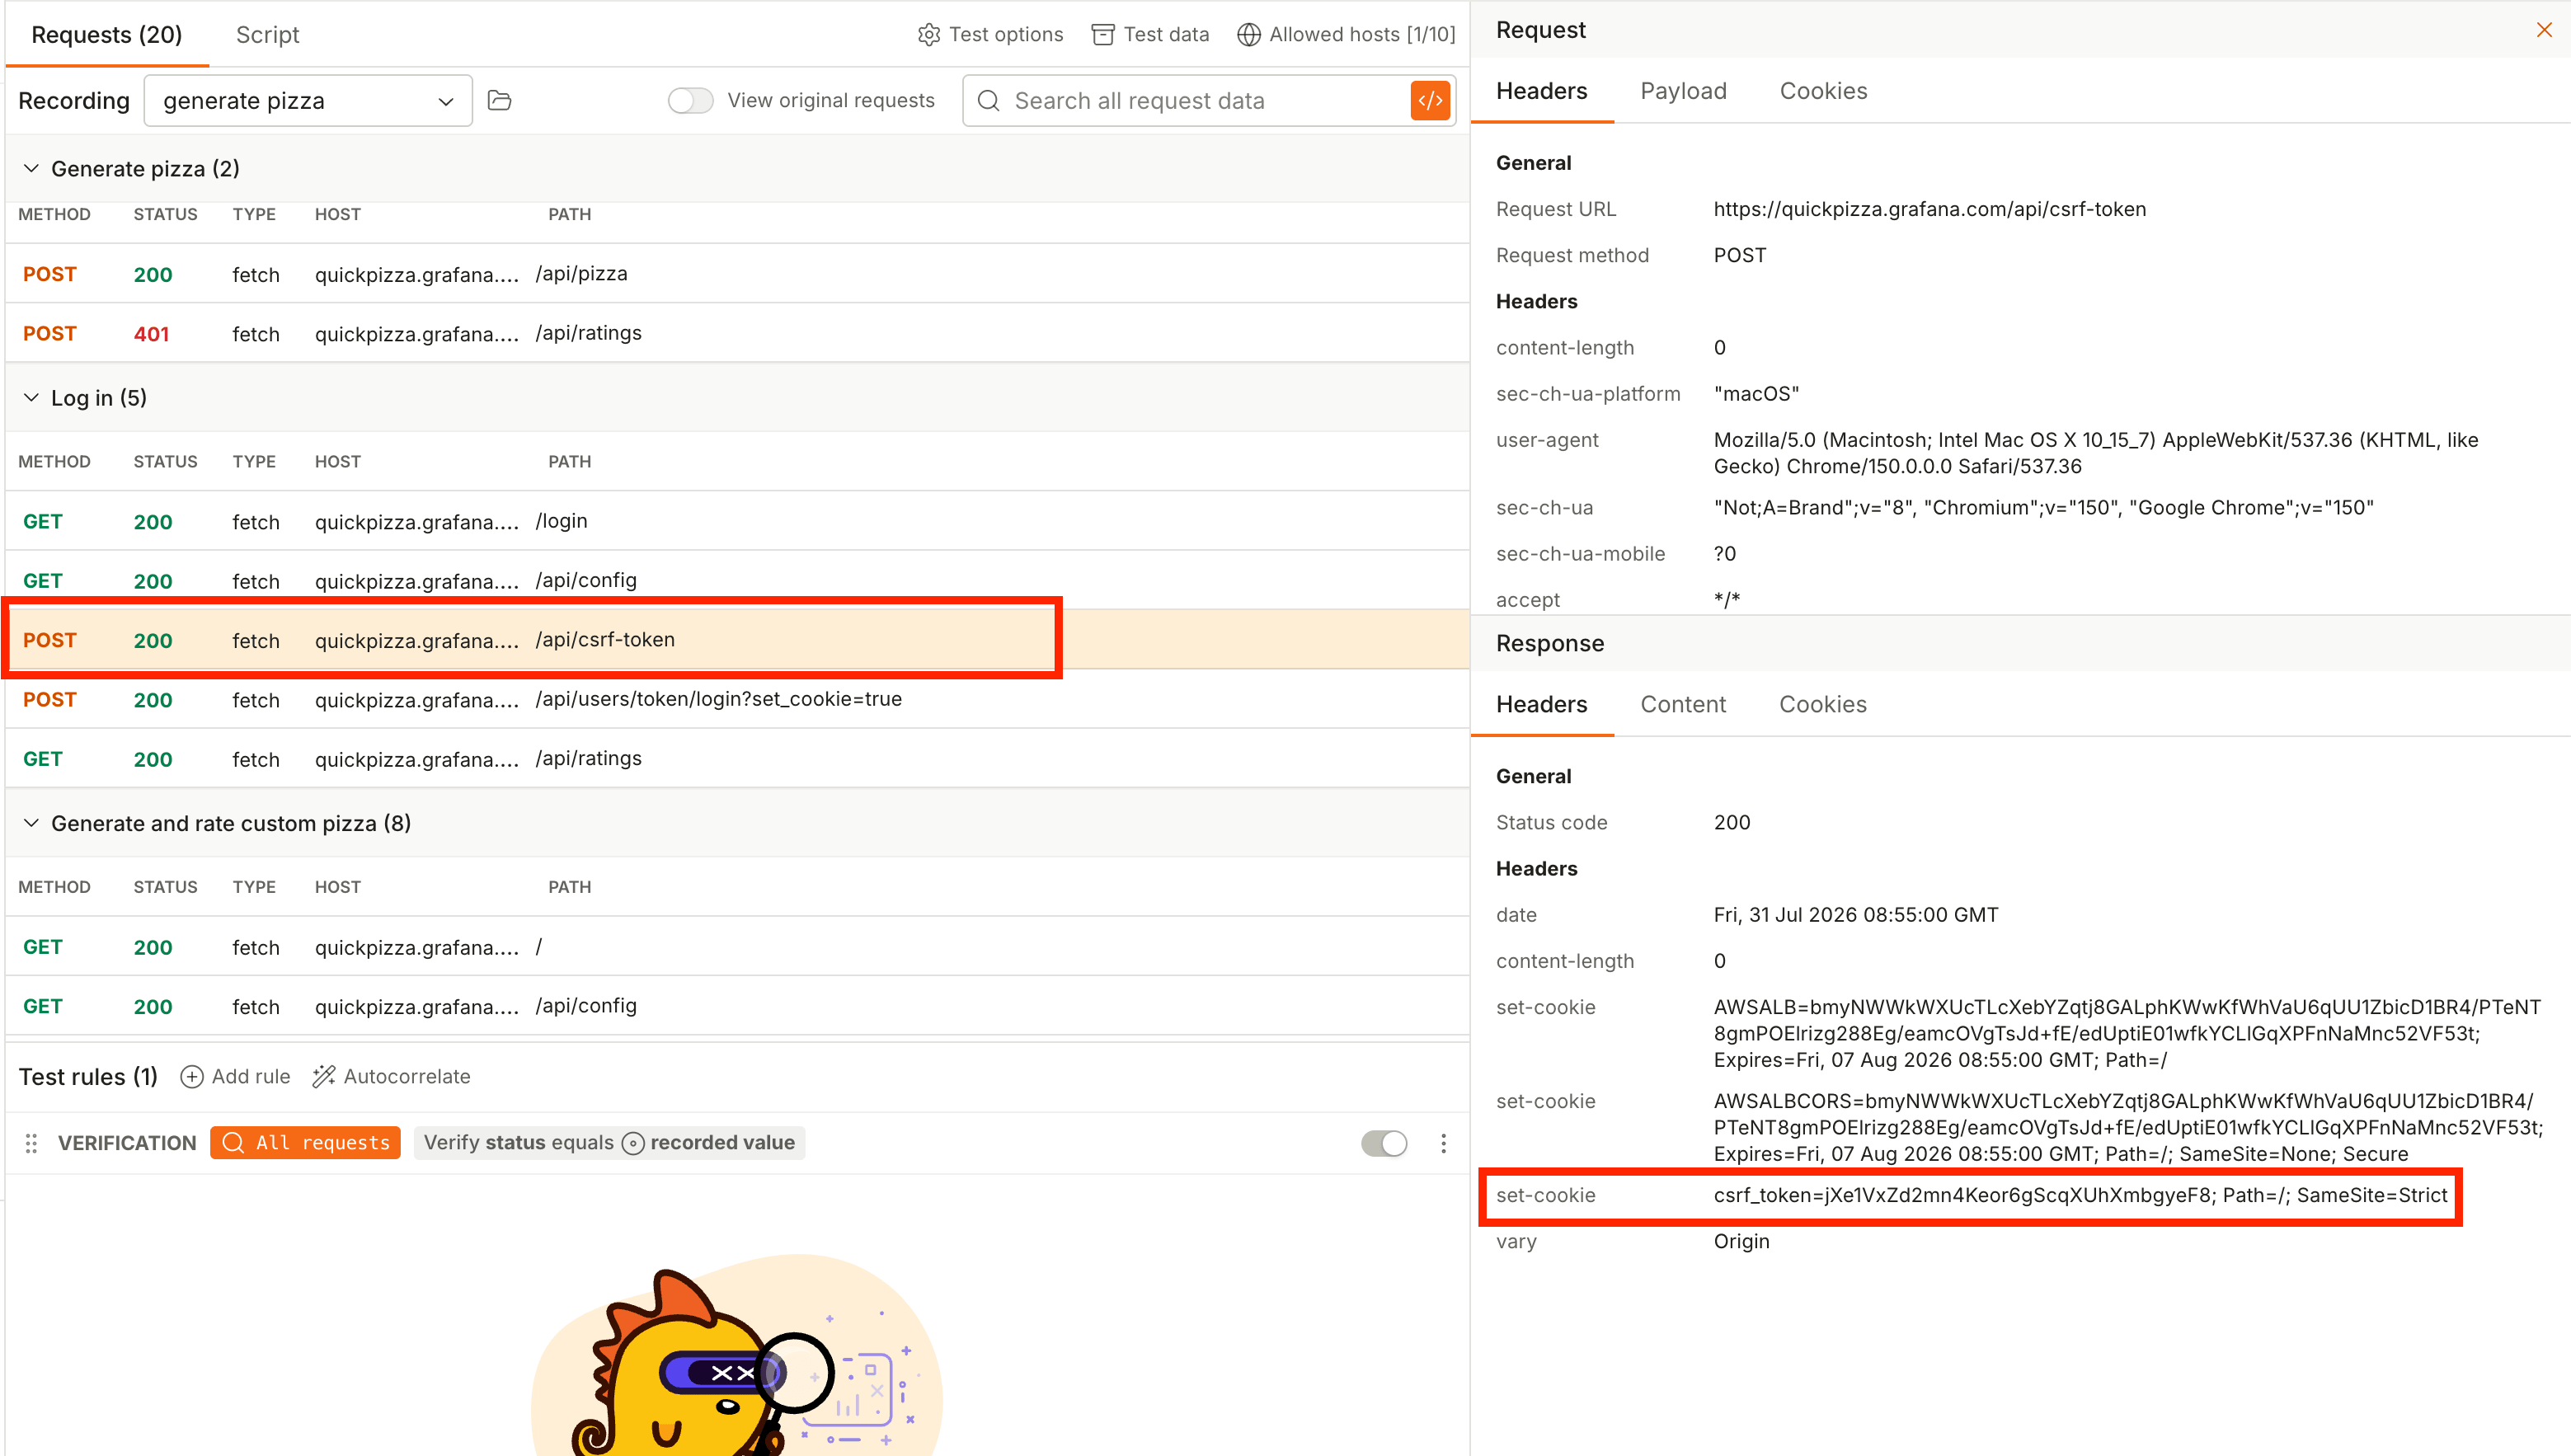
That’s an example of a dynamic value that you can’t predict when generating the script because that value is generated by the server when you reach the log in form, and the server expects it back when you submit the form.
You’ll need a way to customize the script so that it knows to get this value at runtime and replace the value from the recording from this extraction. You can do that by using the Correlation Rule.
To add a correlation rule:
- In k6 Studio, click + Add rule and select Correlation from the entries.
- Under Extractor, set the Target field to Headers.
- In the Begin field, type
csrf_token=. - In the End field, type
;.
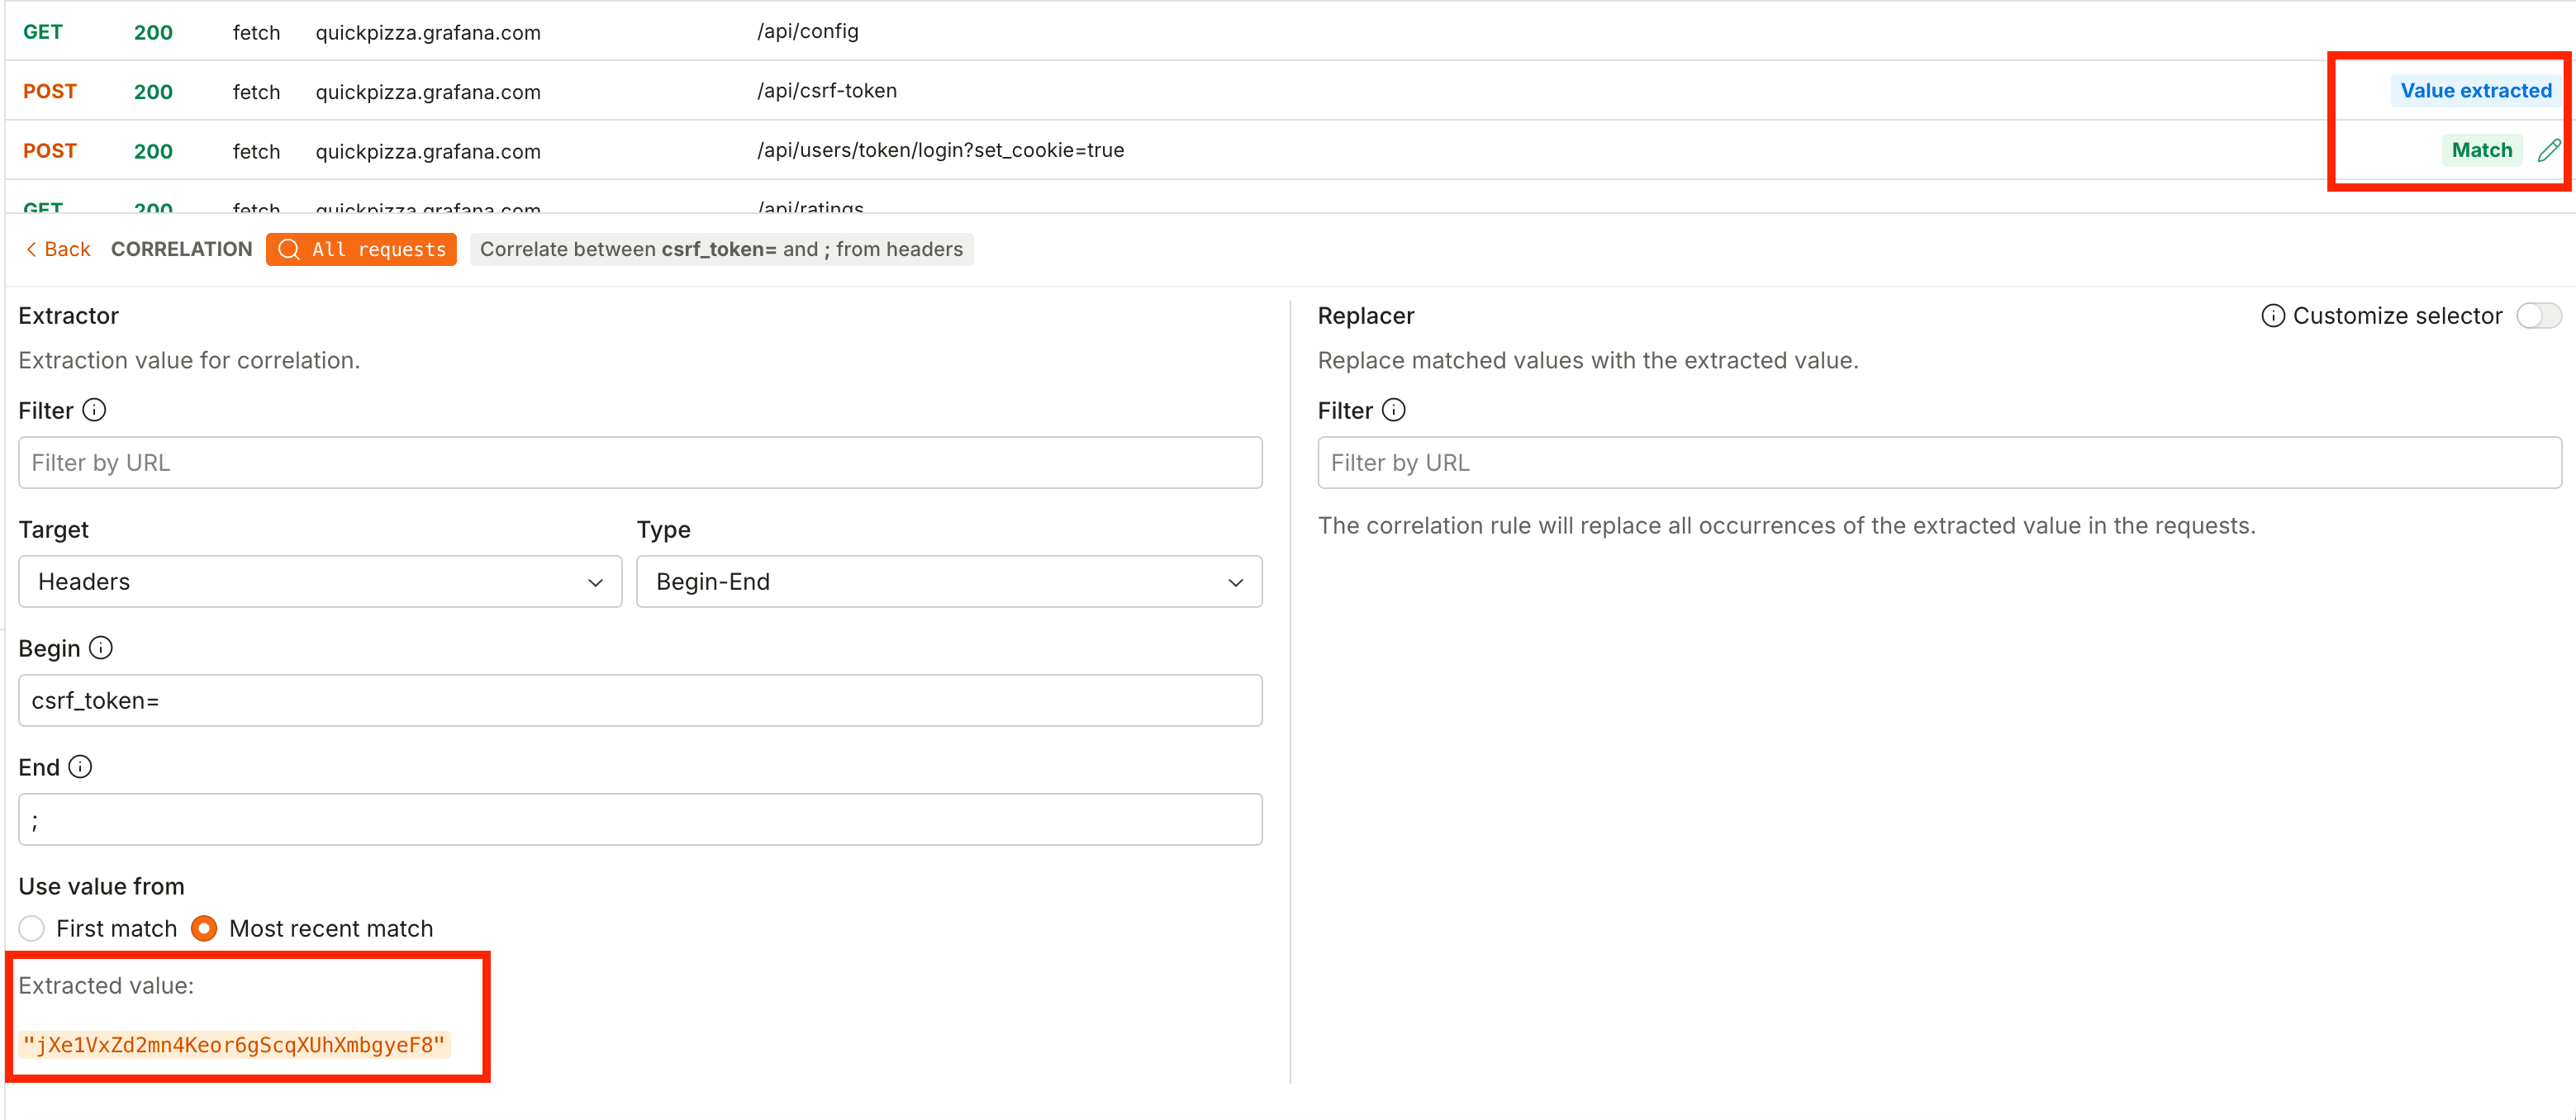
On the request list, you’ll see that a Value extracted and match label appears next to a couple of requests. These are the requests that this particular rule is either extracting or replacing a value from.
At the bottom of the rule editor, you can see the value that got extracted.
k6 Studio updates the labels in real-time as you edit your rule. It’s useful to see when you actually have a match and where you are actually replacing values. When replacing the value, by default the rule will try to find occurrences of that value and automatically replace those. If you need more control over it you can open the toggle to customize the replacer selector.
With this rule in place, you have added dynamic data correlation to your script without having to touch any code.
If you run the validation step again, you can see that one of the failing requests returns a 201 status code.
There’s still one failing request related to the generated ID for the pizza not being extracted and used in the next request. To fix that:
- In k6 Studio, click + Add rule and select Correlation from the entries.
- Under Extractor, set the Target field to Body, set the Type field to JSON.
- In the JSON property path field, type
pizza.id.
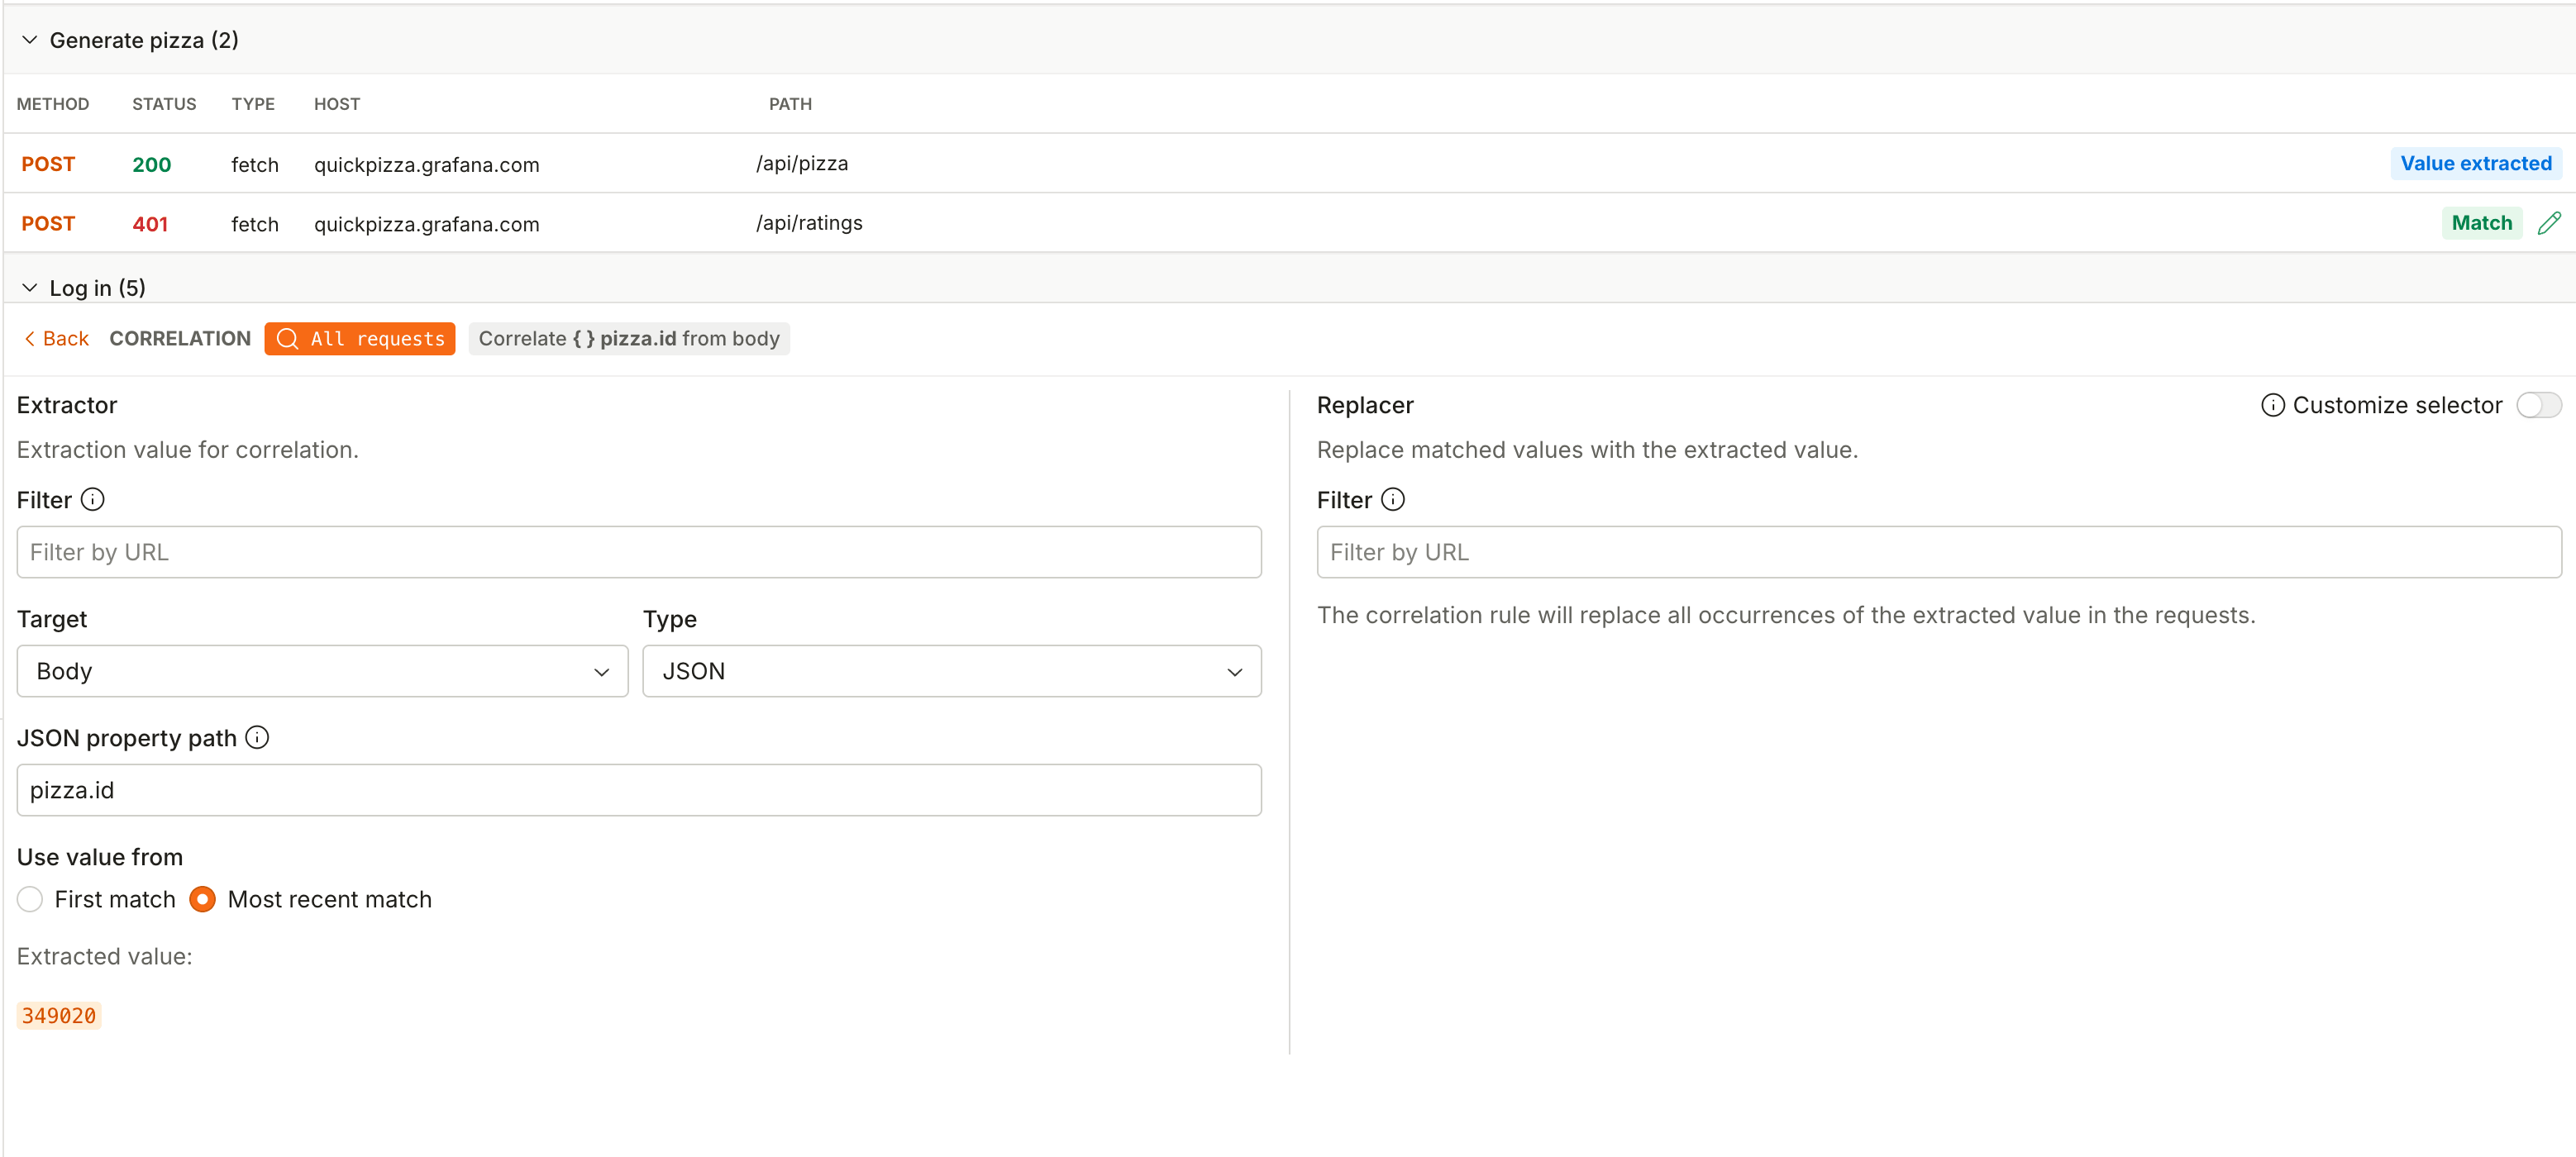
This correlates the generated pizza ID in both the Generate pizza and Generate and rate custom pizza groups.
You can validate the test script again, and all the requests should be returning the correct status code, and the k6 checks should be passing.
You can also use Autocorrelation to create correlation rules automatically using Grafana Assistant.
Parameterize a value
You can make use of the parameterization rule to modify a value from some text, and replace it with a variable or even data from a CSV or JSON file.
To add a parameterization rule:
- Under Test rules, click + Add rule and select Parameterization.
- Change the Type field to
Text. - In the Text input, insert the name you used earlier when generating the custom pizza.
- On the right-side, insert the new value you want to replace with under Value. For example
Grotpizza.
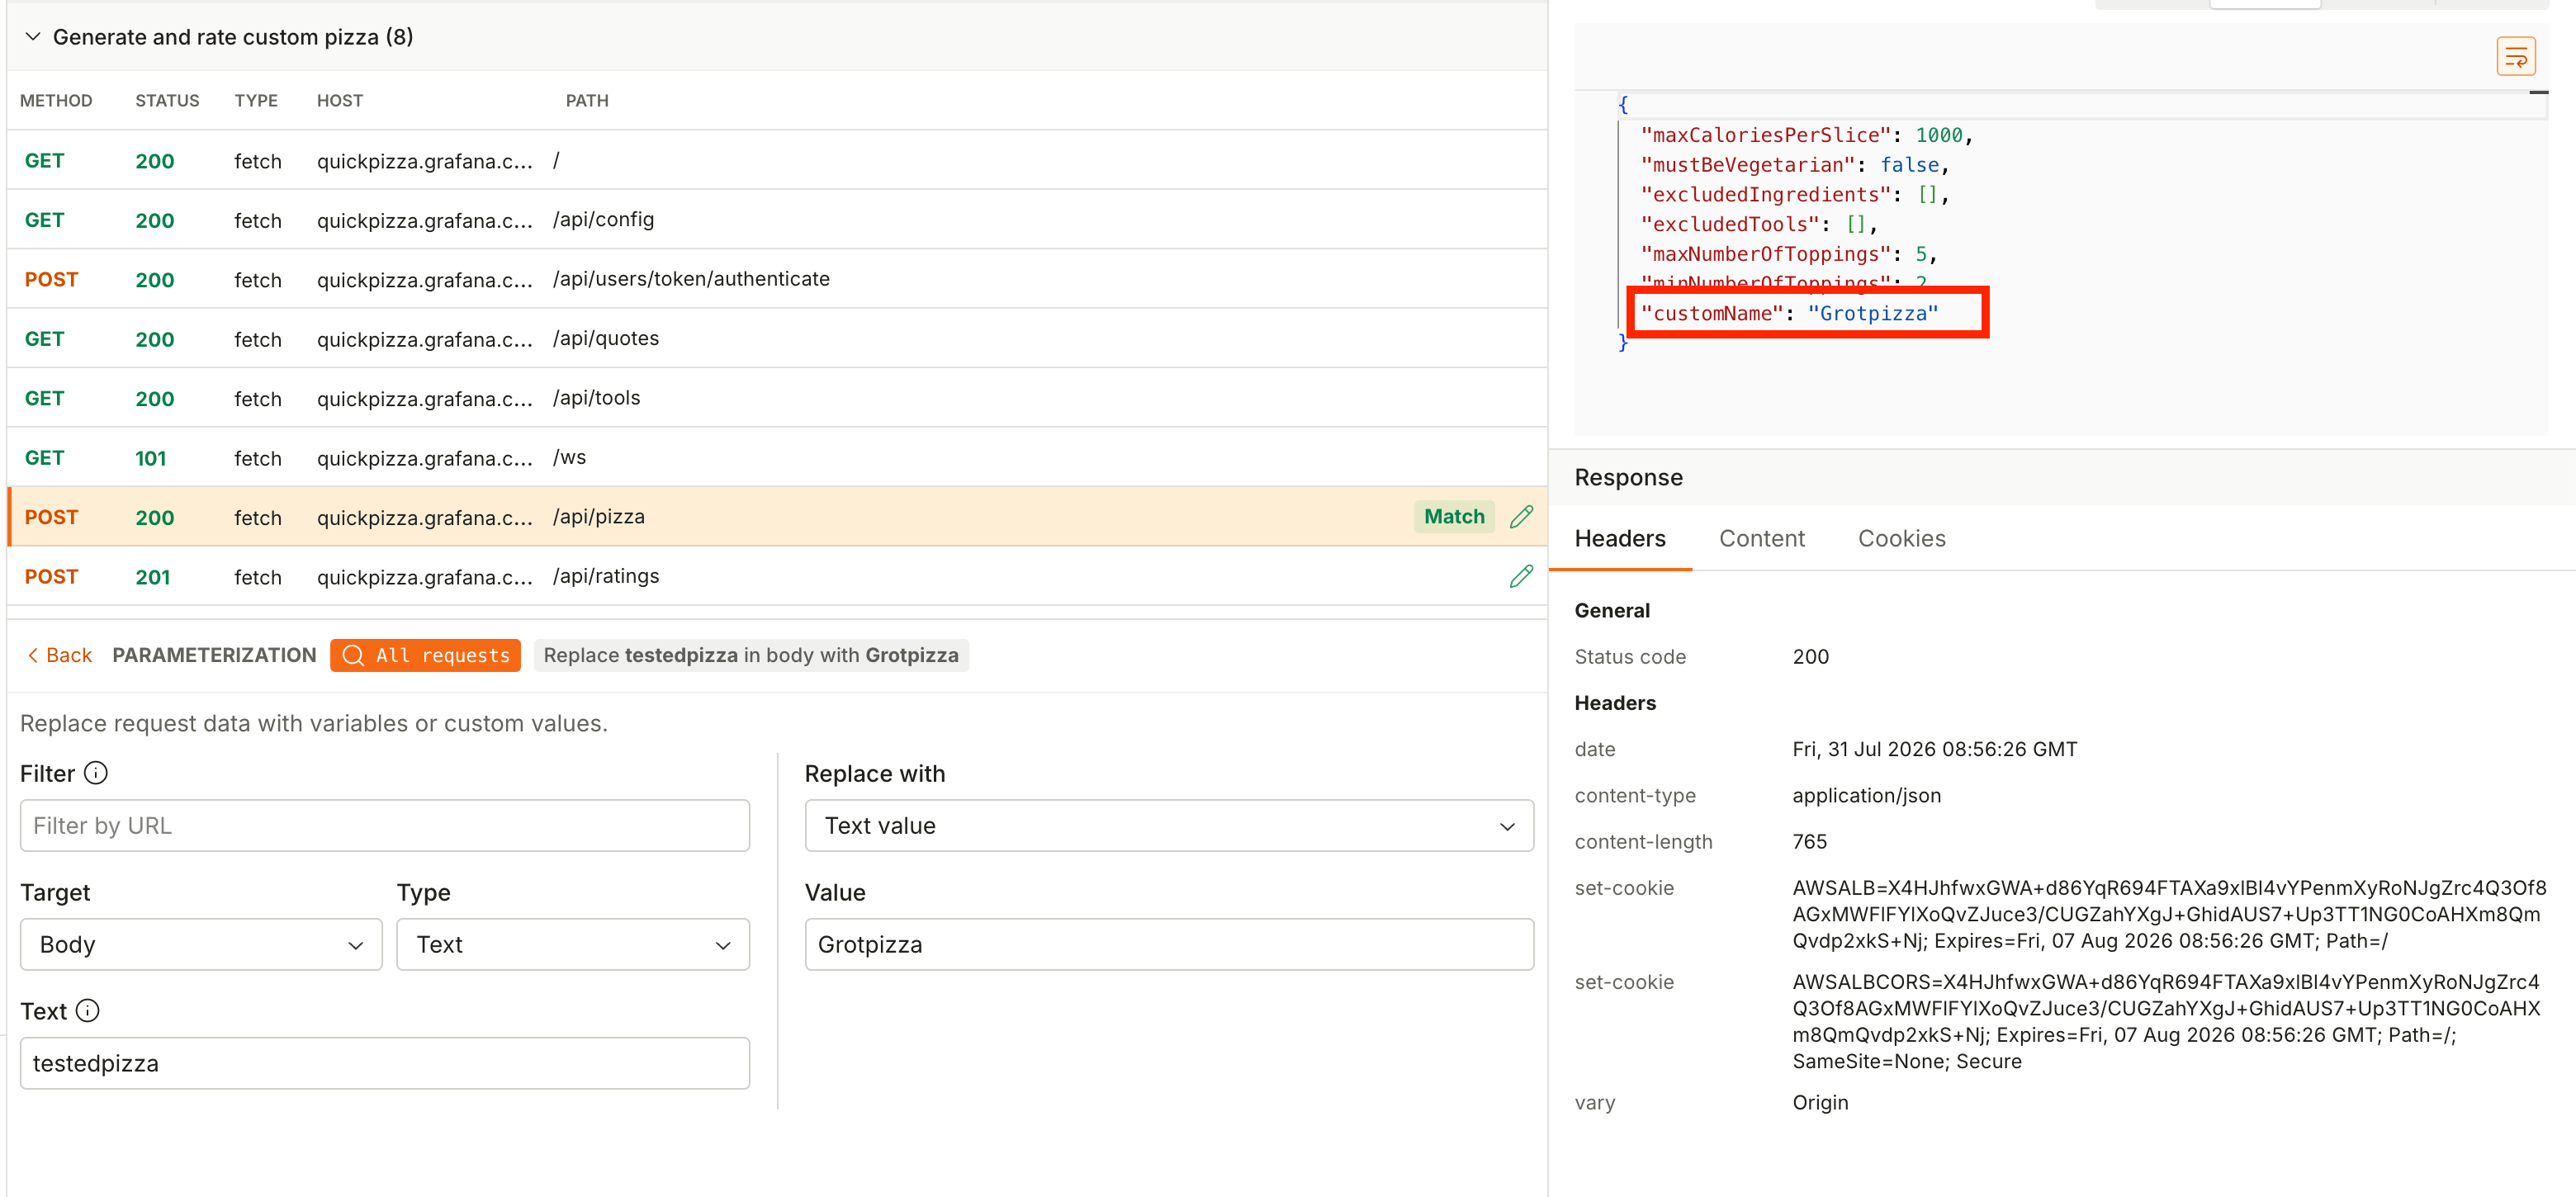
You’ll see that the POST request from the recording now has the match label next to it. If you inspect the Payload you can see that it’s now using the newly defined name.
Insert a custom JavaScript snippet
You can make use of the Custom Code rule to insert a custom JavaScript snippet in your script.
- In k6 Studio, click + Add rule and select Custom Code from the entries.
- In the Snippet input, type
console.log('hello k6').
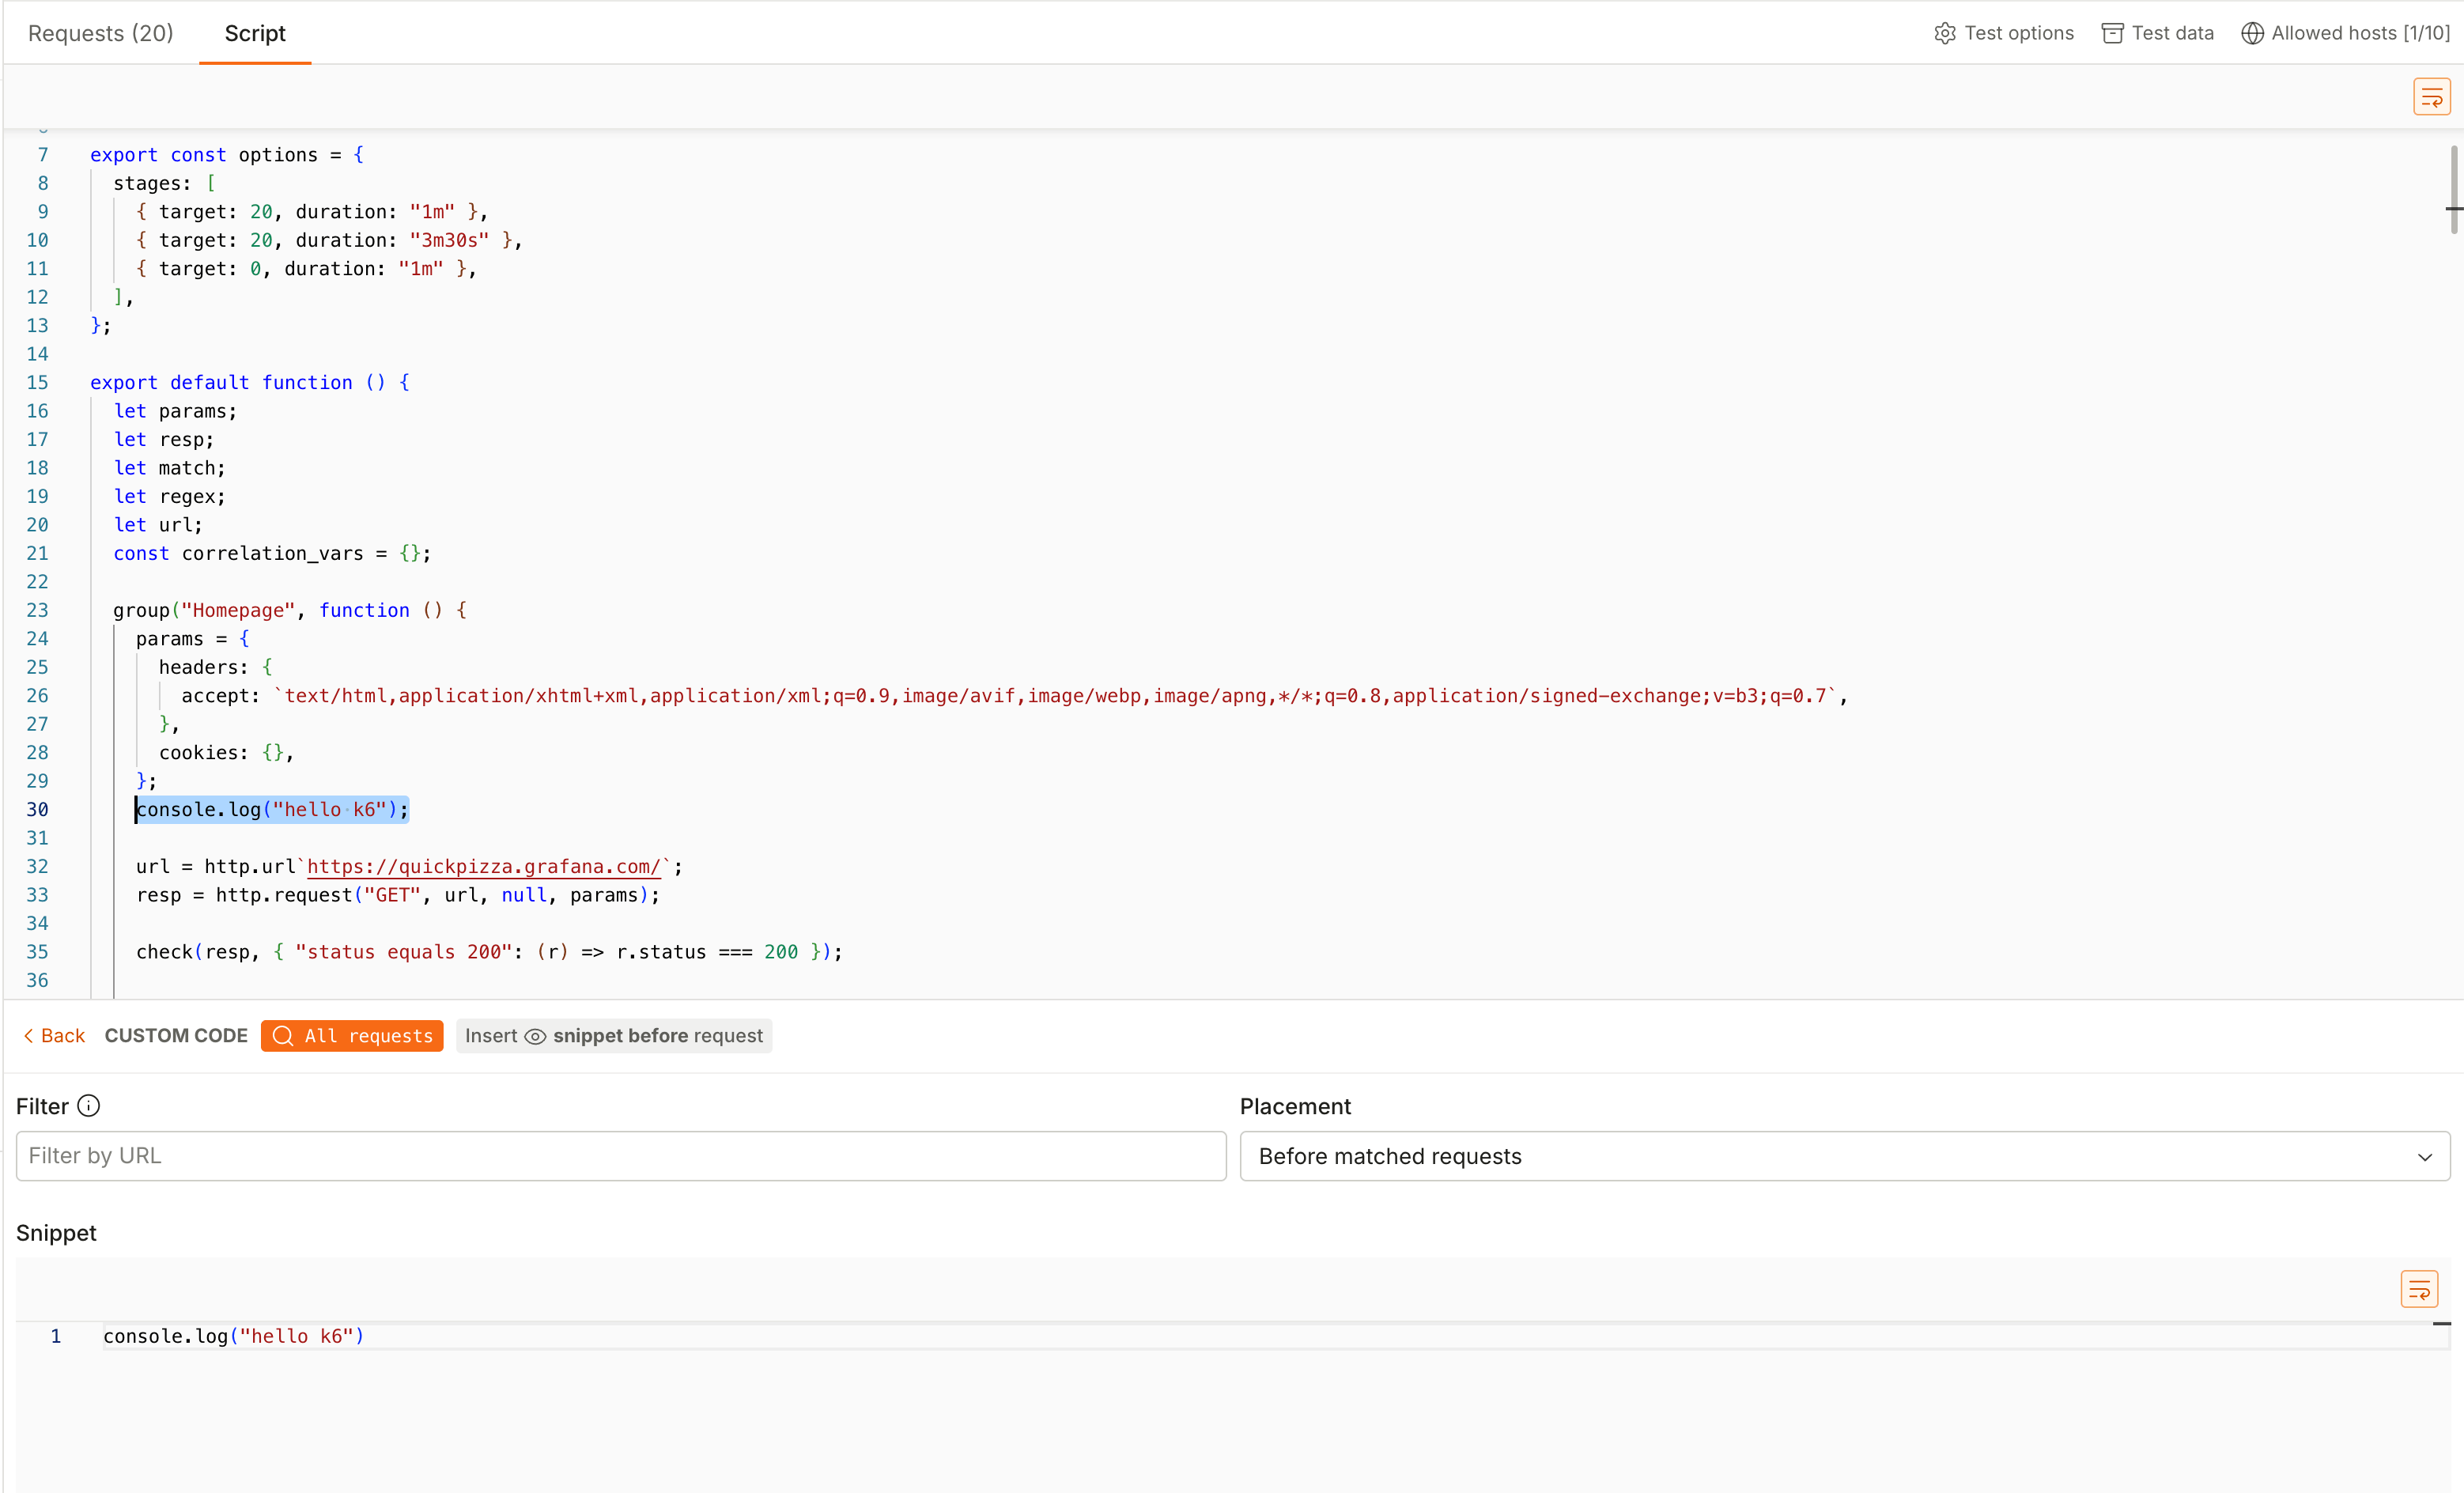
If you open the Script tab, you can see the script getting updated in real-time with the snippet being inserted before every request.
Export a test script
To export a test script:
- In k6 Studio, click on the
Scripttab next toRequests. - Click Export script on the top-right.
- In the save dialog, choose a name and location for your script.
After you save the script, it’ll show up under Scripts on the left side. You can right click on the script and click Open containing folder to find it in your system, and then use k6 to run it.
Summary
To summarize:
- You created a Generator from a test recording, and learned how to use the correlation, parameterization, and custom code rules.
- You learned how to validate a test script after setting up rules in the Generator.
- You exported a test script from your test recording and rules setup.
Now you can use the same steps to generate a test script for an application or service that you own. You can then use those scripts to run performance tests by using the k6 CLI, or Grafana Cloud k6.
Next steps
- Continue to Run in Grafana Cloud k6 to run your exported script.
- Learn how to create a browser test from the browser interactions in your recording.
- Learn how to install and run a test using the k6 CLI.
- Try Configure a test with Grafana Assistant to have Grafana Assistant propose this configuration for you instead.
Was this page helpful?
Related resources from Grafana Labs