Recorder
The Recorder is the first component of k6 Studio. With it, you can start a recording which opens a browser window, and then navigate through a website or application to record a user flow you want to test.
k6 Studio collects every request and response, as well as browser interactions. After you stop the recording, it generates a HAR file including the browser events. You can then inspect every request and response to see if your test recording accurately reflects a user flow, and then use it as the source for your test script.
The Recorder window is composed of:
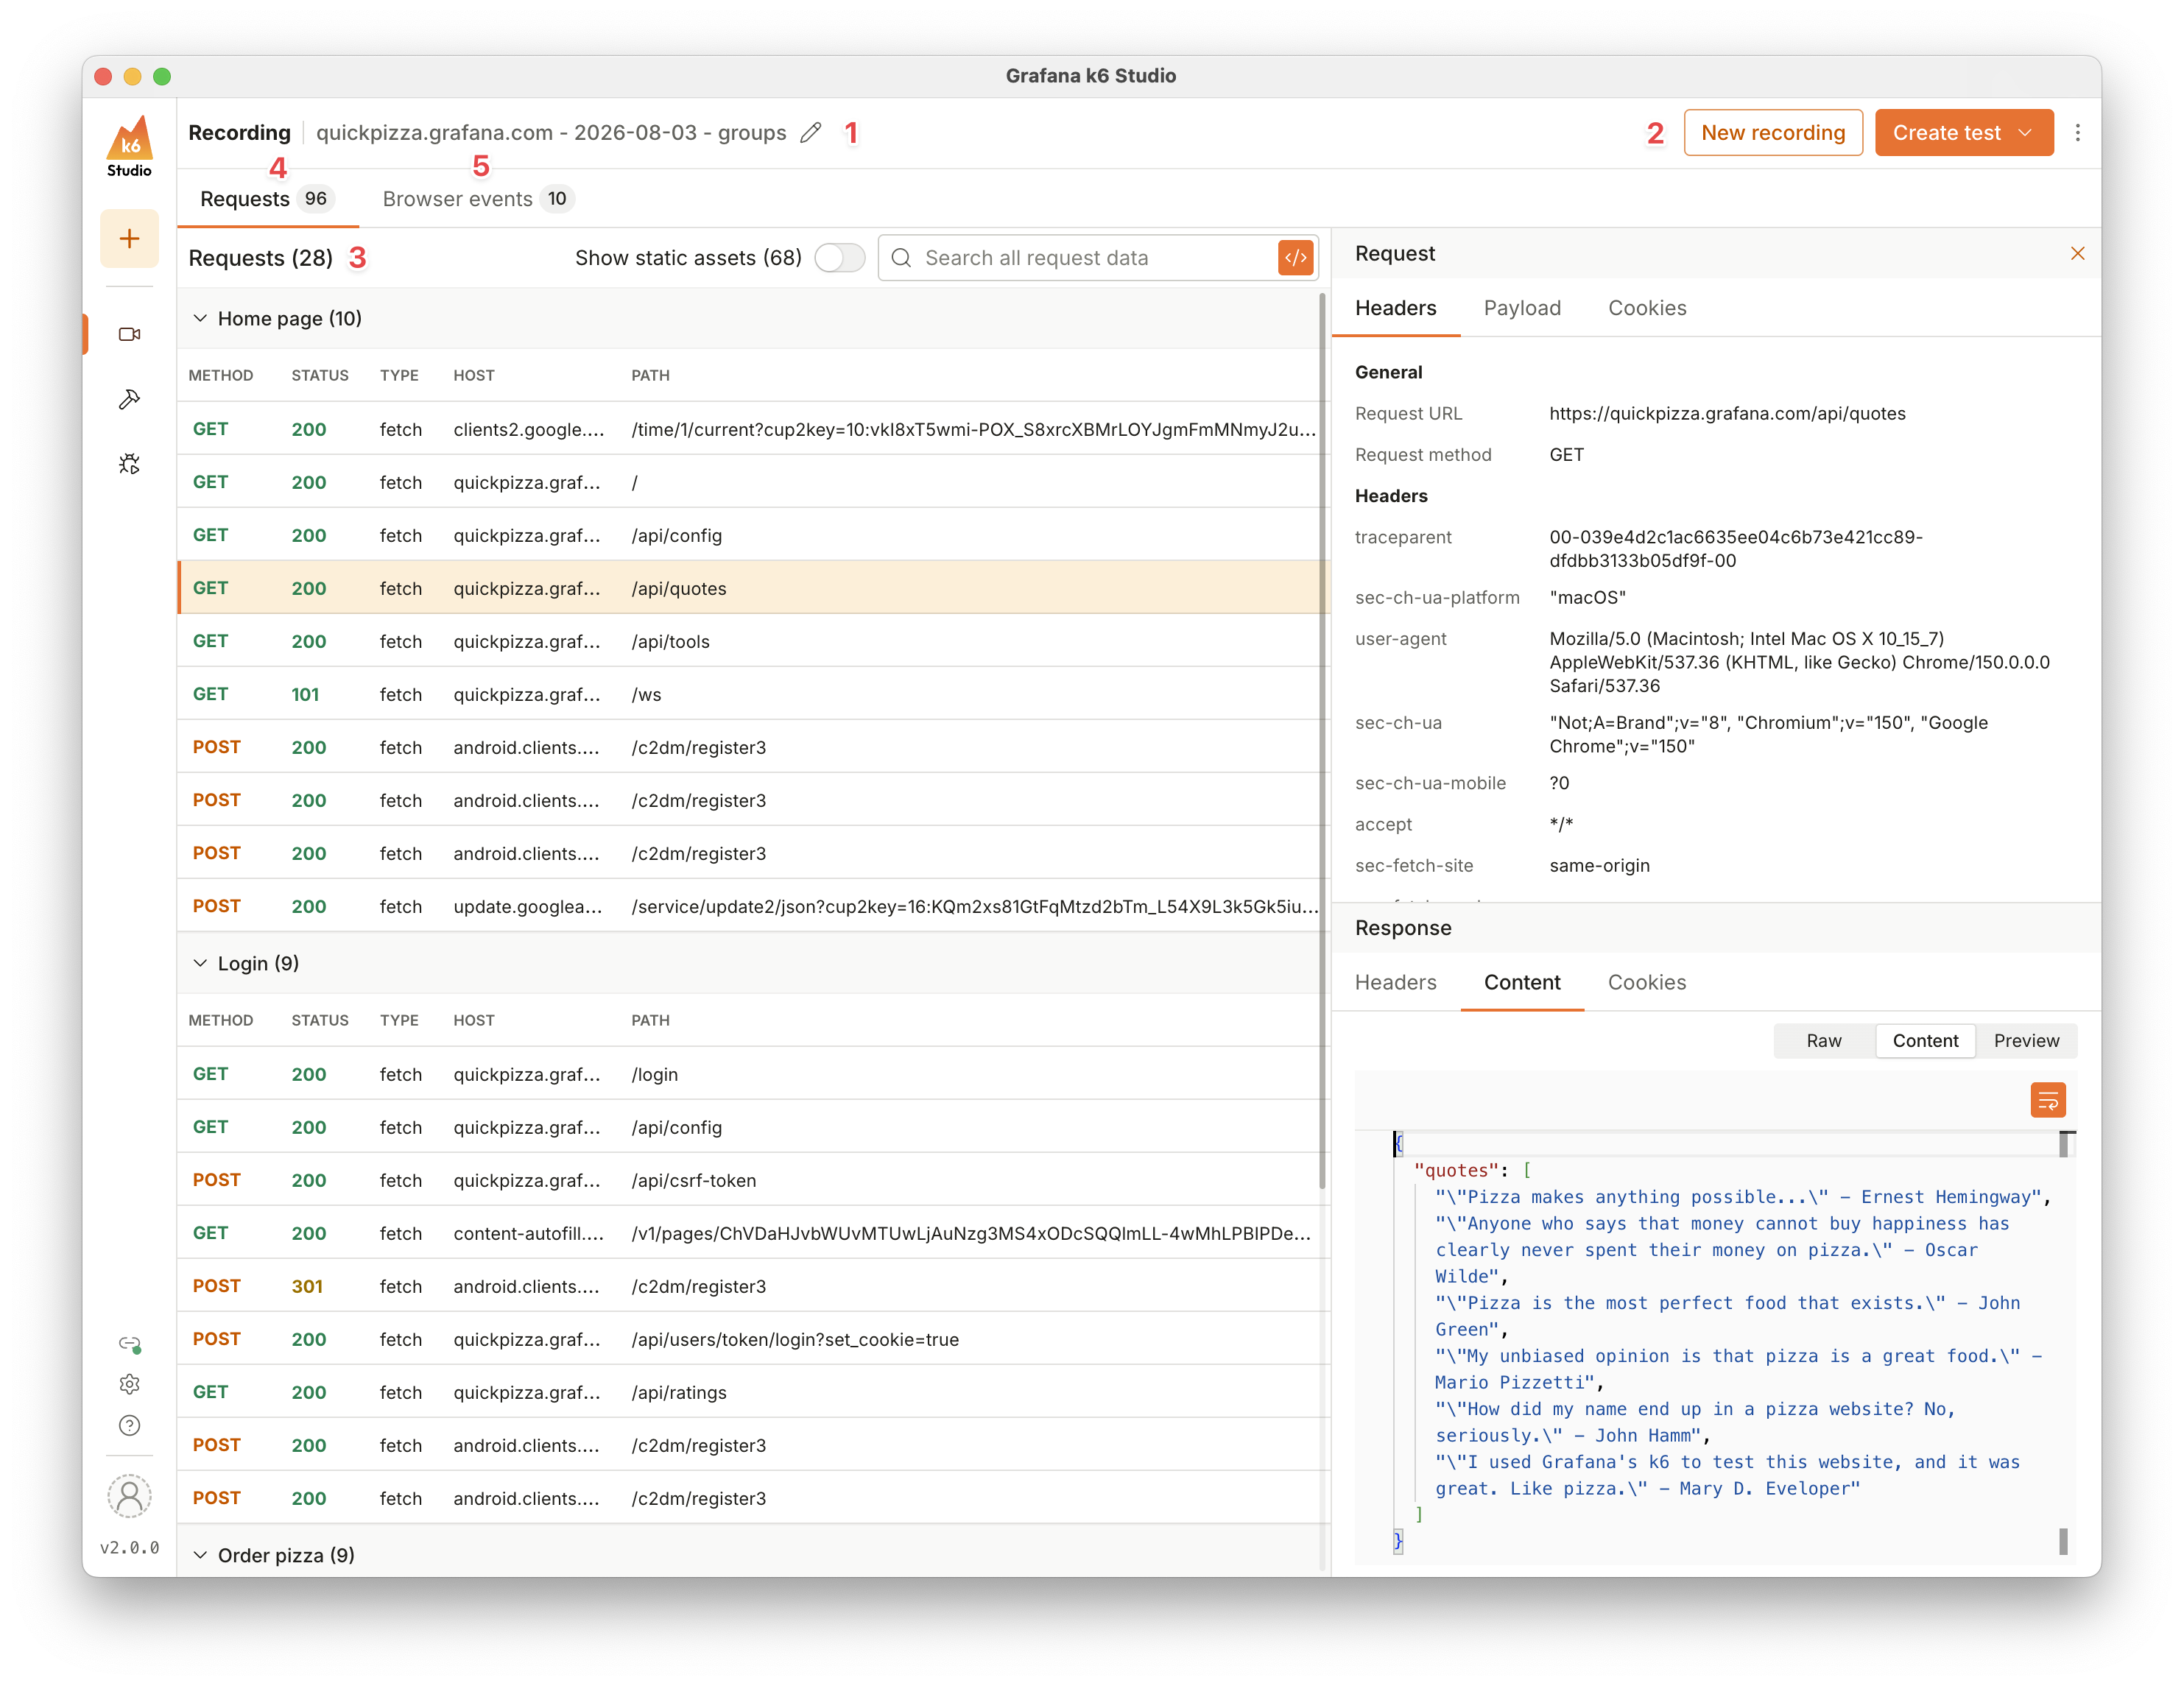
Test recording name
The name of the test recording and HAR file. This is automatically generated, but you can rename it to help keep your recordings organized.
Recorder actions
On the top-right you can see the action buttons for the Recorder. Depending on whether you’re starting a recording or inspecting a recording, you might see:
- New recording: Starts a new recording.
- Stop recording: Stops the existing recording.
- Discard: Deletes the existing recording and returns you to the empty Recorder, where you can start a new one.
- Create test: Opens a menu with two options:
- HTTP test: Creates a test generator from the selected test recording.
- Browser test: Creates a browser test script from the recorded browser events.
Recorder options
Below the test recording name, you can see:
- Requests: The total number of requests in the recording
- Show static assets: A toggle that controls whether you can see all static assets requests in the Requests list. The static assets requests are hidden by default.
- Search: A search box that lets you search across all request data, such as headers, cookies, payload, and response data. You can also use the toggle to search only by URL, method, or status code.
Requests tab
Shows the list of requests, and groups if any, in the HAR file. The requests are organized by time, and you can see the method, status code, host, and path for each one. You can also collapse and expand groups to inspect them more easily. Click on a request to open the request and response inspector on the right side, where you can view the headers, payload, cookies, and content of the request.
Browser events tab
Shows the list of browser events recorded during the session, such as clicks, navigation, form inputs, and assertions. Each event shows a short description of the interaction and the element it targeted. Hover over an event to highlight the corresponding element in the browser window, or click a URL in a navigation event to jump the browser to that page.
Note
The recorder uses a proxy to catch requests from the specific browser window, which is powered by mitmproxy.
Record browser events
When creating k6 test scripts, there are two main types of tests:
- Protocol-level tests: test your application and services by making requests to different protocols such as HTTP, WebSockets, etc.
- Browser tests: test your browser-based application by interacting with browser-level APIs. Interact with elements on the page, such as clicking buttons, navigating links, or validating text elements.
k6 Studio automatically records both protocol requests and browser events when you start a recording, unless you clear the Capture browser events checkbox on the Record your user flow page before you start.
View browser events
There are two ways to view browser events while recording:
- In the recorded browser window, click the sidepanel icon in the toolbox at the top of the page to open a drawer with the list of events recorded so far.
- In k6 Studio, click the Browser events tab. This list updates in real time while the recording is active, and stays available after you stop the recording.
Note
By default, the recorder only records clicks on interactive controls, such as buttons and links. You can change this from the drawer’s Settings section, under Click event options, to record clicks on any element instead.
Add assertions and wait conditions
Assertions let you validate that the content or state of an element on the page is what you expect, and wait conditions let you pause the test until an element appears. You can add either while recording, from the toolbox at the top of the recorded browser window:
- Click the inspect element icon, then click any element on the page. Depending on the element, the menu shows:
- Add check assertion, for checkboxes, radio buttons, and switches.
- Add value assertion, for text boxes and search boxes.
- Add visibility assertion, for any element.
- Add text assertion, for any element.
- Wait for element, to add a wait condition instead of an assertion.
- Click the select text icon, then highlight any text on the page to add a text assertion pre-filled with the text you selected. Click Add to confirm it.
After you add an assertion or wait condition, an event is added to the browser events list.
Create a browser test script
Browser events generate a separate test script from the default protocol-level test created by k6 Studio, as they test different aspects of an application.
To create a browser test script from your recording, click Create test > Browser test on the top-right. k6 Studio opens the browser test editor with an actions list generated from your browser events. Refer to Using k6 browser for more details on how to customize your browser test script.
Disable browser events
To disable browser events from being recorded, clear the Capture browser events checkbox on the Record your user flow page before you start a recording. When you disable browser events, the toolbox in the recorded browser window isn’t displayed.
Supported browser events
- Navigating to a page, either by typing a URL in the address bar, using the browser’s back and forward history, or as a side effect of another action, such as submitting a form.
- Reloading a page.
- Clicking an element.
- Typing into a text input.
- Selecting or clearing a checkbox.
- Selecting an option in a radio group.
- Selecting one or more items in a drop-down or list.
- Submitting a form.
Was this page helpful?
Related resources from Grafana Labs