
 Grafana Cloud
Observe and act
Monitor applications
Frontend Observability
Configure
Link errors to commits
Grafana Cloud
Observe and act
Monitor applications
Frontend Observability
Configure
Link errors to commitsLink frontend errors to GitHub commits
The Suspect Commits feature in Frontend Observability helps you move from a frontend error to the GitHub code and commits that may have caused it. It can show:
- The commit where the error first appeared, when your app reports its Git commit hash.
- Ranked commits that changed paths in the error stack trace.
Commit-hash correlation is the recommended setup because it provides a direct signal from the app build. Stack-trace matching adds ranked candidates and can appear below the introducing commit when hash correlation succeeds.
This guide covers web apps. Setup requires Grafana Editor or administrator permissions. Other users can view the results after an Editor or administrator completes the setup.
Note
The Faro Web SDK transmits the injected commit hash to Grafana Cloud as part of Faro telemetry and stores it with the error’s first-seen record. If you operate in a regulated industry or your repository is proprietary, review your organization’s data-handling policies before enabling this feature.
Before you begin
You need:
- A web app instrumented with the Faro Web SDK.
- A GitHub repository that contains the app code.
- Grafana Editor or administrator permissions to configure the app.
- An organization administrator who can install and configure the GitHub data source.
Source maps are not required for the introducing commit path. Upload source maps to enable stack-trace-based matching to app paths. Refer to Upload source maps with bundlers.
Configure the feature
Complete these steps in order.
Minimum versions:
@grafana/faro-web-sdkand@grafana/faro-react: 2.7.0@grafana/faro-webpack-plugin: 0.12.0@grafana/faro-rollup-plugin: 0.11.0@grafana/faro-esbuild-plugin: 0.6.0@grafana/faro-metro-plugin: 0.2.0@grafana/faro-cli: 0.10.0 for post-build injection
Configure the GitHub data source
Follow the GitHub data source configuration guide. Use read-only GitHub access where possible and make sure the credentials can read the repository that contains your app code.
Use the Save & test action in the GitHub data source settings. The connection must be working before you select it for an app.
Select the GitHub data source for your app
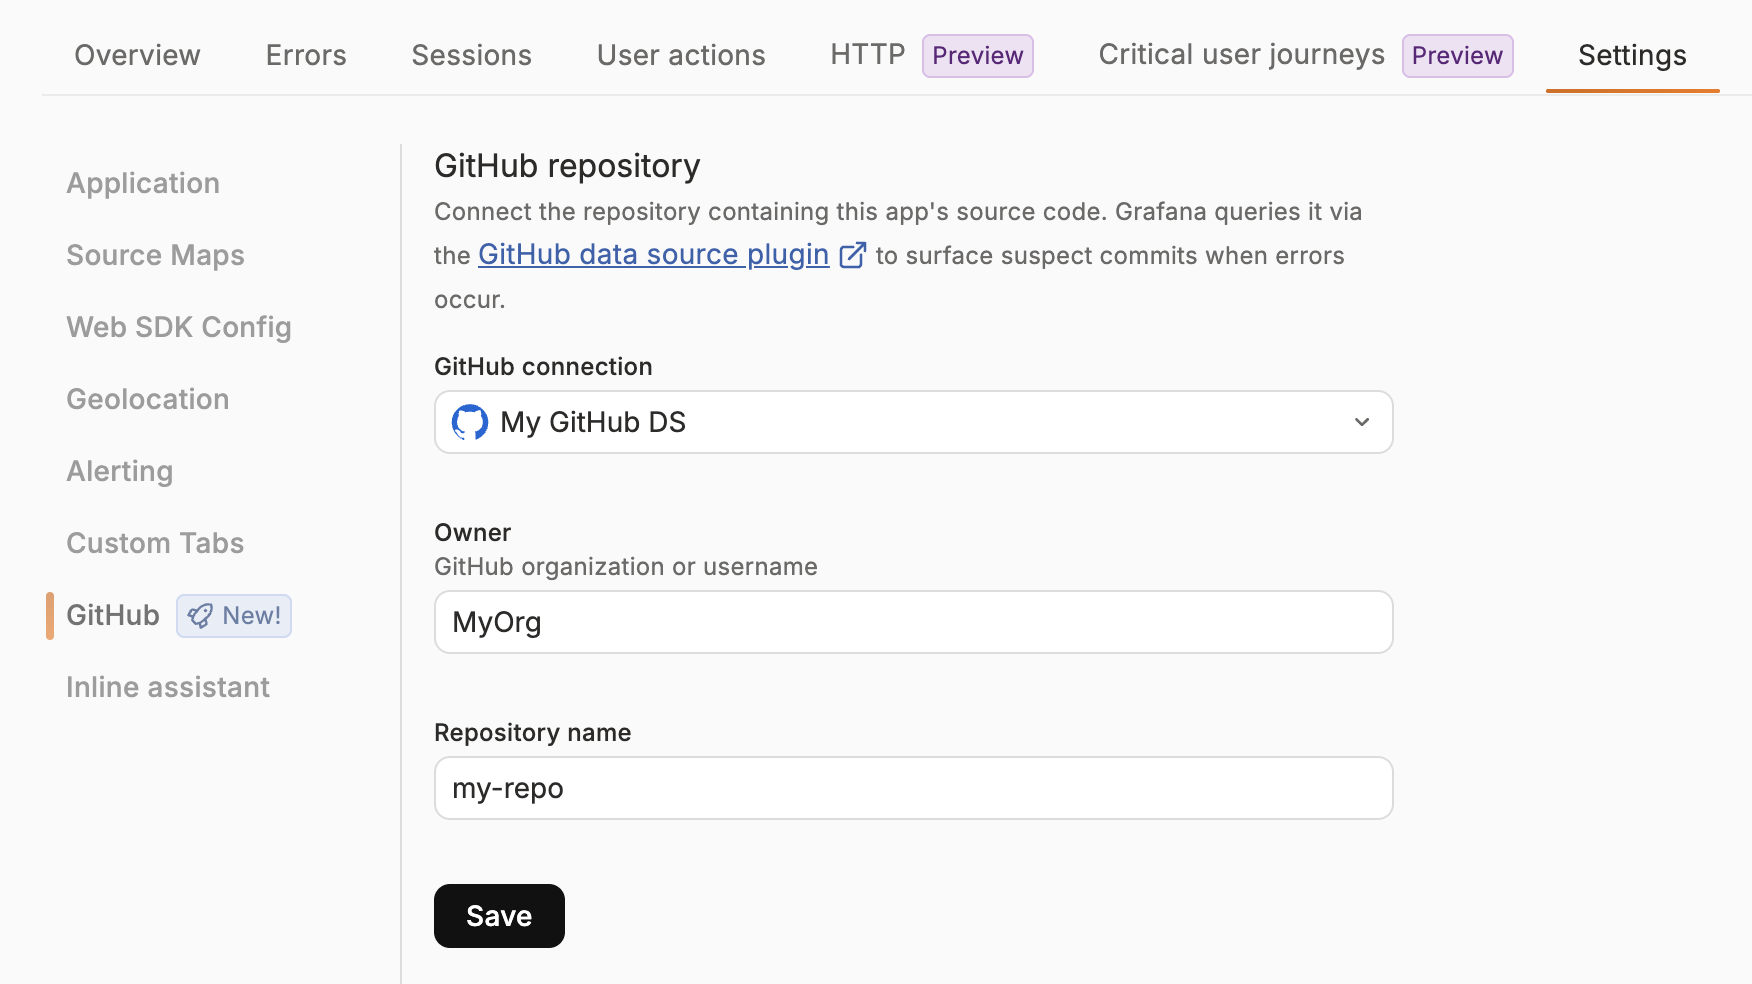
- In your Grafana stack, open Frontend Observability.
- Open the web app that you want to configure.
- Go to Settings > GitHub.
- In GitHub connection, select the GitHub data source that you configured earlier.
- Enter the GitHub organization or user name in Owner.
- Enter the repository name in Repository name.
- Select Save.
The owner and repository must match the location of the app code. If your organization uses more than one GitHub data source, select the one that can access this repository. Frontend Observability does not choose a data source automatically.
Upload source maps for stack-trace matching
Refer to Upload source maps with bundlers to configure the Webpack, Rollup/Vite, or esbuild integration for your build.
Source maps allow Frontend Observability to resolve an error stack trace to app paths. Keep the source map appName, appId, stackId, and bundle information aligned with the Faro Web SDK configuration used by the app.
After a build, verify the upload in Frontend Observability > your app > Settings > Source Maps.
Inject the Git commit hash into each build
Commit-hash correlation is the preferred setup because it records which build was running when the error first appeared. The Faro Web SDK sends the hash with telemetry, and Frontend Observability uses it to show the corresponding commit in the Suspect commits section.
The recommended option is to inject the hash with the Faro bundler plugins. The plugins can inject the hash while they upload source maps. They use this priority order:
- An explicit
gitHashvalue passed to the plugin. - The result of
git rev-parse HEADin the build environment.
Use a full 40-character, lowercase hexadecimal commit SHA. If the explicit value does not match this format, the plugin falls back to git rev-parse HEAD. If neither value resolves, no hash is injected and the build still succeeds. The build log contains [Faro] Git hash could not be resolved.
Prefer an explicit gitHash value in continuous integration or multi-stage builds when the build environment does not contain the correct Git metadata. In GitHub Actions pull request builds, pass the pull request head SHA instead of a synthetic merge SHA when that is the commit you want to associate with the deployed build:
Pass the value to the plugin through its gitHash option. Setting an environment variable without using it in the plugin configuration has no effect:
new FaroSourceMapUploaderPlugin({
  appName: '$your-app-name',
  endpoint: '$your-faro-sourcemap-api-url',
  gitHash: process.env.FARO_GIT_HASH,
});- name: build
env:
FARO_GIT_HASH: ${{ github.event.pull_request.head.sha || github.sha }}
run: yarn buildWhen gitHash is not specified, the plugin runs git rev-parse HEAD during the build. This works when the .git directory is available in the build context.
Warning
Multi-stage Docker builds commonly exclude
.gitthrough.dockerignore, which causes auto-detection to fail. SetgitHashexplicitly in that case.
Post-build injection with the Faro command-line tool
If you cannot run the bundler plugin at build time, use the Faro command-line tool to inject the hash into existing JavaScript artifacts:
npx @grafana/faro-cli inject-git-hash \
  --app-name '$your-app-name' \
  --git-hash $(git rev-parse HEAD) \
  --files 'dist/**/*.js'
Refer to the faro-JavaScript-bundler-plugins repository for the full command-line reference.
Set the commit hash in the Faro Web SDK configuration
If you do not use the Faro bundler plugins, set app.gitHash when initializing the Faro Web SDK. Because browsers do not have access to process.env, embed the commit SHA into the bundle at build time.
For local builds, make the SHA available to the build:
export GIT_HASH=$(git rev-parse HEAD)For continuous integration, use the environment variable provided by your system. For GitHub Actions pull request builds, use the pull request head SHA described earlier. Jenkins provides GIT_COMMIT, and GitLab CI provides CI_COMMIT_SHA.
Configure your bundler to inline the value:
- Create React App: Set
REACT_APP_GIT_HASHand referenceprocess.env.REACT_APP_GIT_HASH. - Next.js: Set
NEXT_PUBLIC_GIT_HASHand referenceprocess.env.NEXT_PUBLIC_GIT_HASH. - Vite: Set
VITE_GIT_HASHand referenceimport.meta.env.VITE_GIT_HASH. - Webpack: Use
DefinePluginto replaceprocess.env.GIT_HASHwith the build-time value. - Rollup: Use
@rollup/plugin-replaceto replaceprocess.env.GIT_HASHwith the build-time value. esbuild: Use thedefineoption to replaceprocess.env.GIT_HASHwith the build-time value.
For Webpack, add DefinePlugin to your build configuration:
const webpack = require('webpack');

module.exports = {
  plugins: [
    new webpack.DefinePlugin({
      'process.env.GIT_HASH': JSON.stringify(process.env.GIT_HASH),
    }),
  ],
};
For Rollup, use @rollup/plugin-replace:
import replace from '@rollup/plugin-replace';

export default {
  plugins: [
    replace({
      preventAssignment: true,
      'process.env.GIT_HASH': JSON.stringify(process.env.GIT_HASH),
    }),
  ],
};
For esbuild, use the define option:
import * as esbuild from 'esbuild';

await esbuild.build({
  define: {
    'process.env.GIT_HASH': JSON.stringify(process.env.GIT_HASH),
  },
});
Reference the value in your Faro initialization:
import { initializeFaro } from '@grafana/faro-web-sdk';

initializeFaro({
  url: '$your-faro-collector-url',
  app: {
    name: '$your-app-name',
    version: '1.0.0',
    gitHash: process.env.GIT_HASH, // or import.meta.env.VITE_GIT_HASH for Vite
  },
});
Verify the setup
For a new error, or an error that does not yet have a first-seen record:
- Open Frontend Observability and select the app.
- Open the Errors view.
- Select an error to open its summary page.
- Find the Suspect commits section.
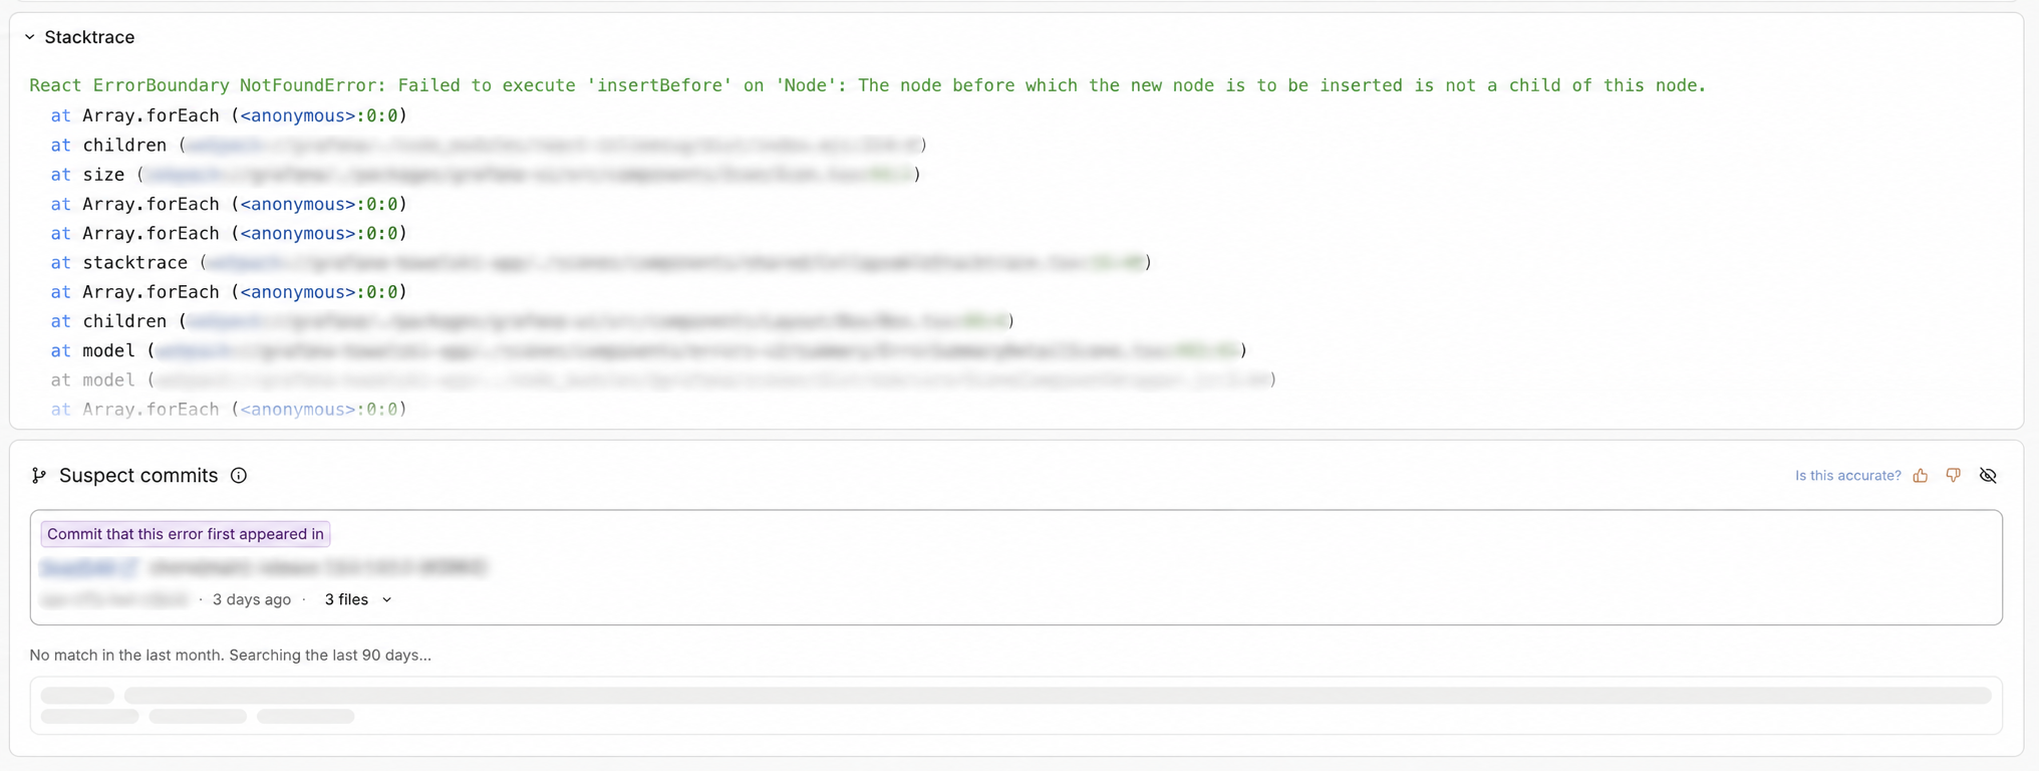
When commit-hash correlation succeeds, the section shows Commit that this error first appeared in at the top. This commit is a direct signal from the app build and is not a likelihood score.
The section can also show ranked commits based on stack-trace-based matching, including when an introducing commit is present. Expand a result to see the matched paths. The introducing commit can also show a Likely root cause badge when its changed paths match the stack trace. Select a commit SHA or path to open the corresponding location in GitHub.
You can also verify commit-hash injection before investigating an error:
- Build log: Check for
[Faro] Git hash could not be resolved. If it appears, the build did not inject a hash. - Bundle: For the bundler-plugin path, open the browser developer tools console and run
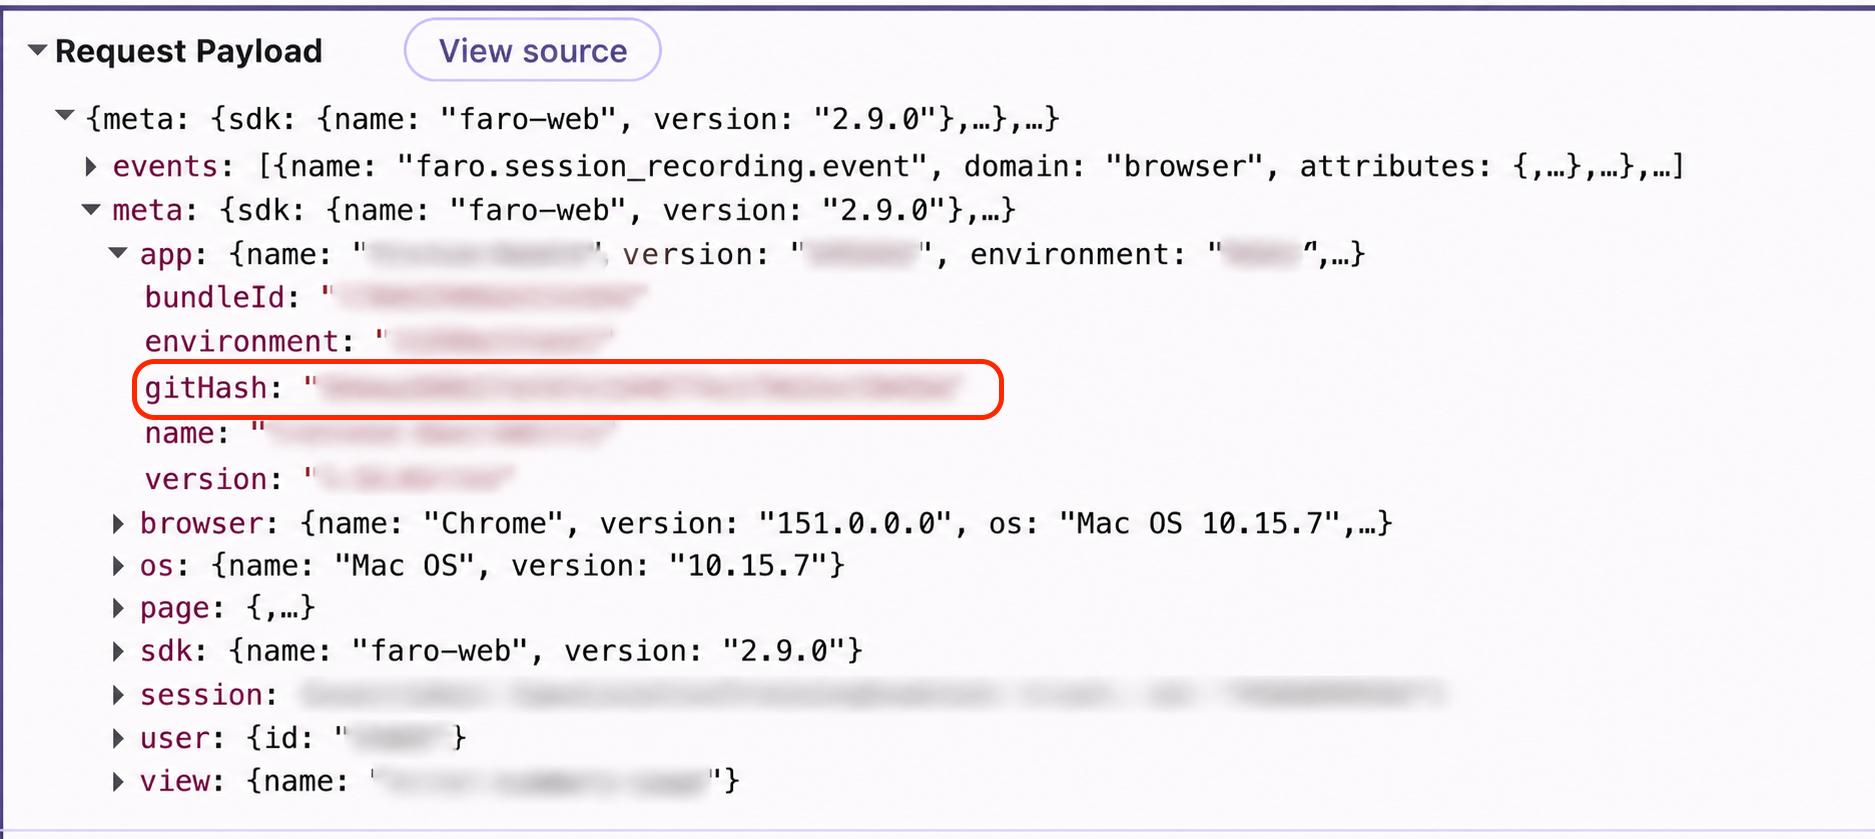
window.__faroGitHash_<your-app-name>. Expect a 40-character SHA. - Telemetry: In the browser Network tab, inspect a Faro
/collectrequest.meta.app.gitHashshould be set on the payload.
Interpret Suspect Commits results
Suspect Commits uses the error’s first-seen time rather than the time range selected elsewhere on the page. It searches up to 90 days before that time, widening the search progressively from the last week to the last month and then the last 90 days. The time label tells you how much history was searched.
The section can show two types of results:
- Introducing commit: A direct lookup of the SHA reported by the app build when the error was first observed.
- Ranked candidates: Commits that changed paths in the error stack trace. These are candidates for investigation, not proof of causation, and can appear below the introducing commit.
If an error was first recorded before commit-hash injection was enabled, later occurrences do not backfill the missing hash on that existing first-seen record. Verify the setup with an error whose first-seen record was created after hash injection was enabled.
Troubleshoot missing results
Next steps
Was this page helpful?
Related resources from Grafana Labs



