Synthetic Monitoring alerting
Synthetic Monitoring integrates with Grafana Alerting to trigger alerts based on the results of a check run.
Check results are stored as metrics in your cloud Prometheus instance. You can then query the check metrics and create custom alerts.
Additionally, Synthetic Monitoring includes default alert rules:
- HighSensitivity: Fires an alert if 5% of a check’s probes fail for 5 minutes.
- MedSensitivity: Fires an alert if 10% of a check’s probes fail for 5 minutes.
- LowSensitivity: Fires an alert if 25% of a check’s probes fail for 5 minutes.
To start using alerts, you need to:
- Create the default sensitivity alert rules.
- Enable a check to trigger an alert.
After you complete those steps, you can configure Alerting notifications to customize how, when, and where alert notifications are sent.
Create the default alert rules
To create the default sensitivity alert rules:
- Navigate to Testing & synthetics > Synthetics > Alerts.
- If you have not already set up default rules, click the Populate default alerts button.
- The
HighSensitivity,MedSensitivity, andLowSensitivitydefault rules are automatically generated. These rules query the probe success percentage and check options to decide whether to fire alerts.
You only have to do this once for your Grafana stack.

Enable a check to trigger default alerts
To configure a check to trigger an alert:
Navigate to Testing & synthetics > Synthetics > Checks.
Click New Check to create a new check or edit a preexisting check in the list.
Click the Alerting section to show the alerting fields.
Select a sensitivity level to associate with the check and click Save.
This sensitivity value is published to the
alert_sensitivitylabel on thesm_check_infometric each time the check runs on a probe. The default alerts use that label value to determine which checks to fire alerts for.
Checks that have enabled a sensitivity level trigger their corresponding alerts when the success percentage drops below their thresholds.
Configuring the alert sensitivity option allows you to set the sensitivity metric label value, which is used to determine whether to trigger sensitivity alerts.
How default alert rules work
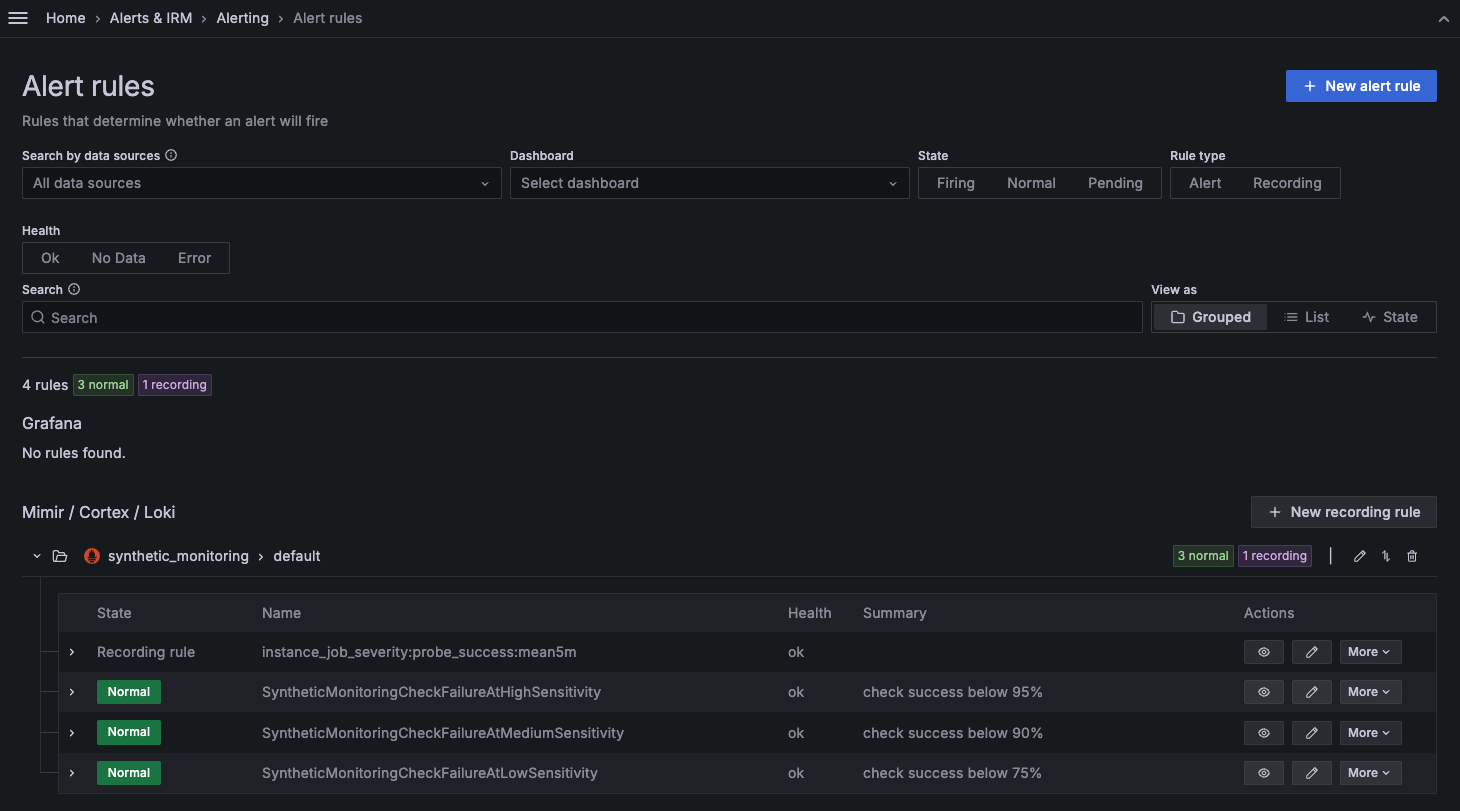
The default alert rules are built with one recording rule and three alert rules, one for each sensitivity level: high, medium, and low.
The recording rule (instance_job_severity:probe_success:mean5m) queries the Prometheus check metrics, evaluating the success rate of the check and the alert_sensitivity label. If alert_sensitivity is defined, the recording rule saves the results as new precomputed metrics:
instance_job_severity:probe_success:mean5m{alert_sensitivity="high"}instance_job_severity:probe_success:mean5m{alert_sensitivity="medium"}instance_job_severity:probe_success:mean5m{alert_sensitivity="low"}
Then, each default alert rule queries its corresponding metric and evaluates it against its threshold to decide whether to fire the alert or not.
For example, if a check has the alert_sensitivity=high, its success rate is evaluated and compared to its threshold (which defaults to 95%). If the success rate drops below the threshold, the alert rule enters a pending state. When the success rate remains below the threshold for the duration of the pending state (defaults to 5m), the rule starts firing. For further details, refer to Alert Rule Evaluation.
You can edit the threshold values and the duration of the pending state, but you can’t edit the predefined alert_sensitivity values.
Create custom alert rules
You can also create PromQL queries for check metrics to create custom Grafana alerts.
Example query: check if latency exceeds 1 second.
sum by (instance, job) (rate(probe_all_duration_seconds_sum{}[10m]))
/
sum by (instance, job) (rate(probe_all_duration_seconds_count{}[10m])) > 1
Example query: check if the probe error rate is higher than 10%.
1 - (
sum by (instance, job) (rate(probe_all_success_sum{}[10m]))
/
sum by (instance, job) (rate(probe_all_success_count{}[10m]))
) > 0.1
For more examples, refer to the most popular synthetic monitoring alerts and find the distinct metrics for the various check types.
To explore the different options and settings for creating alerts, refer to Configure Alert Rules.
Access alert rules from Alerting
Synthetic monitoring alert rules can also be found in Grafana Cloud Alerting within the synthetic_monitoring namespace. Default rules are created inside the default rule group.

You can then use alert labels to configure the alert notifications in Grafana Alerting.
Default alert rules set the namespace and alert_sensitivity labels. For reference, the default configuration of the low sensitivity alert rule is as follows:
alert: SyntheticMonitoringCheckFailureAtLowSensitivity
expr: instance_job_severity:probe_success:mean5m{alert_sensitivity="low"} < 75
for: 5m
labels:
  . namespace: synthetic_monitoring
annotations:
  description: check job {{ $labels.job }} instance {{ $labels.instance }} has a success rate of {{ printf "%.1f" $value }}%.
  summary: check success below 75%
Note
Alerts can be edited in Synthetic Monitoring on the alerts page or in the Cloud Alerting UI.
It’s possible that substantially editing an alert rule in the Cloud Alerting UI causes it to no longer be editable in the Synthetic Monitoring UI. In that case, the alert rule can only be edited in Cloud Alerting.
For example, if you edit the value
0.9to0.75, this change propagates back to the Synthetic Monitoring alerts tab, and the alert then fires according to your edit. However, if you edit the value0.9tosteve, the alert becomes invalid and no longer editable in the Synthetic Monitoring alerts tab UI.
Avoid alert-flapping
When enabling alerting for a check, it’s recommended to run that check from multiple locations, preferably three or more. That way, if there’s a problem with a single probe or the network connectivity from that single location, you won’t be needlessly alerted, as the other locations running the same check will continue to report their results alongside the problematic location.
Next steps
After you have configured your alert rules and enabled your check to trigger alerts, you can set up Alerting notifications to know when a probe fails. Refer to Alerting Notifications for more details.
You can also refer to the following blog posts for alerting best practices:
Was this page helpful?
Related resources from Grafana Labs


