
Manage Fleet Management in Grafana Cloud using Terraform
Learn how to create Grafana Fleet Management collectors and pipelines in Grafana Cloud using Terraform. This guide shows you how to create an access policy and a token for Fleet Management and Grafana Alloy, a collector with remote attributes, and a pipeline for profiling Alloy.
Before you begin
Before you begin, you should have the following available:
- A Grafana Cloud account, as shown in Get started
- Terraform installed on your machine
- Alloy installed on your machine
- Administrator permissions in your Grafana instance
Note
All of the following Terraform configuration files should be saved in the same directory.
Configure a provider for Grafana Cloud
This Terraform configuration configures the Grafana provider to provide necessary authentication when interacting with the Cloud API.
The grafana_cloud_stack (Data Source) is used to retrieve the user ID and URL details of your instance.
Create a Grafana Cloud access policy and token. To create a new one, refer to Grafana Cloud Access Policies. Add your stack to the realms list. The scopes needed for the examples in this guide are:
accesspolicies:readaccesspolicies:writeaccesspolicies:deletestacks:read
Create a file named
cloud-provider.tfand add the following code block:terraform { required_providers { grafana = { source = "grafana/grafana" version = ">= 3.19.0" } } } provider "grafana" { alias = "cloud" cloud_access_policy_token = "<CLOUD_ACCESS_POLICY_TOKEN>" } data "grafana_cloud_stack" "stack" { provider = grafana.cloud slug = "<STACK_SLUG>" }Replace the following field values:
<CLOUD_ACCESS_POLICY_TOKEN>with the access policy token you created in the first step<STACK_SLUG>with your stack slug, which is the subdomain where your Grafana Cloud instance is available:https://<STACK_SLUG>.grafana.net
Create an access policy and token for Fleet Management
This Terraform configuration creates the following:
- An access policy named
fleet-management-policywithfleet-management:readandfleet-management:writescopes, usinggrafana_cloud_access_policy(Resource) - A token named
fleet-management-token, usinggrafana_cloud_access_policy_token(Resource)
Create a file named
fm-access-policy.tfand add the following code block:resource "grafana_cloud_access_policy" "fm_policy" { provider = grafana.cloud name = "fleet-management-policy" region = data.grafana_cloud_stack.stack.region_slug scopes = [ "fleet-management:read", "fleet-management:write" ] realm { type = "stack" identifier = data.grafana_cloud_stack.stack.id } } resource "grafana_cloud_access_policy_token" "fm_token" { provider = grafana.cloud name = "fleet-management-token" region = grafana_cloud_access_policy.fm_policy.region access_policy_id = grafana_cloud_access_policy.fm_policy.policy_id }
Configure a provider for Fleet Management
This Terraform configuration configures the Grafana provider to provide necessary authentication when interacting with the Fleet Management API.
Create a file named
fm-provider.tfand add the following code block:locals { fm_id = data.grafana_cloud_stack.stack.fleet_management_user_id fm_token = grafana_cloud_access_policy_token.fm_token.token fm_url = data.grafana_cloud_stack.stack.fleet_management_url } provider "grafana" { alias = "fm" fleet_management_auth = "${local.fm_id}:${local.fm_token}" fleet_management_url = local.fm_url }
Create a Fleet Management collector
This Terraform configuration creates a collector with a remote attribute, using grafana_fleet_management_collector (Resource).
This configuration only preregisters the collector. You must complete the Run Alloy step for the collector to register with Fleet Management and be assigned remote attributes.
Create a file named
fm-collector.tfand add the following code block:resource "grafana_fleet_management_collector" "fm_collector" { provider = grafana.fm id = "prod_collector" remote_attributes = { "env" = "PROD" } enabled = true }
Create a Fleet Management pipeline
This Terraform configuration creates a pipeline for Alloy profiling with a matcher for the collector declared in the previous step, using grafana_fleet_management_pipeline (Resource).
The pipeline writes the profiles to Grafana Cloud Profiles.
Create a file named
profiling.alloy.tftpland add the following content:Create a file named
fm-pipeline.tfand add the following code block:locals { profiles_id = data.grafana_cloud_stack.stack.profiles_user_id profiles_url = data.grafana_cloud_stack.stack.profiles_url } resource "grafana_fleet_management_pipeline" "pipeline" { provider = grafana.fm name = "profiling" contents = templatefile( "profiling.alloy.tftpl", { profiles_id = local.profiles_id, profiles_url = local.profiles_url, }, ) matchers = [ "env=\"PROD\"" ] enabled = true }
Create an access policy and token for Alloy
This Terraform configuration creates the following:
- An access policy named
alloy-policywithset:alloy-data-writescope, usinggrafana_cloud_access_policy(Resource) - A token named
alloy-token, usinggrafana_cloud_access_policy_token(Resource)
Create a file named
alloy-access-policy.tfand add the following code block:resource "grafana_cloud_access_policy" "alloy_policy" { provider = grafana.cloud name = "alloy-policy" region = data.grafana_cloud_stack.stack.region_slug scopes = [ "set:alloy-data-write" ] realm { type = "stack" identifier = data.grafana_cloud_stack.stack.id } } resource "grafana_cloud_access_policy_token" "alloy_token" { provider = grafana.cloud name = "alloy-token" region = grafana_cloud_access_policy.alloy_policy.region access_policy_id = grafana_cloud_access_policy.alloy_policy.policy_id } output "alloy_token" { value = grafana_cloud_access_policy_token.alloy_token.token sensitive = true }
Create a configuration file for Alloy
This Terraform configuration creates an Alloy configuration file with the remotecfg block for Fleet Management, using local_file (Resource).
Create a file named
config.alloy.tftpland add the following content:remotecfg { id = "${collector_id}" url = "${fm_url}" poll_frequency = "60s" basic_auth { username = "${fm_id}" password = sys.env("GCLOUD_RW_API_KEY") } }Create a file named
alloy-config.tfand add the following code block:resource "local_file" "alloy_config" { filename = "<ALLOY_CONFIG_PATH>" content = templatefile( "config.alloy.tftpl", { collector_id = "prod_collector", fm_id = local.fm_id, fm_url = local.fm_url, }, ) directory_permission = "0644" file_permission = "0644" }Replace the following field values:
<ALLOY_CONFIG_PATH>with the path the Alloy configuration file should be written to, for exampleconfig.alloy
Apply the Terraform configuration
In a terminal, run the following commands from the directory where all of the configuration files are located.
Initialize a working directory containing Terraform configuration files:
terraform initPreview the Terraform changes:
terraform planApply the configuration:
terraform apply
Run Alloy
To learn how to start or restart Alloy, refer to Run Grafana Alloy.
Note
The variable
GCLOUD_RW_API_KEYmust be set in the environment where Alloy is running for the remote configuration in this example to work.
Run the following command to view the Alloy token:
terraform output -raw alloy_tokenSet the environment variable
GCLOUD_RW_API_KEYto the value from the first step.Run Alloy.
Validation
After you apply the changes in the Terraform configurations and run Alloy, you should be able to verify the following:
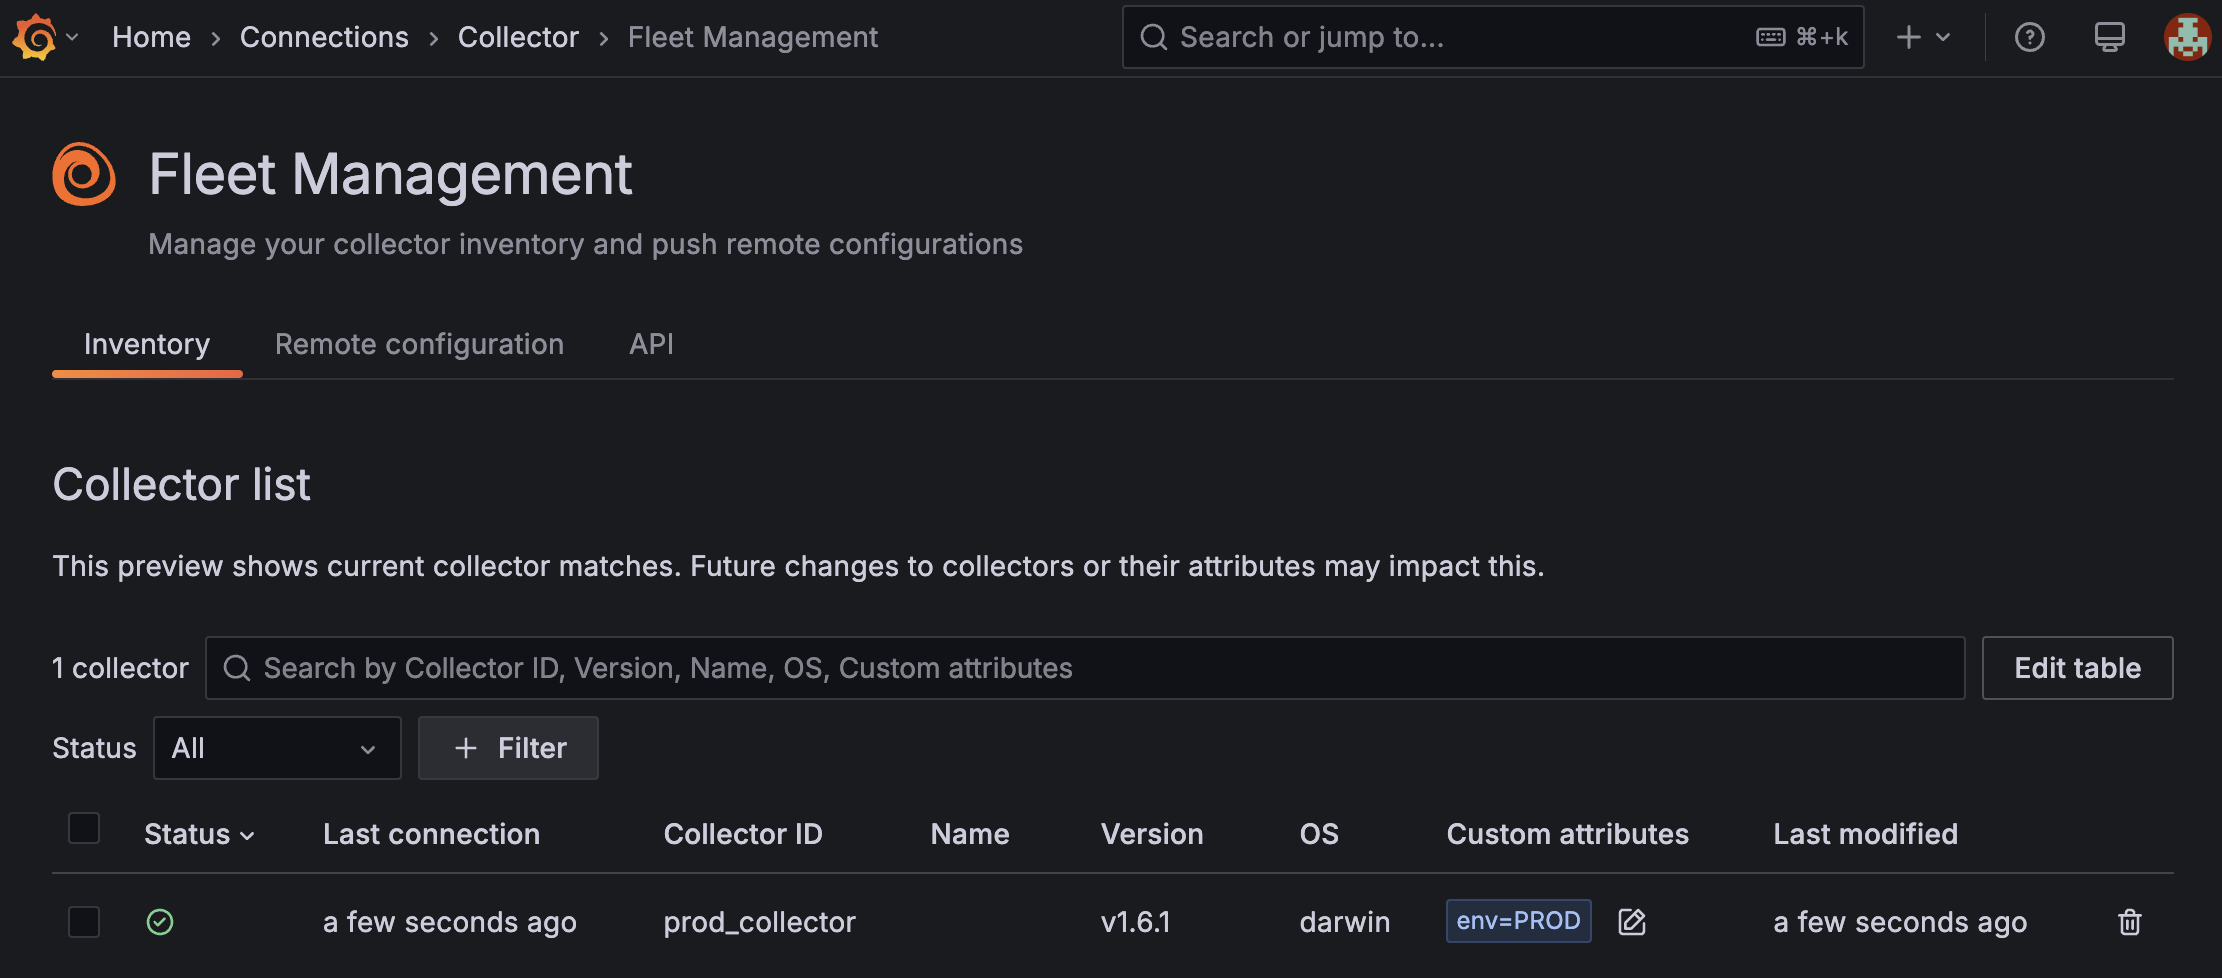
A collector is added to the Fleet Management Inventory tab:
![The Inventory screen in the Fleet Management interface in Grafana Cloud which shows that a new collector called `prod_collector` is registered with attribute `env=PROD`, has a healthy status, and was last modified a few seconds ago.]()
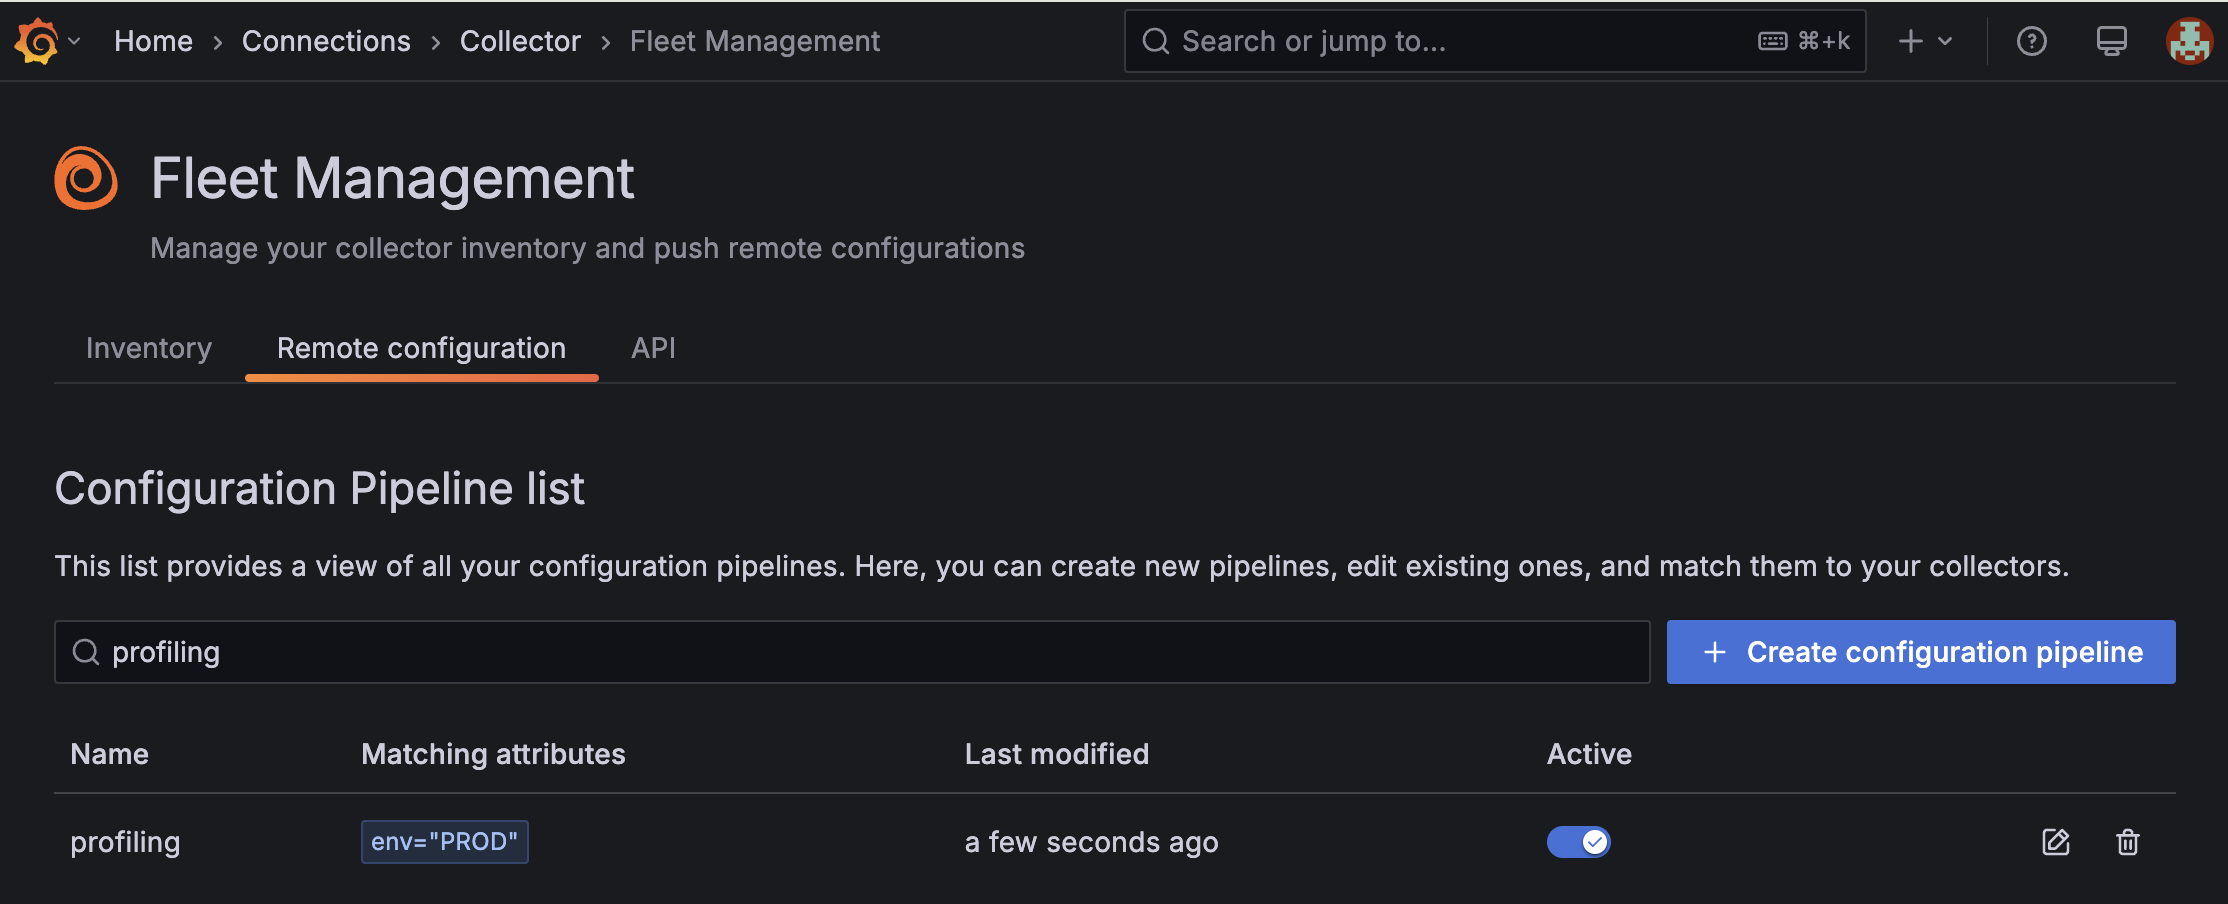
A pipeline is added to the Fleet Management Remote configuration tab:
![The Remote configuration screen in the Fleet Management interface in Grafana Cloud which shows that a new configuration pipeline called `profiling` is active and was last modified a few seconds ago.]()
Alloy profiles are being exported to Grafana Cloud Profiles:
![A dashboard in Grafana Cloud which shows Alloy profiling data, including graphs for CPU and memory.]()

Conclusion
In this guide, you created an access policy and a token for Fleet Management and Alloy, a collector with remote attributes, and a pipeline for profiling Alloy, all using Terraform.
To learn more about managing Grafana Cloud using Terraform, refer to Grafana provider’s documentation.
Was this page helpful?
Related resources from Grafana Labs


