Notification policies
Notification policies provide you with a flexible way of designing how to handle notifications and minimize alert noise.
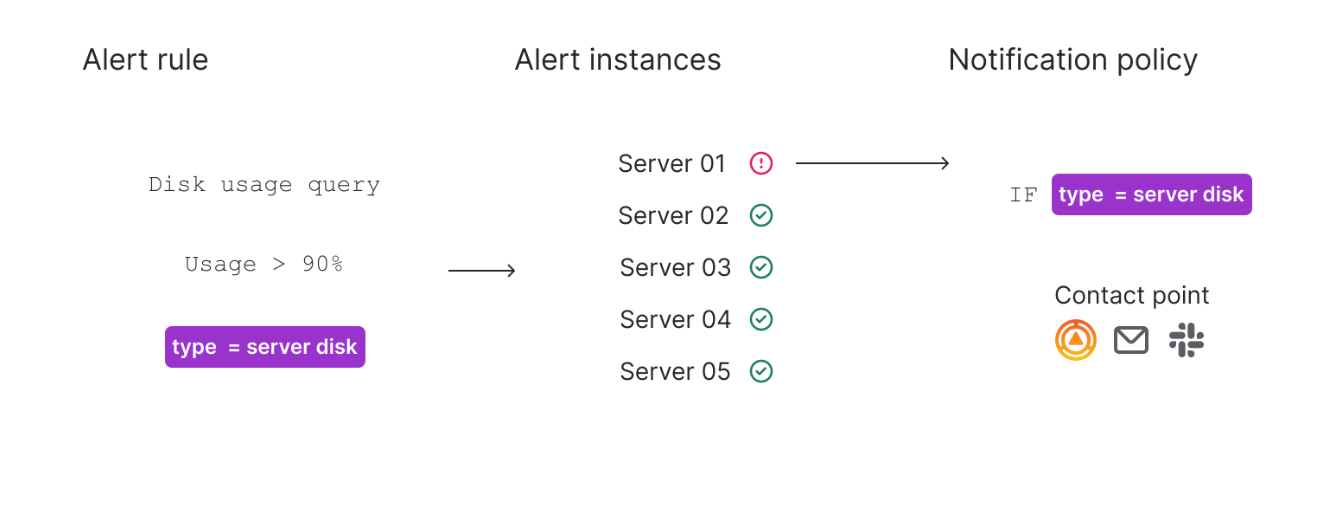
Using label matchers, alert instances are routed to notification policies. The notification policy can then group multiple alert instances into a single notification and deliver it to the contact point.
Notification policies are not a list, but rather are structured according to a tree structure:
- The root of the notification policy tree is the Default notification policy.
- Each policy can have child policies.
- Each policy can have sibling policies, sharing the same parent and hierarchical level.
Each policy consists of a set of label matchers (0 or more) that specify which alerts they are or aren’t interested in handling. A matching policy refers to a notification policy with label matchers that match the alert instance’s labels.
Use labels and label matchers to link alert rules to notification policies and silences. This allows for a flexible way to manage your alert instances, specify which policy should handle them, and which alerts to silence.
A label matchers consists of 3 distinct parts, the label, the value and the operator.
The Label field is the name of the label to match. It must exactly match the label name.
The Value field matches against the corresponding value for the specified Label name. How it matches depends on the Operator value.
The Operator field is the operator to match against the label value. The available operators are:
Note
If you are using multiple label matchers, they are combined using the AND logical operator. This means that all matchers must match to link a rule to a policy.
By default, Grafana uses a single notification policy tree for all alert routing. There is also the option to set up and configure multiple notification policies with the multiple policy feature, which allows you to split routing logic into separate, independently managed routing trees.
Label matching example
If you define the following set of labels for your alert:
{ foo=bar, baz=qux, id=12 }
then:
- A label matcher defined as
foo=barmatches this alert rule. - A label matcher defined as
foo!=bardoes not match this alert rule. - A label matcher defined as
id=~[0-9]+matches this alert rule. - A label matcher defined as
baz!~[0-9]+matches this alert rule. - Two label matchers defined as
foo=barandid=~[0-9]+match this alert rule.
Exclude labels
You can also write label matchers to exclude labels.
Here is an example that shows how to exclude the label Team. You can choose between any of the values below to exclude labels.

Tip
For a practical example of routing with notification policies, refer to our Getting Started with Alert Instances and Notification Routing tutorial.
Routing
To determine which notification policies handle an alert instance, the system looks for matching policies starting from the top of the tree—beginning with the default notification policy.
If a matching policy is found, the system continues to evaluate its child policies in the order they are displayed. If a child policy matches the alert, the system then evaluates its child policies recursively until no more matching child policies are found. In this case, only the deepest matching child policy handles the alert instance.
By default, once a matching policy is found, the system does not continue to look for sibling policies. If you want sibling policies of one matching policy to handle the alert instance as well, then enable Continue matching siblings on the particular matching policy.
Note
The default notification policy matches all alert instances. It always handles alert instances if there are no child policies or if none of the child policies match the alert instance’s labels—this prevents any alerts from being missed.
If alerts use multiple labels, these labels must also be present in a notification policy to match and route notifications to a specific contact point.
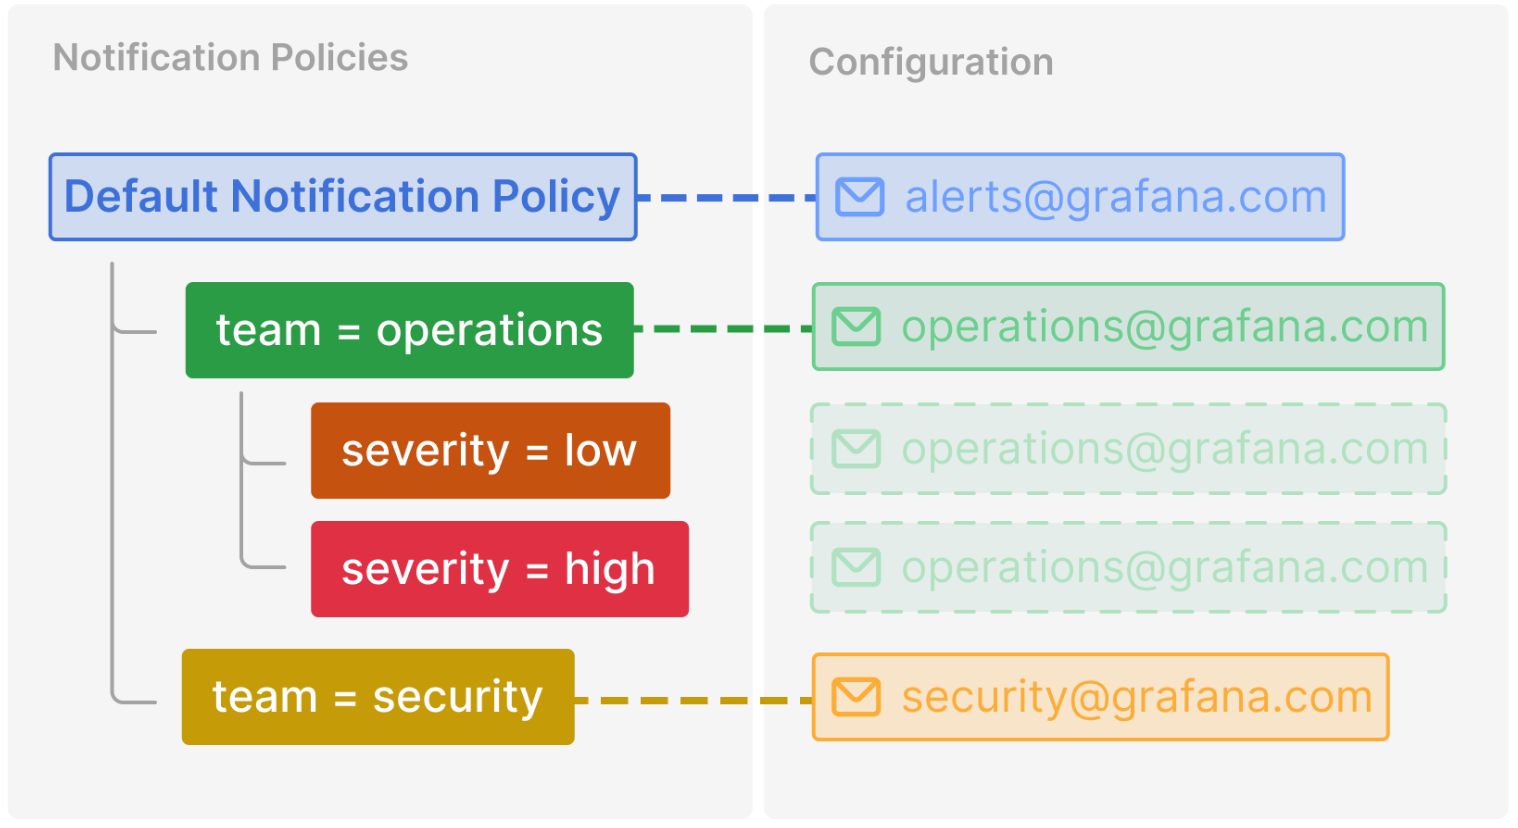
Here’s a breakdown of the previous example:
Pod stuck in CrashLoop does not have a severity label, so none of its child policies are matched. It does have a team=operations label, so the first policy is matched.
The team=security policy is not a match and Continue matching siblings was not configured for that policy.
Disk Usage – 80% has both a team and severity label, and matches a child policy of the operations team.
Note
When an alert matches both a parent policy and a child policy (like it does in this case), the routing follows the child policy (
severity) as it provides a more specific match.
Unauthorized log entry has a team label but does not match the first policy (team=operations) since the values are not the same, so it will continue searching and match the team=security policy. It does not have any child policies, so the additional severity=high label is ignored.
This routing and tree structure makes it convenient to organize and handle alerts for dedicated teams, while also narrowing down specific cases within the team by applying additional labels.
Inheritance
In addition to child policies being a useful concept for routing alert instances, they also inherit properties from their parent policy. This also applies to child policies of the default notification policy.
By default, a child policy inherits the following notification properties from its parent:
Then, each policy can overwrite these properties if needed.
The inheritance of notification properties, together with the routing process, is an effective method for grouping related notifications and handling specific cases through child policies.
Inheritance example
This example shows how the notification policy tree from the previous example allows the child policies of the team=operations to inherit its contact point. In this way, you can avoid specifying the same contact point multiple times for each child policy.


