Cross-tenant query federation
GET supports creating access policies that can span multiple tenants. Viewers in Grafana Enterprise can see data coming from more than one tenant simultaneously.
By default, the GET gateway service is used as the target for querying GET (for example, using trace ID or TraceQL queries) and sending trace span data (using OTLP gRPC). Cross-tenant query federation, however, requires an extra component called the federation-frontend service.
Architecture
The federation-frontend service acts as the target for queries instead of the GET gateway service. The diagram below shows this as a visualization:
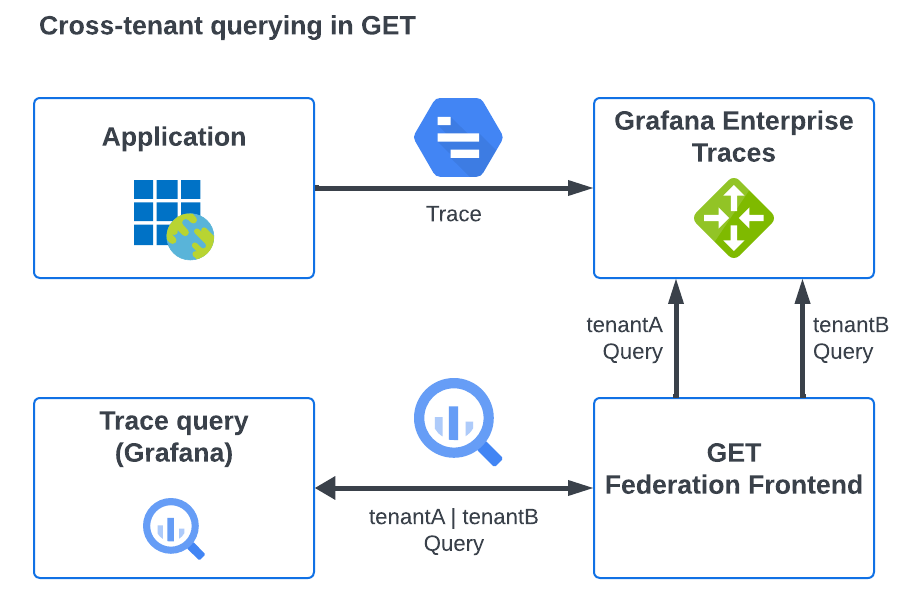
The data from multiple tenants is aggregated in a single trace lookup or search query as multiple queries to the GET gateway. The gateway then carries out these queries and returns the data to the federation service which combines them as a final query result.
The federation-frontend runs with tenant federation enabled by default. The federation-frontend service can be deployed independently from a GET installation, however, there are certain circumstances in which some queries are not valid in this case.
Cross-tenant queries are made by sending queries via the federation-frontend service that include basic authentication with a username signifying that multiple tenants should be inspected. In this case, the username can be either tenant names or a wildcard to search all tenants when configuring the Authentication in the GET plugin.
These tenants must be accessible using the same access policy token and separated by the pipe (|) symbol, or using the wildcard (*) symbol. Using the wildcard symbol searches all tenants that can be queried by the supplied access token.
This page covers the ability to query data from multiple tenants at once.
Before you begin
The procedures on this page assume there are two GET tenants: team-engineering and team-finance. To create a tenant, refer to Set up a GET tenant.
The federation-frontend target itself requires a configured GET installation installed using the tempo-distributed Helm chart. The examples provided use a GET installation that does not use TLS.
For cross-tenant querying, the federation-frontend component is usually deployed as part of a larger GET installation, and therefore has access to all of the configuration for that installation.
Specify cross-tenant requests in the form <tenant1>|<tenant2>|...<tenantN>, in which case the federation-frontend separate the request into individual tenant requests.
To allow requests from any valid tenant associated with the supplied token, use a wildcard tenant name (*) as the username in cross-tenant requests.
To use a wildcard tenant name, your federation-frontend must access the admin storage bucket as the GET clusters so the service can retrieve the specific tenants that pertain to the access policy that the token represents.
Verify that the federation-frontend configuration includes an admin_client section. For example:
auth_enabled: true
admin_client:
  storage:
    backend: s3
    s3:
      bucket_name: <bucketName>
      endpoint: <s3Endpoint>
      access_key_id: <accessKey>
      secret_access_key: <secretKey>
In situations where a wildcard tenant name passes to the federation-frontend, you must supply an admin_client configuration section if the component is not part of a GET installation.
Configure cross-tenant queries
To enable the federation-frontend for an installed GET cluster, you need to add an extra configuration in your Helm chart’s values.yaml file and upgrade the GET cluster using the values.yaml file.
This configuration assumes that TLS is not enabled as part of the GET installation.
This example configuration enables the federation-frontend service, and then details the targets that it should use to send onward queries to, via the proxy_targets URL list (this being the GET gateway).
The default access policy management in GET allows only for tokens created in that GET cluster to access its own tenants, and therefore there is only one entry in the proxy_targets list.
For more information, refer to the federation-frontend configuration documentation.
Locate your
values.yamlfile used with yourtempo-distributedHelm chart installation.Open the file and add the following section:
enterpriseFederationFrontend:
  enabled: true
  proxy_targets:
	- url: http://myinstall-get-cluster-tempo-enterprise-gateway.get.svc:3100
  	tls_insecure_skip_verify: true
Save the changes.
Use the command below to upgrade the GET cluster with the changes in your
values.yamlfile.- Change the GET installation name (
MYINSTALL-GET-CLUSTER) to your GET cluster - Add the appropriate namespace by replacing
GET-NAMESPACE - Add the version number of the Helm chart (
HELM-CHART-VERSION). Run the command to upgrade the GET cluster.
helm upgrade -f values.yaml MYINSTALL-GET-CLUSTER grafana/tempo-distributed --namespace GET-NAMESPACE --version HELM-CHART-VERSION- Change the GET installation name (
Helm updates the GET installation to include the federation-frontend service, which allows any queries routed to it to be cross-tenant compatible.
Queries against single tenants can be sent via the GET gateway, if required, although it may be more convenient to use the service for all queries regardless of cross-tenant status.
Set up an access policy with tenant federation and a token
For demonstration purposes, we’ll create two new tenants, create a shared access policy for them, and then query trace data using a single data source and query.
Create two new tenants
First, create two new tenants, team-engineering and team-finance, using the Grafana Enterprise Traces plugin for Grafana.
Within Grafana, select Apps > Grafana Enterprise Traces.
Select Tenants and then choose Create tenant.
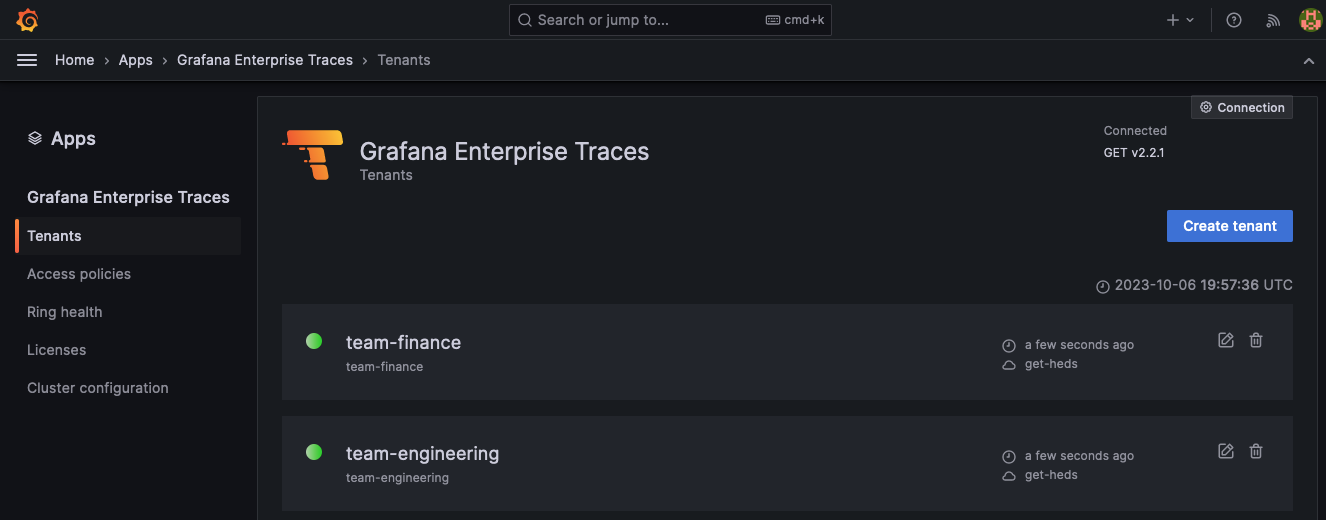
Name the first tenant
team-engineering.Select Create tenant again and name the second tenant
team-finance.![Add two new tenants using the GET plugins]()
Create an access policy for the tenants
To allow queries to span both GET tenants, create a new access policy called leadership.
For demonstration purposes, name these tenants team-engineering and team-finance.
To create a raw access policy:
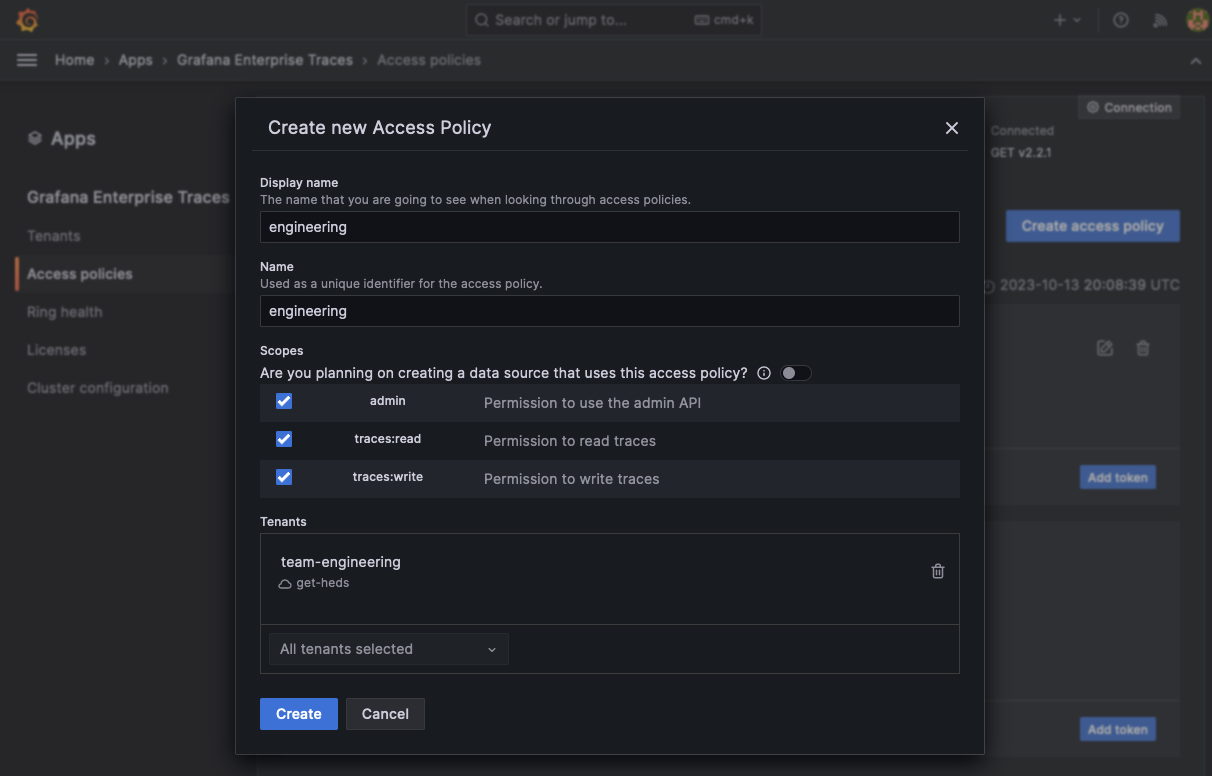
Create a new access policy
leadership.Enable the
traces:readscope.Add the tenants
team-engineeringandteam-finance. Alternatively, you can add the special tenant name*to create an access policy that has access to all tenants in the cluster.Select Create to add the new access policy.
![Create a new access policy for the tenants]()
Select Add token to create a new token for the access-policy.
Select Copy to clipboard to store the token in your clipboard.
There’s supposed to be a video here, but for some reason there isn’t. Either we entered the id wrong (oops!), or Vimeo is down. If it’s the latter, we’d expect they’ll be back up and running soon. In the meantime, check out our blog!
Set up a Grafana data source using the access policy
In the standard configuration, the Grafana Enterprise Traces plugin creates a data source for each tenant, which uses the GET gateway and configures it specifically for the single tenant specified. To use the cross-tenant capabilities, create a new Tempo data source that uses the federation-frontend service and specifies both tenants.
To set up a data source using the access policy:
Create a new Tempo data source from the Grafana Connections menu and select Data sources. Select Add new data source.
Search for Tempo and select Tempo data source.
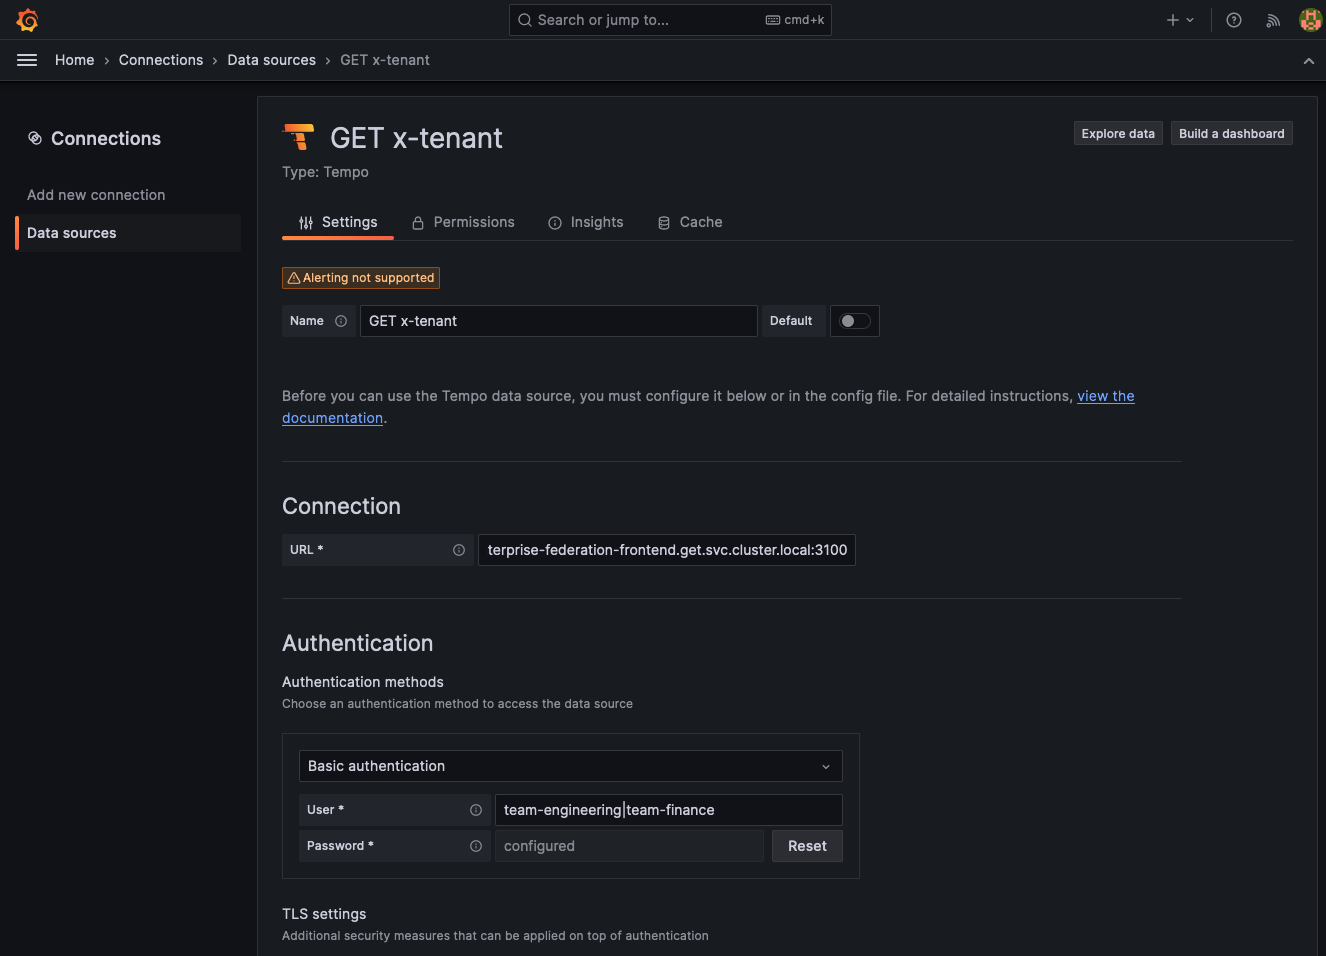
Under Connection field, select URL from the drop-down. Enter the URL of the frontend-federation Kubernetes service in your GET cluster. For example, where
mycluster-get-install-tempo-enterprise-federation-frontendrepresents your GET namespace:http://mycluster-get-install-tempo-enterprise-federation-frontend.get.svc.cluster.local:3100.From the Authentication section, enable Basic authentication.
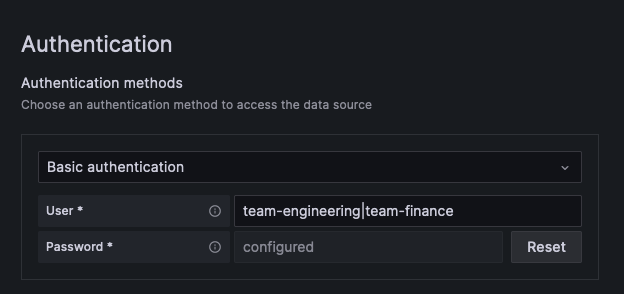
- In the User field, enter:
team-engineering|team-financewhere all the names of the tenants that you want to query across are separated by the|pipe character. - In the Password field, paste the token created in the token creation process for the tenant policy.
- In the User field, enter:
At the bottom of the page, select Save to preserve your changes and Test to validate the configuration.
The test should respond with ‘Data source successfully connected’.
Use OpenTelemetry telemetrygen to generate tracing data
Next, use OpenTelemetry telemetrygen to generate tracing data to test your configuration.
In the following instructions, the GET gateway is port-forwarded to a local development machine on port 3100 using the kubectl port-forward command.
To use this example, replace the content in upper case with the information for your cluster.
kubectl port-forward --address 0.0.0.0 service/MYCLUSTER-GET-INSTALL-TEMPO-ENTERPRISE-GATEWAY 3100:3100 --namespace GET-NAMESPACEInstall
telemetrygenusing the installation procedure. NOTE: You don’t need to configure an OpenTelemetry Collector because you’re using Grafana Alloy.Create a new
base64token for both theteam-engineeringandteam-financetenants. For example:echo 'team-engineering:<generatedToken>' | base64 echo 'team-finance:<generatedToken>' | base64Run this command twice to generate traces using
telemetrygenfor each separate tenant and token for each token. Replace thebase64Tokenwith the one generated for each tenant.telemetrygen traces --traces 1 --otlp-insecure --otlp-header 'Authorization="Basic <base64Token>"' --otlp-endpoint localhost:3100
This configuration sends a single trace to each of the tenants. When a cross-tenant query runs, you should see two traces instead of a single trace for one tenant.
Use cross-tenant query federation
Queries are performed using the cross-tenant configured data source in either Explore or inside of dashboards are performed across all the tenants that you specified in the User field. These queries are processed as if all the data were in a single tenant.
To submit a query across all tenants that your access policy has access rights to, you can either:
Explicitly set the name of all the tenants separated by a pipe character “|” in the username. For example, to query across
tenant1,tenant2, andtenant3you would entertenant1|tenant2|tenant3.Set the username to a wildcard character
*. This will query all tenants that the access policy grants you access to, without requiring you to explicitly specify their names.
Conversely, if you use a wildcard username in your data source configuration with an access policy with specific tenants, that data source has access to only those tenants.
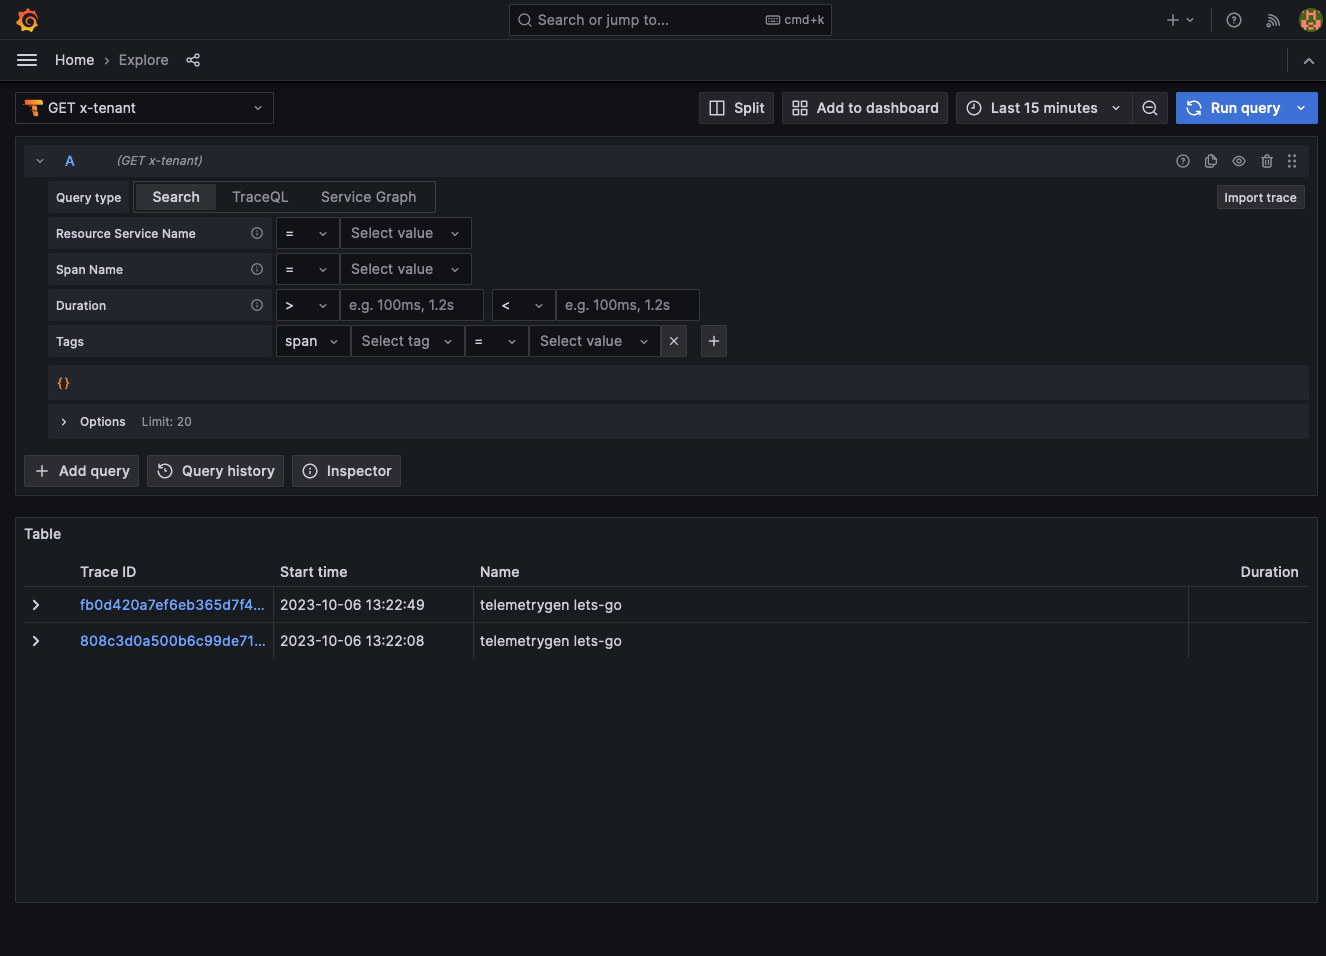
- Go to your Grafana instance and select the Explorer.
- Select your cross-tenant data source.
- Selection Query type > Search and select Run query. You should see two traces returned, one from each tenant.