Publish or update a plugin
You've just built your plugin and now you want to share it with the world!
Publishing your plugin to the Grafana plugin catalog makes it easily discoverable by millions of Grafana users. Read on to learn how to manage the lifecycle of a plugin in the catalog, from publishing and updating to potentially deprecating.
Before you begin
- Review our guidelines - Learn about the Grafana Labs criteria for publishing and signing plugins.
- Review our publishing best practices - Ensure your plugin is in the best state it can be before submitting it for review.
- Package a plugin - Build the plugin and get it ready to share in the form of a ZIP archive.
- Refer to plugin-examples to review best practices for building your plugin.
To speed up the time it takes to review your plugin:
- Check that your plugin is ready for review using the plugin validator.
- Provide sample dashboards and test data with your repository so that the plugin's functionality can be verified. Use the provisioning process provided to simplify this step.
Publish your plugin
Follow these steps to publish your plugin for the first time.
-
Sign in to your Grafana Cloud account. Note that you need to be an administrator for the Grafana Cloud organization being used to publish the plugin.
-
In the left menu, under Org Settings, click My Plugins.
-
Click Submit New Plugin. The Create Plugin Submission dialog box appears.
Submit plugin. -
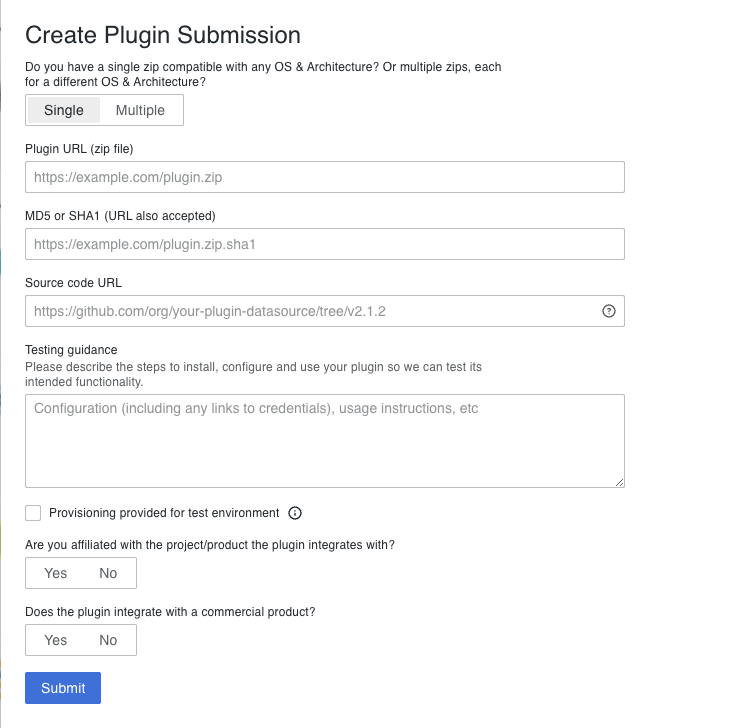
Enter the information requested by the form.
- OS & Architecture:
- Select Single if your plugin archive contains binaries for multiple architectures.
- Select Multiple if you'd like to submit separate plugin archives for each architecture. This can lead to faster downloads since users can select the specific architecture on which they want to install the plugin.
- URL: A URL that points to a ZIP archive of your packaged plugin.
- Source code URL: A URL that points to a public Git repository or ZIP archive of your complete plugin source code.
- SHA1: The SHA1 hash of the plugin specified by the URL.
- Testing guidance: An overview covering the installation, configuration, and usage of your plugin.
- Provisioning provided for test environment: Check this box if you have configured provisioning. If you've done this, rest assured it will be identified during the review, and no additional action is needed on your part.
- The remaining questions help us determine the signature level for your plugin.
- OS & Architecture:
-
Click Submit.
Plugin submission review
After you submit your plugin:
- The Grafana Plugins team runs an automated validation to make sure it adheres to the Grafana guidelines.
- Upon the validation, your submission is placed in a review queue.
- A plugin reviewer performs a manual inspection that consists of:
- Code review: For quality and security purposes, we review the source code for the plugin.
- Tests: We install your plugin on one of our Grafana instances to test it for basic use.
- We may ask you to assist us in configuring a test environment for your plugin.
- We'll use this test environment whenever you submit a plugin update.
Following best practices or providing a test environment does not guarantee the approval of a submitted plugin. The Grafana Plugins team studies each submission individually and decides on a case-by-case basis.
Update your plugin
To update a plugin, follow the same guidance as for publish your plugin, except in Step 3 where you can now click Submit Update for the plugin you want to update.
All plugin submissions, new or updates, go through the same automated and rigorous manual review process. Because we may have a test environment already setup for an existing plugin, plugin update reviews may go faster.
Deprecate a plugin
If a plugin is no longer relevant or is unable to be maintained, plugin developers can request that the plugin be deprecated and removed from the catalog. Similarly, Grafana Labs may deprecate and delist a plugin as part of curating the catalog and ensuring plugins meet our standards for security, quality and compatibility.
For more information on plugin deprecation and how to request your plugin to be deprecated, refer to the Grafana Labs Plugin Deprecation Policy.