
How to monitor your kids’ chores: An introduction to Grafana-powered parenting
I’m the proud father of two boys, Benjamin and Ethan, who try to pick up their rooms on a daily basis, but don’t always succeed. I’m also a Senior Solutions Engineer here at Grafana Labs — which, naturally, led me to wonder if I could use Grafana to tackle this ongoing challenge.
In particular, I set out to monitor my kids’ cleaning progress in Grafana Cloud, as well as automatically notify them if they failed to clean their rooms. The result of this mission is what my wife Elizabeth and I (lovingly) refer to as Roboparenting.

In this blog post, we’ll walk through exactly how I set up this Roboparenting solution, including:
- How to create Slack messages with dynamic elements that call a custom endpoint written in Python.
- How to record event data from the endpoint interactions in a MySQL database.
- How to write a custom exporter for Prometheus in Python and use Grafana Agent to send the metrics and logs to Grafana Cloud.
- How to generate alerts and route those alerts to Slack using Grafana IRM, which includes Grafana OnCall and Grafana Incident.
Note: I accomplished all of this using the free tier of Grafana Cloud. If you don’t already have a free Grafana Cloud account, you can sign up today.
I’ll also talk a little bit about how I convinced my boys to get on board with this project (fortunately, given their natural interest in technology, this wasn’t too hard). Let’s get started.
Setting up alerts to record the room state
I needed a UI to send alerts and record the state of the kids’ rooms. I use Slack for corporate communication and I have a personal workspace that I already use for some other home automations. I thought this would work well as the primary UI for notifications and setting the state, since I have it open on my laptop most of the day.
I did some early research and found that it wasn’t too difficult to build an interactive Slack message using Block Kit. Later, I added some slash commands that call my endpoints to send events and retrieve statuses (more on that below).
My finished message looks like this:

I’ll pause here to acknowledge that, of course, for a Roboparenting solution like this to work, you have to actually get a response from your kids. In my case, Benjamin and Ethan are both really into technology. They always ask me about my job and what Grafana can do. This project has been a fun way to showcase that, and the boys honestly don’t mind getting these notifications each morning before school (though, full disclosure: I often have to prompt them from the other room for a response). What’s more, my wife and I have always set the expectation that everyone has a role to play in household chores. We are fortunate enough to be able to reward the kids with a weekly allowance and experiences like skiing, mountain biking, and traveling. For us, this Roboparenting solution is a great way to track their performance and simplify our daily reminders.
Okay, now back to the technical details.
When the boys click the buttons in the Slack message, this calls my webhook, which I’ll get into below.
The message is stored in a JSON object and can be sent from a number of different native SDKs. You have to be on a paid Slack plan to use some of them, but a basic curl command with a JSON object is free. I like the free services for my home automations, so that is the method I chose for sending the messages.
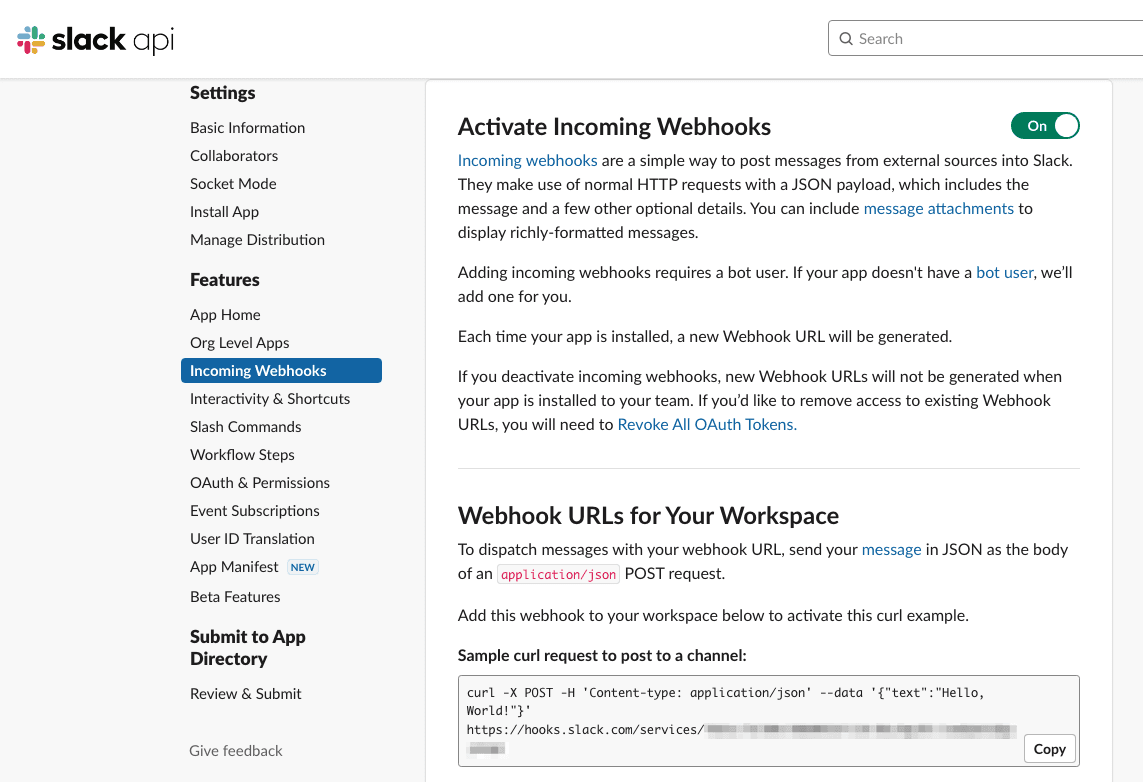
I wrote a bash script and added it to the crontab on my Linux server. Benjamin and Ethan each receive their own Slack message in their own channel everyday. You can find the bash scripts in this GitHub repository.
Webhook for receiving events from Slack
I first wrote a webhook using Flask in Python that receives the events from Slack and writes them to a log file. You can review the final version in this GitHub repo.
I thought this would meet my requirements, since the events I’m tracking are a state and not a metric. My original plan was to turn logs into metrics by creating a recorded query of the logs.

The problem I ran into is that the last state — “picked up” or “not picked up” — doesn’t take into account the required state based on the time of day. For example, I don’t care if the kids’ rooms are not picked up between midnight and some time in the morning before they leave for school. I also wanted to have different required times in the mornings for weekdays vs. weekends. I needed the ability to combine these log events with some conditional logic.
The best solution was to create my own custom exporter, which I also wrote in Python. (I’ll go into more details on the exporter later.) I store the events and some of my configuration in a MySQL database.
My main Python function for receiving events from Slack is roboparentEvent.
This function writes to a table in MySQL called roboparentevent.

This table is cleared down and populated with the NewDay events each day by a bash script executed by the crontab that calls the method resetEventTableAndSnooze.
I also noticed that bots were scraping my endpoints, so I decided to prevent unauthorized usage. I installed the Python Slack SDK library and added the following header to each of my endpoints.
##slack_signing_secret is loaded from a secrets file

#########authorize the request############
    timestamp = request.headers['X-Slack-Request-Timestamp']
    slack_payload = request.form

    signatureVerifier = signature.SignatureVerifier(slack_signing_secret,signature.Clock())

    calculated_signature = signatureVerifier.generate_signature(timestamp=timestamp,body=slack_payload)

    isValid = signatureVerifier.is_valid(slack_payload,timestamp,calculated_signature)

    if (isValid == False):
        return 'Unauthorized', 400
    #########end authorize the request########
The above code uses the standard technique provided by Slack to hash the message body using the signing secret unique to my application to verify that the request is authorized. The technique even uses the current time to prevent repeat message attacks.
Note: My exporter and my webhook run under systemd on Debian Linux. Instructions on how to create a custom service are here.
Querying the room status
I wrote a method called getRoomStatus that queries the roboparentevent table to evaluate the events based on the eventname in ascending order by the created date. Some basic logic determines if the room is picked up or not based on the last event (NewDay, SuccessfulCleanup, FailedCleanup, or Snoozed).
I use the method getRoomStatus in the exporter, which I will explain later, as well as in the slash commands, which I will also explain later.
Snooze functionality
I determined quickly that I would need to snooze notifications when we are on vacation or one of the kids is away overnight. I created a table called snooze with a field to track the kid and snooze date. I wrote a method called setSnooze that removes any existing snooze record, inserts a new snooze record into the snooze table, and inserts an event into the roboparentevent table.
Slash commands in Slack
As mentioned earlier, I wanted the ability to set statuses and check statuses from slash commands in Slack. This is fairly straightforward. You just define a slash command in the API tool and configure it with a URL, parameters, and usage suggestion.

The Slack SDK provides the ability to return a message to the channel with the response of the webhook.
Custom metrics exporter
I wrote a custom exporter using the prometheus_client Python library, based on these instructions.
My metrics are the following:
ROBOPARENT_NUMBER_OF_KIDS: This one was mostly for fun and was the first one I wrote while getting started.ROBOPARENT_REQUIRED_ROOM_STATUS: This is the required room status for each kid, based on the day of the week and the time they leave for school. I used a label calledkidto separate Benjamin and Ethan.ROBOPARENT_ROOM_STATUS: This is the actual status of each kid’s room. Again, I used a label calledkidto separate the two.
I created a recorded query to combine ROBOPARENT_REQUIRED_ROOM_STATUS and ROBOPARENT_ROOM_STATUS. I was able to extract the data I wanted.

A room status (or required room status) of 0 = not picked up and a room status (or required room status) of 1 = picked up. I determined that if I subtract the required room status from the actual room status, any value >= 0 means that the room is in compliance.
Here are some examples:
Actual Room Status (A) | Required Room Status (B) | Compliance Status (A-B) |
1 | 1 | 0 |
0 | 0 | 0 |
0 | 1 | -1 |
This is a valid technique that I use with customers when they need to combine metrics in Grafana and perform calculations. It’s particularly helpful if the data is from two different sources. However, my data is from one source and I have free reign to customize the metrics that are being generated. As a result, I found the following tradeoffs with this design that I did not want to accept:
- This is kind of complicated to store in Grafana Cloud vs. building it into a Python method or function. I have the ability to customize my application, so I decided to move this logic to the exporter.
- Grafana Cloud’s current version does not allow you to edit a recorded query once it is created. You have to delete it and recreate it. You also cannot view the query that is generating the metrics.
- Recorded queries would also result in a unique metric name for each kid — for example,
ROBOPARENT_ROOM_COMPLIANCE_[kid]— instead of having one metric name with labels, such asROBOPARENT_ROOM_COMPLIANCE{kid=[kid]}. I have the ability to create a more scalable solution via custom code so I decided this is a better design for my application.
My final design added a metric called ROBOPARENT_ROOM_COMPLIANCE that uses a label for each kid.
The full code for the exporter is here:
import time
from prometheus_client import start_http_server
from prometheus_client.core import GaugeMetricFamily, REGISTRY
from prometheus_client.registry import Collector

import pythonmysql

class CustomCollector(Collector):
    def collect(self):
        self.myDBObject = pythonmysql.PythonMySQL()
        kids = self.myDBObject.getNumKids()
        ROBOPARENT_NUMBER_OF_KIDS_GAUGE = GaugeMetricFamily("ROBOPARENT_NUMBER_OF_KIDS", 'Roboparent Number of Kids', value=kids)
        yield ROBOPARENT_NUMBER_OF_KIDS_GAUGE

        ROBOPARENT_REQUIRED_ROOM_STATUS = GaugeMetricFamily("ROBOPARENT_REQUIRED_ROOM_STATUS", 'Roboparent required room status', labels=['kid'])

        ROBOPARENT_ROOM_STATUS_GAUGE = GaugeMetricFamily("ROBOPARENT_ROOM_STATUS", 'Roboparent room status for each kid',labels=['kid'])
        ROBOPARENT_ROOM_COMPLIANCE_GAUGE = GaugeMetricFamily("ROBOPARENT_ROOM_COMPLIANCE", 'Roboparent room compliance for each kid',labels=['kid'])
        #get all kid records so we know what room statuses to query and what metrics to publish
        kidRecords = self.myDBObject.getAllKidRecords()
        for (name) in kidRecords:
            #set room status and required room status in the guage
            roomStatus = self.myDBObject.getRoomStatus(name[0])
            ROBOPARENT_ROOM_STATUS_GAUGE.add_metric([name[0]],roomStatus)
            requiredRoomStatus = self.myDBObject.getCurrentRequiredRoomStatus(name[0])
            ROBOPARENT_REQUIRED_ROOM_STATUS.add_metric([name[0]],requiredRoomStatus)

            #if the room status is greater than or equal to the required room status, set compliance to 1, if not, set it to 0
            if(roomStatus >= requiredRoomStatus):
                ROBOPARENT_ROOM_COMPLIANCE_GAUGE.add_metric([name[0]],1)
            else:
                ROBOPARENT_ROOM_COMPLIANCE_GAUGE.add_metric([name[0]],0)
        yield ROBOPARENT_ROOM_STATUS_GAUGE
        yield ROBOPARENT_ROOM_COMPLIANCE_GAUGE
        yield ROBOPARENT_REQUIRED_ROOM_STATUS

if __name__ == '__main__':
    start_http_server(5002)
    REGISTRY.register(CustomCollector())
    while True:
        time.sleep(30)
Visualizing the data in Grafana Cloud
My dashboard is quite simple, since my data is from one source and I don’t have to perform any calculations on the metrics.
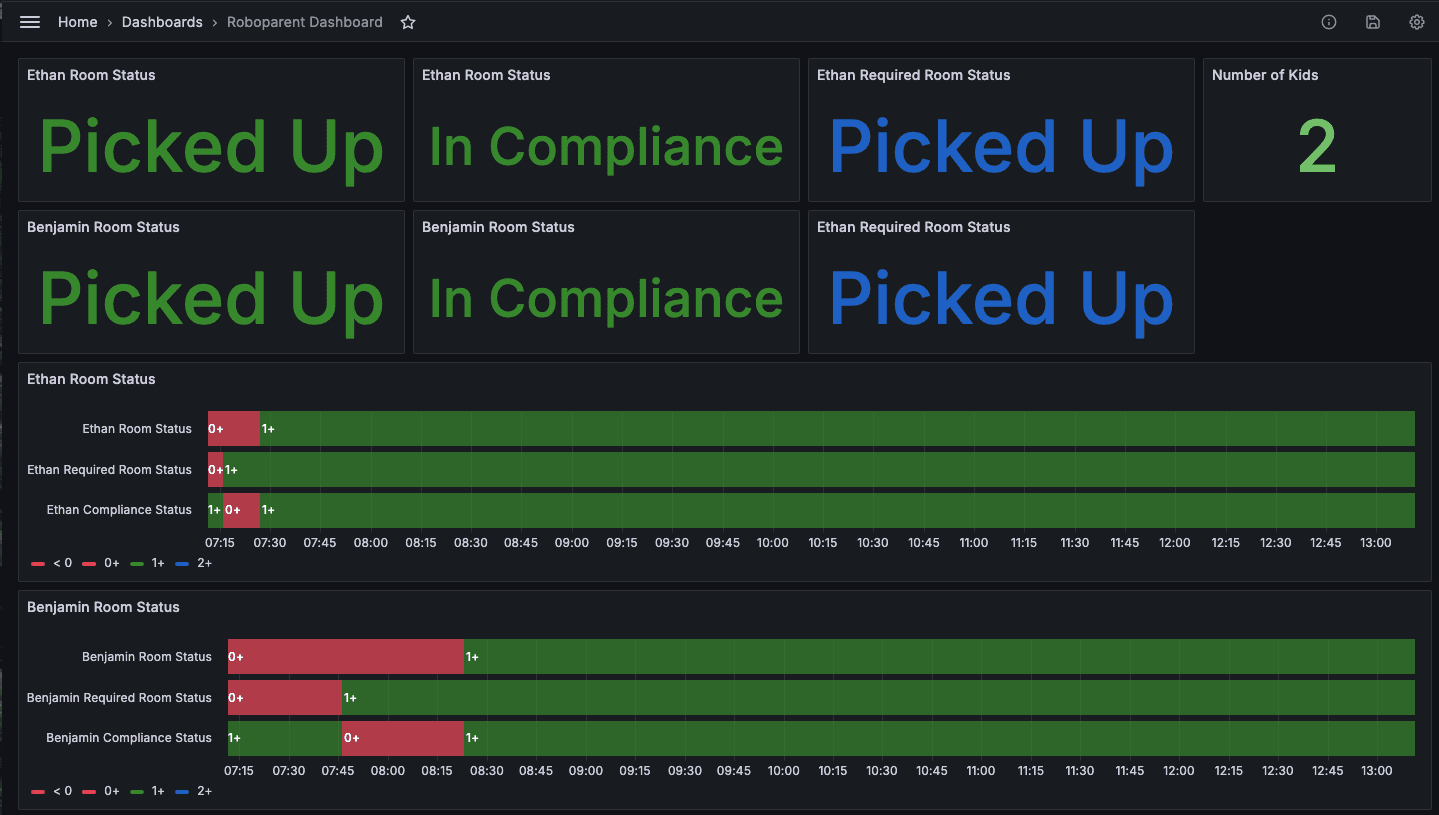
All the stat panels use value mappings to display colored text depending on the metric value.

I use a state diagram to visualize the room status, required room status, and room compliance status.
Generating alert notifications
I set up an alert rule for each of my kids. This alert rule runs a basic query on the ROBOPARENT_ROOM_COMPLIANCE metric using Benjamin as the label so that we return only Benjamin’s compliance metric. If the threshold is below 1 it means that his room is out of compliance, so I generate an alert. The following is an example of an alert rule for Benjamin:

I added a basic annotation that is included in the alert summary.

The default notification policy routes all alerts on my Grafana Cloud instance to Grafana OnCall.
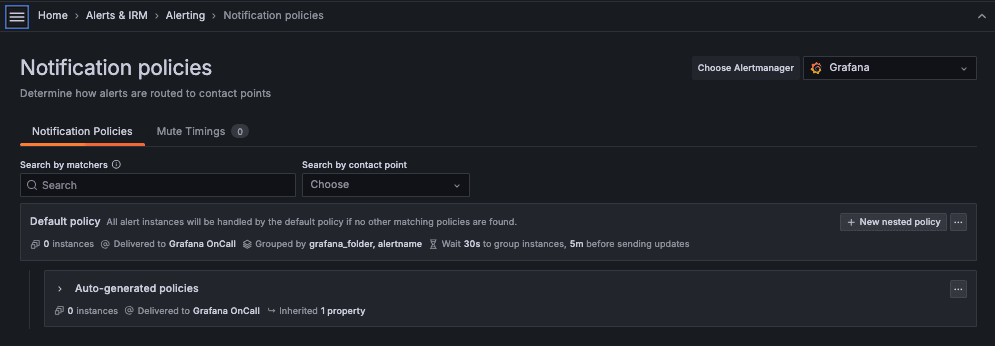
I also created separate routes for each kid, so their alerts are in separate Slack channels. The below screenshot shows how I review the alert payload to determine which kid is generating an alert and route to the appropriate channel.

The escalation chain, Roboparent Notifications, notifies the entire Slack channel three times over 15 minutes when the alert fires.

We are still in the early stages of adoption, so you can see that Benjamin and Ethan missed all three alerts and I had to manually set the status.

Looking ahead, I’d like to create an SLO dashboard using Grafana SLO, once we collect more data. Again, we’re in the early stages of adoption and are still working out the best method and timing for alerting to ensure everyone responds each morning. Who knows — I may even impose performance penalties or bonuses once we reach a mutually acceptable service-level agreement 😉.
Grafana Cloud is the easiest way to get started with metrics, logs, traces, dashboards, and more. We have a generous forever-free tier and plans for every use case. Sign up for free now!

