How to integrate Grafana Alerting and Telegram
Grafana Alerting helps you identify issues almost immediately after they occur — and you don’t have to constantly check your system to get the insights you need. Instead, Grafana Alerting sends alert notifications to reach you wherever you are, whether that’s in a Slack channel or in a messaging app like Telegram.
Telegram is a viable option for receiving alerts, especially when you want personal or individual notifications rather than those sent to a team. In this post, we will show you how to integrate Telegram with Grafana Alerting, so you can receive alert notifications in your Telegram app.
Getting started: your Telegram bot API token and chat ID
To integrate Grafana with Telegram, you need two pieces of information: your Telegram bot API token and chat ID (i.e., the ID of the Telegram chat where you want to receive the alert rule notifications). Later on in this post, we will use this information to create a contact point for Telegram in Grafana Alerting. Then, we will link that to a Grafana Alerting notification policy, which will route the alerts to our Telegram contact point.
Set up your Telegram bot
In order to send any messages over HTTP to Telegram, you need to create a Telegram bot. You will be able to associate this bot to your chats, and perform different actions with it, such as receiving alerts from Grafana.
To set up your bot, follow these steps:
- Open the Telegram app on your device
- Find the Telegram bot named BotFather
- In the chat, type
/helpto see all possible commands - To obtain the Telegram bot API token, you first need to create your own bot. Type or press
/newbot. - Follow the prompts (choose a name for the bot that ends in bot or _bot)
- Done! Copy your HTTP API token.
Get the chat ID
Now that we have the bot API token, we need to add our bot to a group chat by following the steps below. Once the bot is in the group, you will be able to route your alert notifications to that group.
- In the Telegram app, open a group or start a new one
- Search and add your bot to the group
- Now that the bot is added to the group, let’s interact with it by sending a dummy message that starts with “/”

- We can now get the chat ID, but we can’t simply find it in the Telegram app. Instead, we need to send an HTTP request to the bot. Copy the below URL and replace
{your_bot_api_token}with your bot API token.
https://api.telegram.org/bot{your_bot_api_token}/getUpdates- Paste the URL in your browser
- If the request was successful, you should see a response in JSON format, like so:
...
"chat": {
          "id": -4065678900,
          "title": "Tony and Hello world bot",
          "type": "group",
...- And there it is! Copy the value of the
“id”that appears under“chat”.
Configure Grafana Alerting
Now it’s time to create a contact point for Telegram in Grafana Alerting, and then link that to a Grafana Alerting notification policy.
Create the contact point
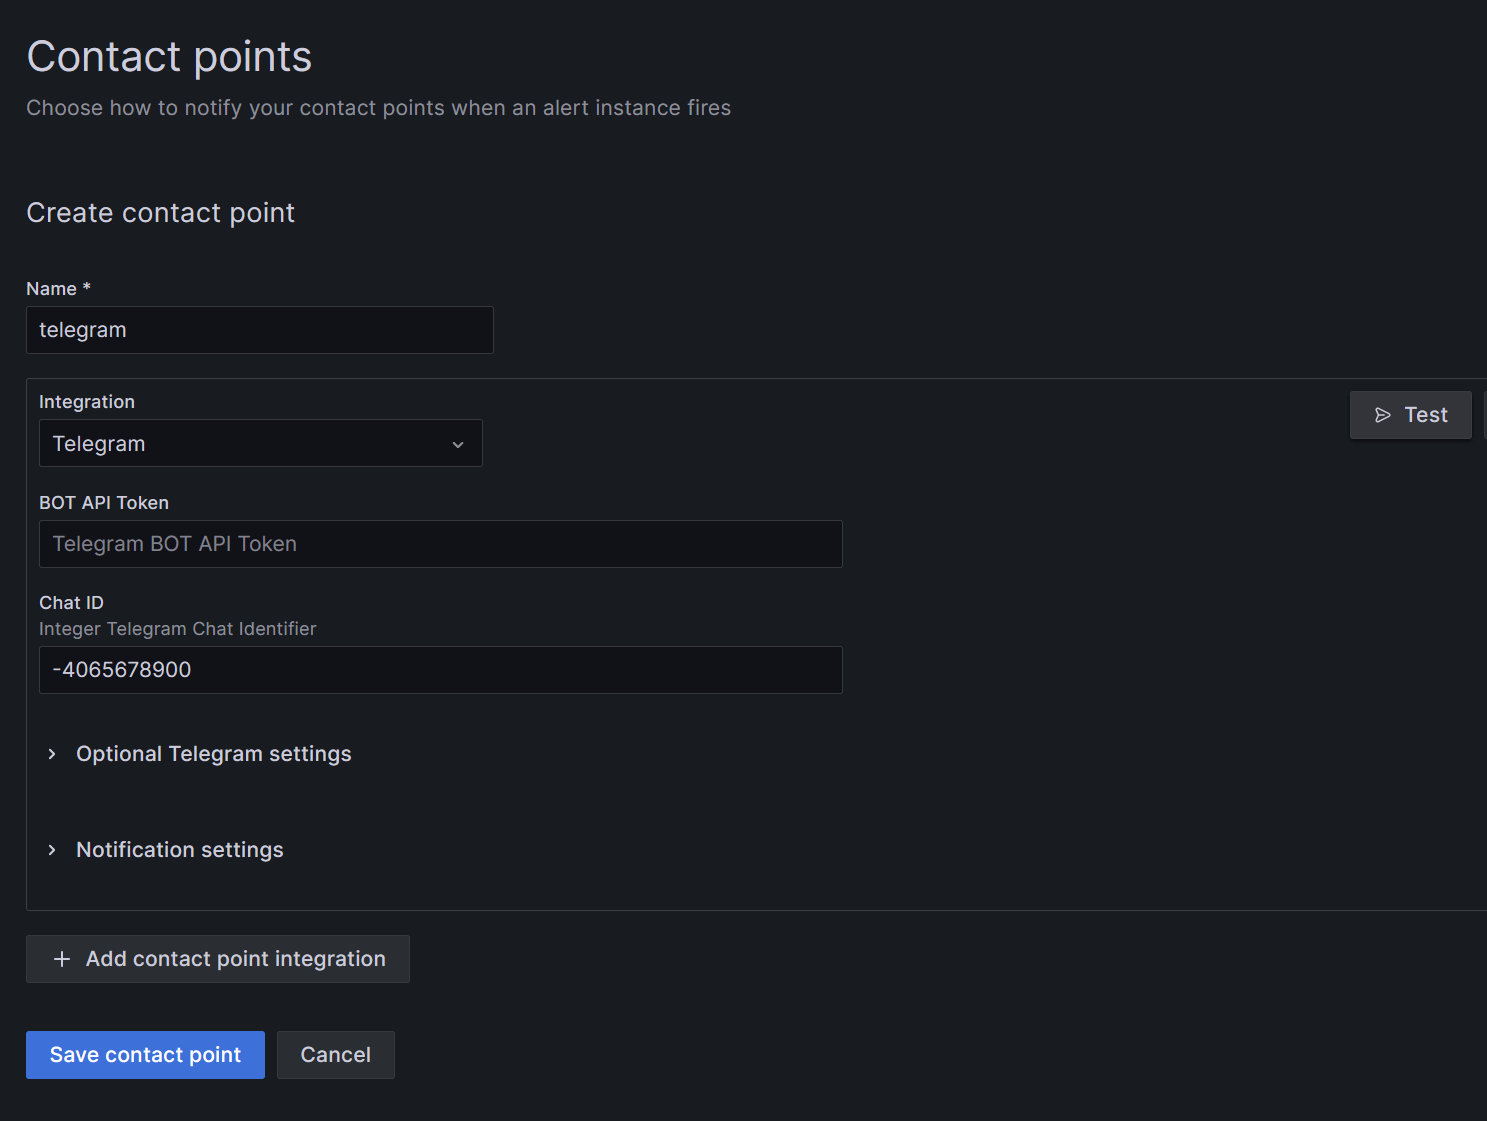
In Grafana, we will add our contact point for Telegram:
- Toggle the side menu and navigate to Alerting > Contact points
- Click on + Add contact point
- Name the contact point. For example:
telegram - Under Integration, select Telegram
- Enter your Telegram credentials: bot API token and chat ID
- Click Test, to check that the integration works. If it does not work, double check that you have copied and pasted your credentials correctly.
- Click Save contact point
Configure the notification policy
Now that we’ve tested that the connection works, we will add this contact point to our notification policy.
- In Grafana’s sidebar, navigate to Notification policies
- Under Default policy, click the ellipsis icon (…)
- Click Edit
- Change the Default contact point to
telegram
Note: if you have more than one contact point, you’ll want to add a new notification policy rather than edit the default one, so you can route specific alerts to Telegram. Learn more here.
That’s it! After following these steps, you will receive your Grafana alerts in Telegram.
To learn more about Grafana Alerting, check out our technical documentation.
Grafana Alerting is available for Grafana OSS, Grafana Enterprise, or Grafana Cloud. The easiest way to get started is with Grafana Cloud’s generous forever-free tier. Sign up for free now!

