How to collect and query Kubernetes logs with Grafana Loki, Grafana, and Grafana Agent
Logging in Kubernetes can help you track the health of your cluster and its applications. Logs can be used to identify and debug any issues that occur. Logging can also be used to gain insights into application and system performance. Moreover, collecting and analyzing application and cluster logs can help identify bottlenecks and optimize your deployment for better performance.
That said, Kubernetes lacks a native solution for managing and analyzing logs. Instead, Kubernetes sends the logs provided by the container engine to standard streams. Fortunately, you can integrate a separate backend to store, analyze, and query logs. For example, you can use a centralized logging solution, like Grafana Loki, to collect and aggregate all of the logs from your Kubernetes cluster in one place.
A centralized logging solution allows you to do the following:
- Audit actions taken on your cluster
- Troubleshoot problems with your applications and clusters
- Gain insights for your performance monitoring strategy
This tutorial first takes a closer look at what Kubernetes logging is. Then we’ll walk you through the following processes:
- Implementing Loki, Grafana, and the Grafana Agent
- Querying and viewing Kubernetes log data using Grafana
- Using metric queries to create metrics from logs
- Setting up alerts from logs
What is Kubernetes logging?
In simple terms, Kubernetes logging architecture allows DevOps teams to collect and view data about what is going on inside the applications and services running on the cluster. However, Kubernetes logging is different from logging on traditional servers and virtual machines in a few ways.
- The logs that Kubernetes collects are not provided directly by the application but by the container engine or runtime. These logs are captured by kubelets, which are agents installed on each node. By default, the kubelet agent keeps logs on the node even after pod termination. This makes it crucial to have a log rotation mechanism that prevents node resources from being overloaded.
- You can use the command
kubectl logto view logs from pods. However, these logs only show you a picture taken at the time of executing the command. Actually, what you need is a backend that allows you to collect logs and perform in-depth data analysis later on. - Kubernetes handles different types of logs, namely application logs, control plane logs, and events. The latter is actually a Kubernetes object that’s intended to provide insights into what’s happening inside nodes and pods and is usually accompanied by logs that expand the output message of the event.
Desipte the differences between traditional logs and Kubernetes logs, it’s still important to set up a logging solution to optimize the performance of your Kubernetes fleet. But before start setting up Grafana Loki in your cluster it’s necessary to review the different deployment modes that Loki, the log-aggregator component, offers. That way, you’ll understand the pros and cons of each.
Loki deployment modes
Loki has three different deployment modes to choose from. Basically, these modes give DevOps teams control over how Loki scales.
- Monolithic mode: As the name suggests, in this mode, all Loki components — the distributor, ingestor, ruler, querier, and query frontend — run as a single binary or single process inside a container. The advantages of this approach is its simplicity in both deployment and configuration, which makes it ideal for those who want to try out Loki. This mode is also appropriate for use cases with read/write volumes not exceeding 100GB per day.
- Microservices mode: This mode allows you to manage each Loki component as an independent target, giving your team maximum control over their scalability. As expected, this approach allows Loki to process huge amounts of logs, which makes this mode ideal for large-scale projects. However, the greater log processing capacity comes at the price of increased complexity.
- Scalable mode: This mode allows Loki to scale to several TBs of logs per day. This is possible by separating read and write concerns into independent microservices, which makes it easy to scale the deployment as needed. Furthermore, separating read and write targets improves Loki’s performance to levels that are difficult to achieve with a monolithic solution. However, you should note that this mode requires a load balancer or gateway to manage the traffic between read and write nodes. As you can imagine, the simple scalable deployment mode is ideal for use cases requiring a logging solution that handles large volumes of logs daily.
You’ll use the scalable mode in this tutorial as it will allow you to see how easy it is to implement Loki to handle a large volume of logs.
Now let’s move on to how to actually query Kubernetes logs with Grafana Loki, Grafana, and Grafana Agent.
Setting up logging in Kubernetes with the Grafana LGTM Stack
The Grafana LGTM Stack (Loki for logs, Grafana for visualizations, tempo for traces, and Mimir for metrics) is a comprehensive open source observability ecosystem. In this tutorial, you’ll use the following components:
- Grafana Loki: Loki is a horizontally scalable, highly available, multitenant log aggregation system inspired by Prometheus. For this reason, you can think of Loki as the heart of this deployment since it will be responsible for handling the logs.
- Grafana: Grafana is the leading open source visualization tool. This tutorial will use Grafana dashboards to visualize logs, run queries, and set alerts.
- Grafana Agent: You can think of the Grafana Agent as a telemetry collector for the LGTM stack. Although you’ll use it to collect logs, the Grafana Agent is also known for its versatility in collecting metrics and traces of applications and services.
Prerequisites
To complete this step-by-step tutorial, you’ll need the following:
- A Kubernetes cluster with a control plane and at least two worker nodes to see how Loki works in a scalable mode
- A local machine with kubectl and Helm installed and configured
Setting up Loki and the Grafana Agent with Helm
From your local machine, add the Grafana Helm chart using the following command:
helm repo add grafana https://grafana.github.io/helm-charts
"grafana" has been added to your repositories
Update Helm charts using the following code:
helm repo update
Hang tight while we grab the latest from your chart repositories...
...Successfully got an update from the "grafana" chart repository
Update Complete. ⎈Happy Helming!⎈
Before continuing, take a moment to review the charts available for Loki:
helm search repo loki
NAME                        	CHART VERSION   APP VERSION 	DESCRIPTION
grafana/loki                	4.7.0       	2.7.3       	Helm chart for Grafana Loki in simple, scalable...
grafana/loki-canary         	0.10.0      	2.6.1       	Helm chart for Grafana Loki Canary
grafana/loki-distributed    	0.69.6      	2.7.3       	Helm chart for Grafana Loki in microservices mode
grafana/loki-simple-scalable	1.8.11      	2.6.1       	Helm chart for Grafana Loki in simple, scalable...
grafana/loki-stack          	2.9.9       	v2.6.1      	Loki: like Prometheus, but for logs.
grafana/fluent-bit          	2.3.2       	v2.1.0      	Uses fluent-bit Loki go plugin for gathering lo...
grafana/promtail            	6.9.0       	2.7.3       	Promtail is an agent which ships the contents o...
As you can see, you have several alternatives to choose from. In this case, the best choice is grafana/loki. (grafana/loki-simple-scalable has been deprecated.)
You’ll now install the grafana/loki chart. It’s good practice to create a separate environment for your logging stack as this gives you more control over permissions and helps you keep resource consumption in check. Create a new namespace called loki:
kubectl create ns lokiLoki requires an S3-compatible object storage solution to store Kubernetes cluster logs. For simplicity, you’ll use MinIO in this tutorial. To enable it, you’ll need to edit Loki’s Helm Chart values file.
Create a file named values.yml and paste the following config in the file:
minio:
  enabled: true
Save the chart and install grafana/loki in the loki namespace using the following command:
helm upgrade --install --namespace loki logging grafana/loki -f values.yml --set loki.auth_enabled=falseThe output should be similar to this:
Release "logging" does not exist. Installing it now.
NAME: logging
LAST DEPLOYED: Mon Feb 27 09:22:00 2023
NAMESPACE: loki
STATUS: deployed
REVISION: 1
NOTES:
***********************************************************************
 Welcome to Grafana Loki
 Chart version: 4.4.0
 Loki version: 2.7.0
***********************************************************************

Installed components:
* grafana-agent-operator
* gateway
* minio
* read
* write
* backend
The command installs Loki, the Grafana Agent Operator, and MinIO from the local chart you modified. To simplify this tutorial, the flag --set loki.auth_enabled=false was used to avoid using a proxy for Grafana Loki authentication.
With Loki and the Grafana Agent installed, the next step is setting up Grafana’s frontend.
Setting up Grafana with Helm
Grafana is a powerful platform to create queries, set up alerts, view logs and metrics, and more. Since you’ve already added the corresponding Helm chart, you can install Grafana in the loki namespace using the following command:
helm upgrade --install --namespace=loki loki-grafana grafana/grafanaTo verify the installation of the logging stack components (Loki, Agent, and Grafana), you can use the following command:
kubectl get all -n lokiThe output should be similar to the following:
NAME                                              	READY   STATUS	RESTARTS   	AGE
pod/logging-minio-0                               	1/1 	Running   1 (155m ago)   40h
pod/logging-grafana-agent-operator-5c8d7bbfd9-g7m2c   1/1 	Running   1 (155m ago)   40h
pod/loki-grafana-79bc49978f-9cffd                 	1/1 	Running   1 (155m ago)   40h
pod/logging-loki-logs-5d9xg                       	2/2 	Running   2 (155m ago)   40h
pod/logging-loki-logs-97786                       	2/2 	Running   2 (155m ago)   40h
pod/logging-loki-logs-8n22r                       	2/2 	Running   2 (155m ago)   40h
pod/loki-gateway-5c778d6557-jfxjj                 	1/1 	Running   0          	18m
pod/loki-canary-xpp6v                             	1/1 	Running   0          	18m
pod/loki-read-575457cc44-85kdb                    	1/1 	Running   0          	18m
pod/loki-read-575457cc44-lnbh8                    	1/1 	Running   0          	18m
pod/loki-backend-1                                	1/1 	Running   0          	18m
pod/loki-backend-0                                	1/1 	Running   0          	18m
pod/loki-read-575457cc44-jldvt                    	1/1 	Running   0          	18m
pod/loki-backend-2                                	1/1 	Running   0          	18m
pod/loki-write-2                                  	1/1 	Running   0          	18m
pod/loki-canary-wv5x5                             	1/1 	Running   0          	16m
pod/loki-canary-qjjgn                             	1/1 	Running   0          	16m
pod/loki-write-1                                  	1/1 	Running   0          	16m
pod/loki-write-0                                  	1/1 	Running   0          	15m

NAME                        	TYPE    	CLUSTER-IP  	EXTERNAL-IP   PORT(S)         	AGE
service/loki-write-headless 	ClusterIP   None        	<none>    	3100/TCP,9095/TCP   40h
service/loki-read-headless  	ClusterIP   None        	<none>    	3100/TCP,9095/TCP   40h
service/loki-grafana        	ClusterIP   10.43.68.47 	<none>    	80/TCP          	40h
service/logging-minio-console   ClusterIP   10.43.86.206	<none>    	9001/TCP        	40h
service/logging-minio       	ClusterIP   10.43.94.154	<none>    	9000/TCP        	40h
service/logging-minio-svc   	ClusterIP   None        	<none>    	9000/TCP        	40h
service/loki-backend-headless   ClusterIP   None        	<none>    	3100/TCP,9095/TCP   18m
service/loki-backend        	ClusterIP   10.43.114.191   <none>    	3100/TCP,9095/TCP   18m
service/loki-gateway        	ClusterIP   10.43.138.230   <none>    	80/TCP          	40h
service/loki-canary         	ClusterIP   10.43.85.250	<none>    	3500/TCP        	40h
service/loki-read           	ClusterIP   10.43.69.223	<none>    	3100/TCP,9095/TCP   40h
service/loki-memberlist     	ClusterIP   None        	<none>    	7946/TCP        	40h
service/loki-write          	ClusterIP   10.43.39.76 	<none>    	3100/TCP,9095/TCP   40h

NAME                           	DESIRED   CURRENT   READY   UP-TO-DATE   AVAILABLE   NODE SELECTOR   AGE
daemonset.apps/logging-loki-logs   3     	3     	3   	3        	3       	<none>      	40h
daemonset.apps/loki-canary     	3     	3     	3   	3        	3       	<none>      	40h

NAME                                         	READY   UP-TO-DATE   AVAILABLE   AGE
deployment.apps/logging-grafana-agent-operator   1/1 	1        	1       	40h
deployment.apps/loki-grafana                 	1/1 	1        	1       	40h
deployment.apps/loki-gateway                 	1/1 	1        	1       	40h
deployment.apps/loki-read                    	3/3 	3        	3       	18m

NAME                                                    	DESIRED   CURRENT   READY   AGE
replicaset.apps/logging-grafana-agent-operator-5c8d7bbfd9   1     	1     	1   	40h
replicaset.apps/loki-grafana-79bc49978f                 	1     	1     	1   	40h
replicaset.apps/loki-gateway-5c778d6557                 	1     	1     	1   	18m
replicaset.apps/loki-gateway-5d69c5f585                 	0     	0     	0   	40h
replicaset.apps/loki-read-575457cc44                    	3     	3     	3   	18m

NAME                         	READY   AGE
statefulset.apps/logging-minio   1/1 	40h
statefulset.apps/loki-backend	3/3 	18m
statefulset.apps/loki-write  	3/3 	40h
Now that all of your logging stack components are in place, we’ll configure Loki as the Grafana data source, which is necessary to visualize Kubernetes logs.
Configuring a data source in Grafana
To access the Grafana UI, you first need the access token created during installation:
kubectl get secret --namespace loki loki-grafana -o jsonpath="{.data.admin-password}" | base64 --decode ; echoCopy the token to a safe place as you’ll need it shortly. Next, allow Grafana traffic to be forwarded to your local machine using the following command:
kubectl port-forward --namespace loki service/loki-grafana 3000:80Now in your browser navigate to the address http://localhost:3000 and enter admin as the username and the access token as the password.

After accessing the main page, click Data Sources.
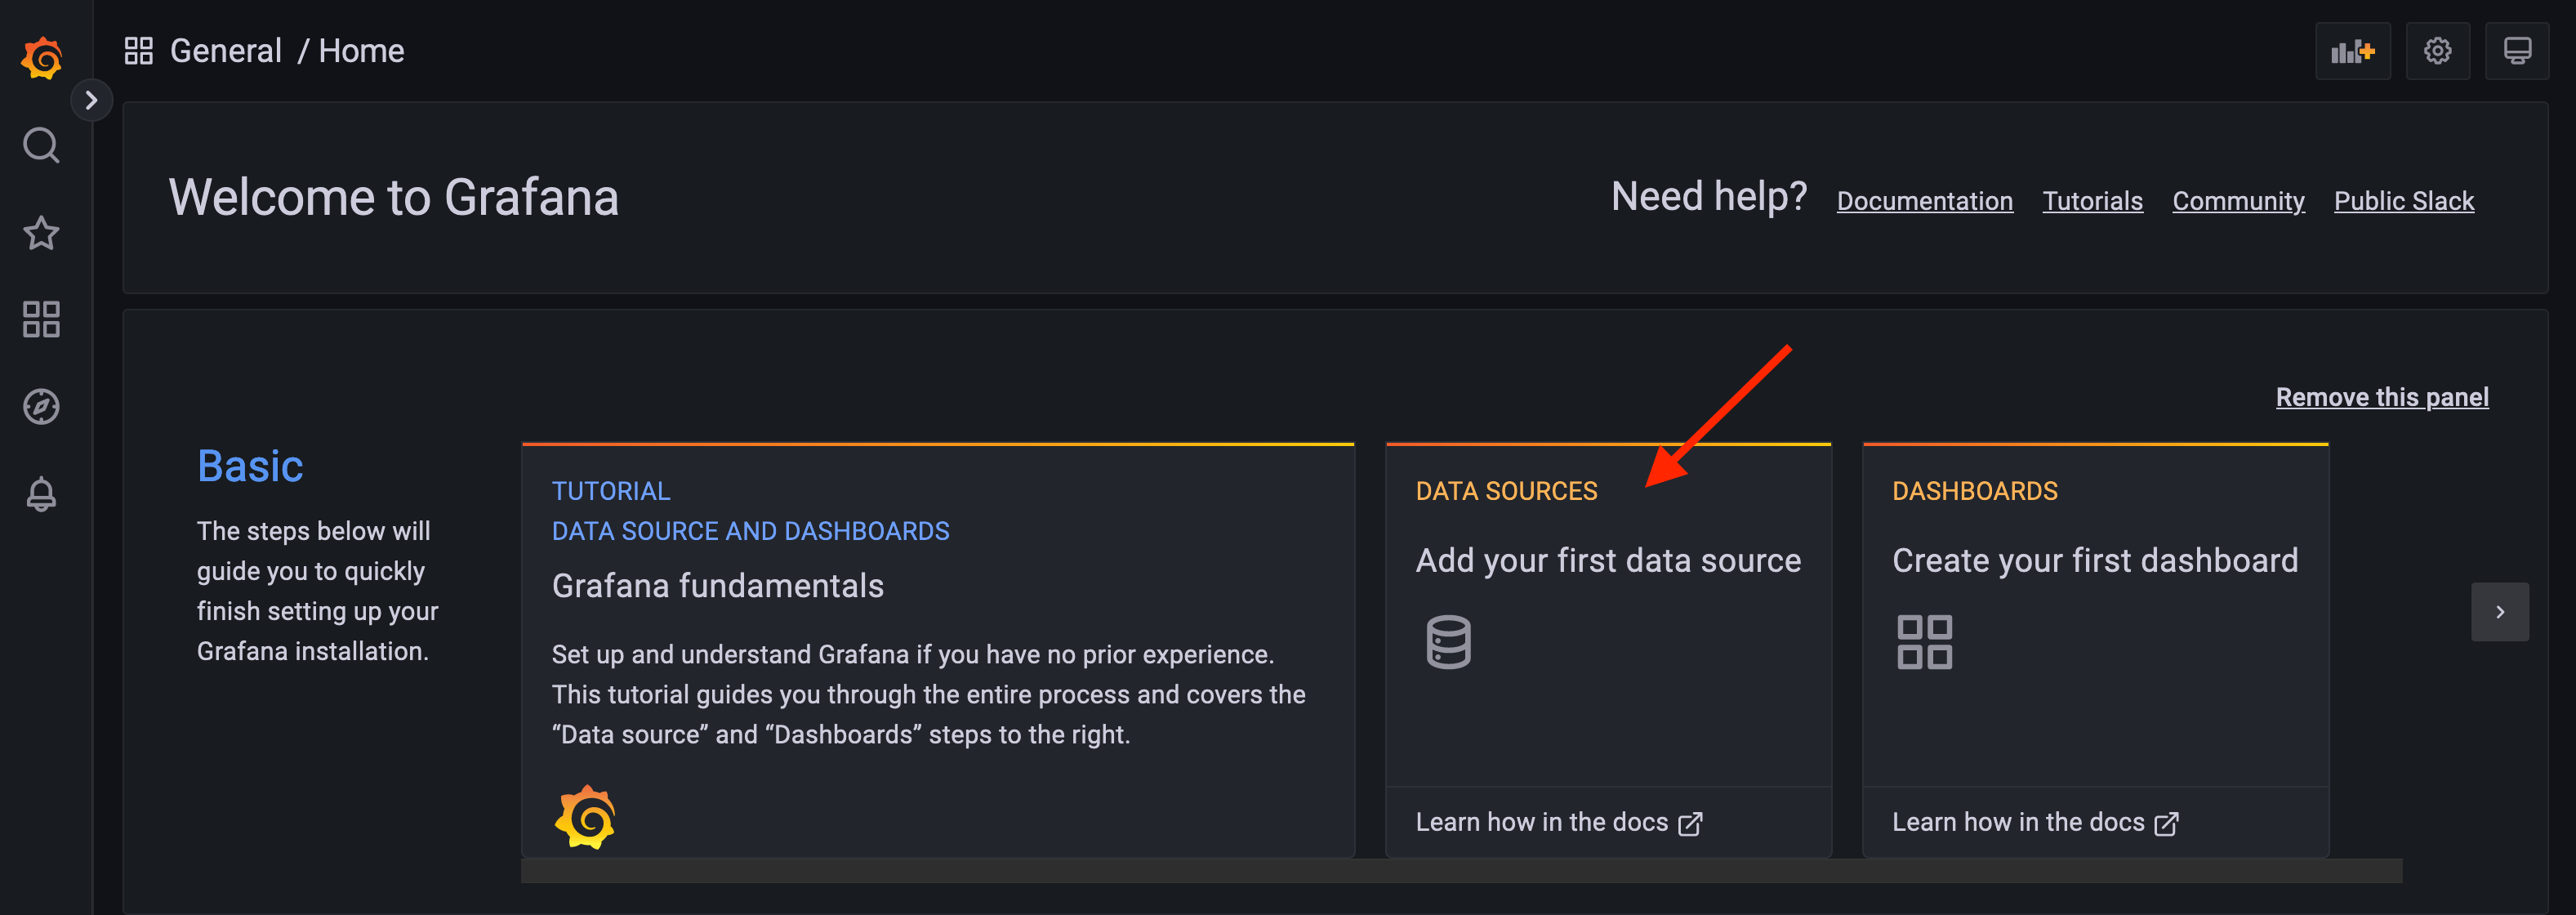
Scroll down until you find Loki and click it to add it as a data source.

The next screen is very important. You’ll need to enter the URL that Grafana will use to access the Loki backend. This URL must be a fully qualified domain name (FQDN) following the format <service-name>.<namespace-of-the-service>.svc.cluster.local.
For this tutorial, that URL would be http://loki-gateway.loki.svc.cluster.local. Once the URL has been entered, you can leave the other fields as they are and press the Save and test button. You’ll know that everything is working as expected if you see the message “Data source connected and labels found” as shown below:
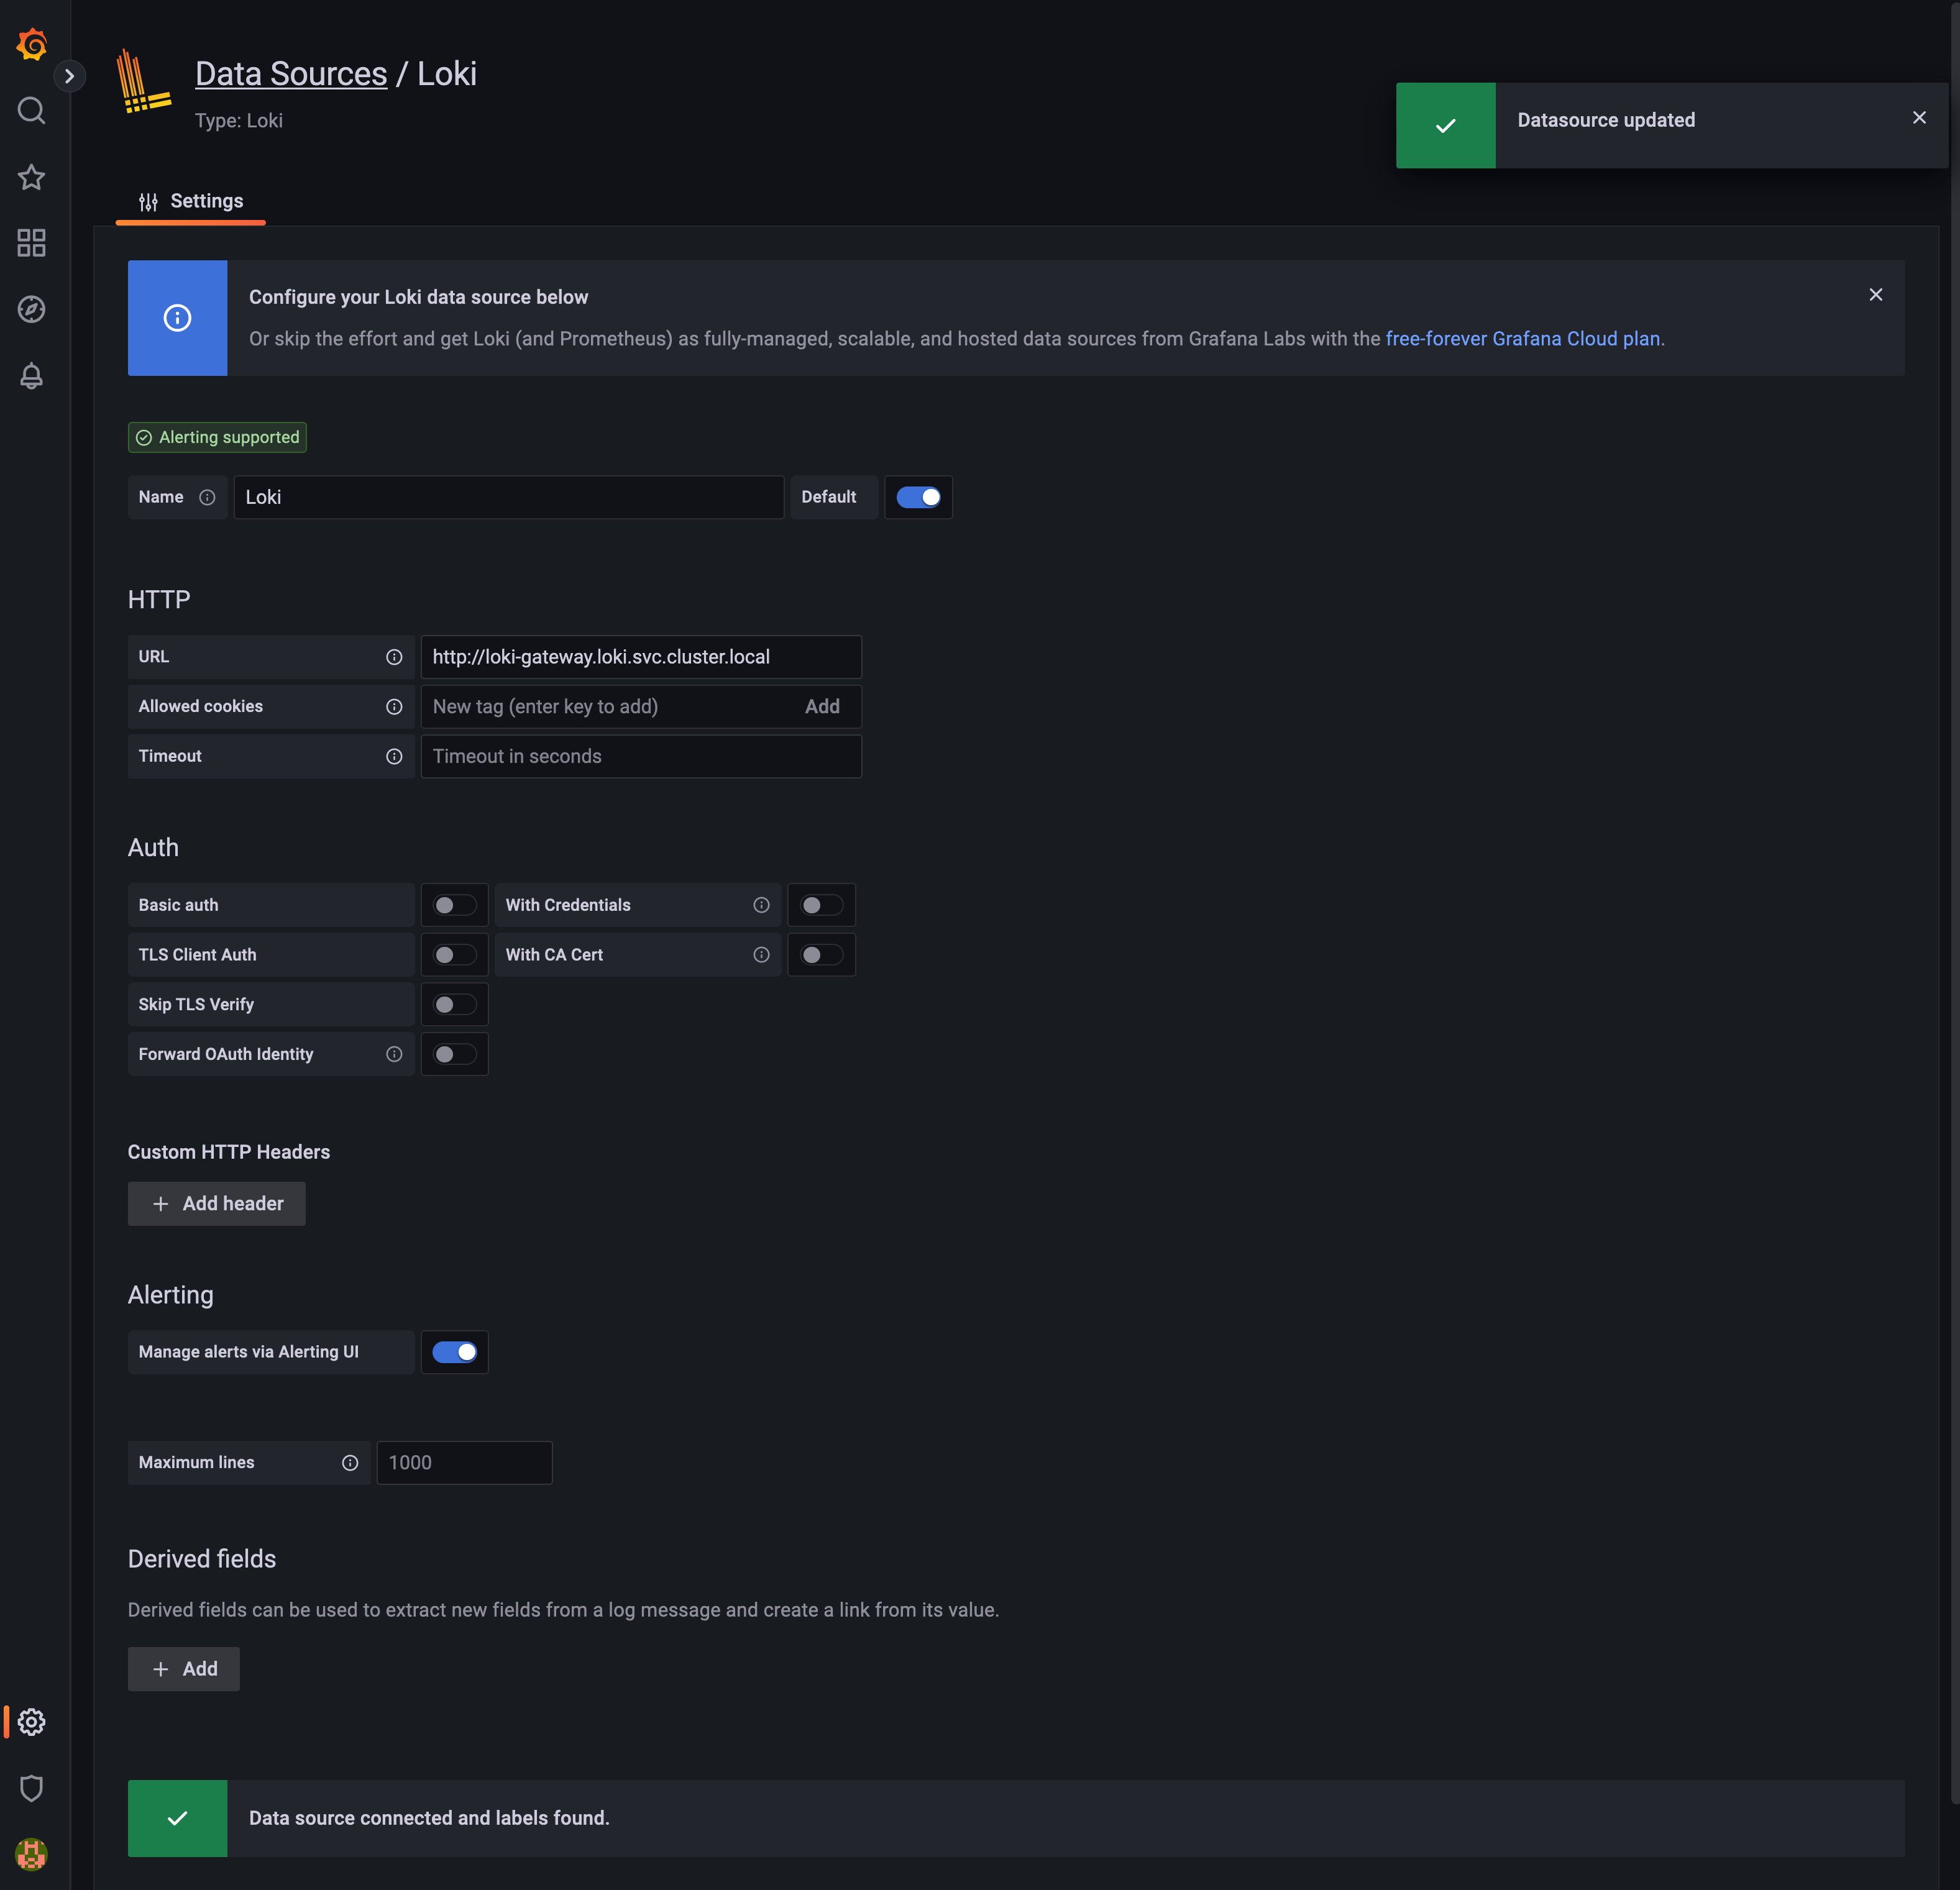
With Loki configured as Grafana’s data source, you’re ready to manage your logs from the UI.
Managing Logs in Grafana
In this section, you’ll learn how to use Grafana Loki to query logs, create metrics from those logs, and finally set up alerts based on metrics.
How to query logs in Grafana
In Loki, you use LogQL, a query language inspired by PromQL, to select a specific log stream using Kubernetes labels and label selectors. Furthermore, LogQL allows you to perform two types of queries: log queries and metric queries.
Let’s start by performing log queries. To do this, go to the Grafana Explore view by clicking the compass icon to your left. By default, the Query Builder is selected. The query builder is intended to make it easier for users who are not familiar with LogQL syntax to build queries. However, in this tutorial, you’ll use LogQL, so click the Code tab as shown below.
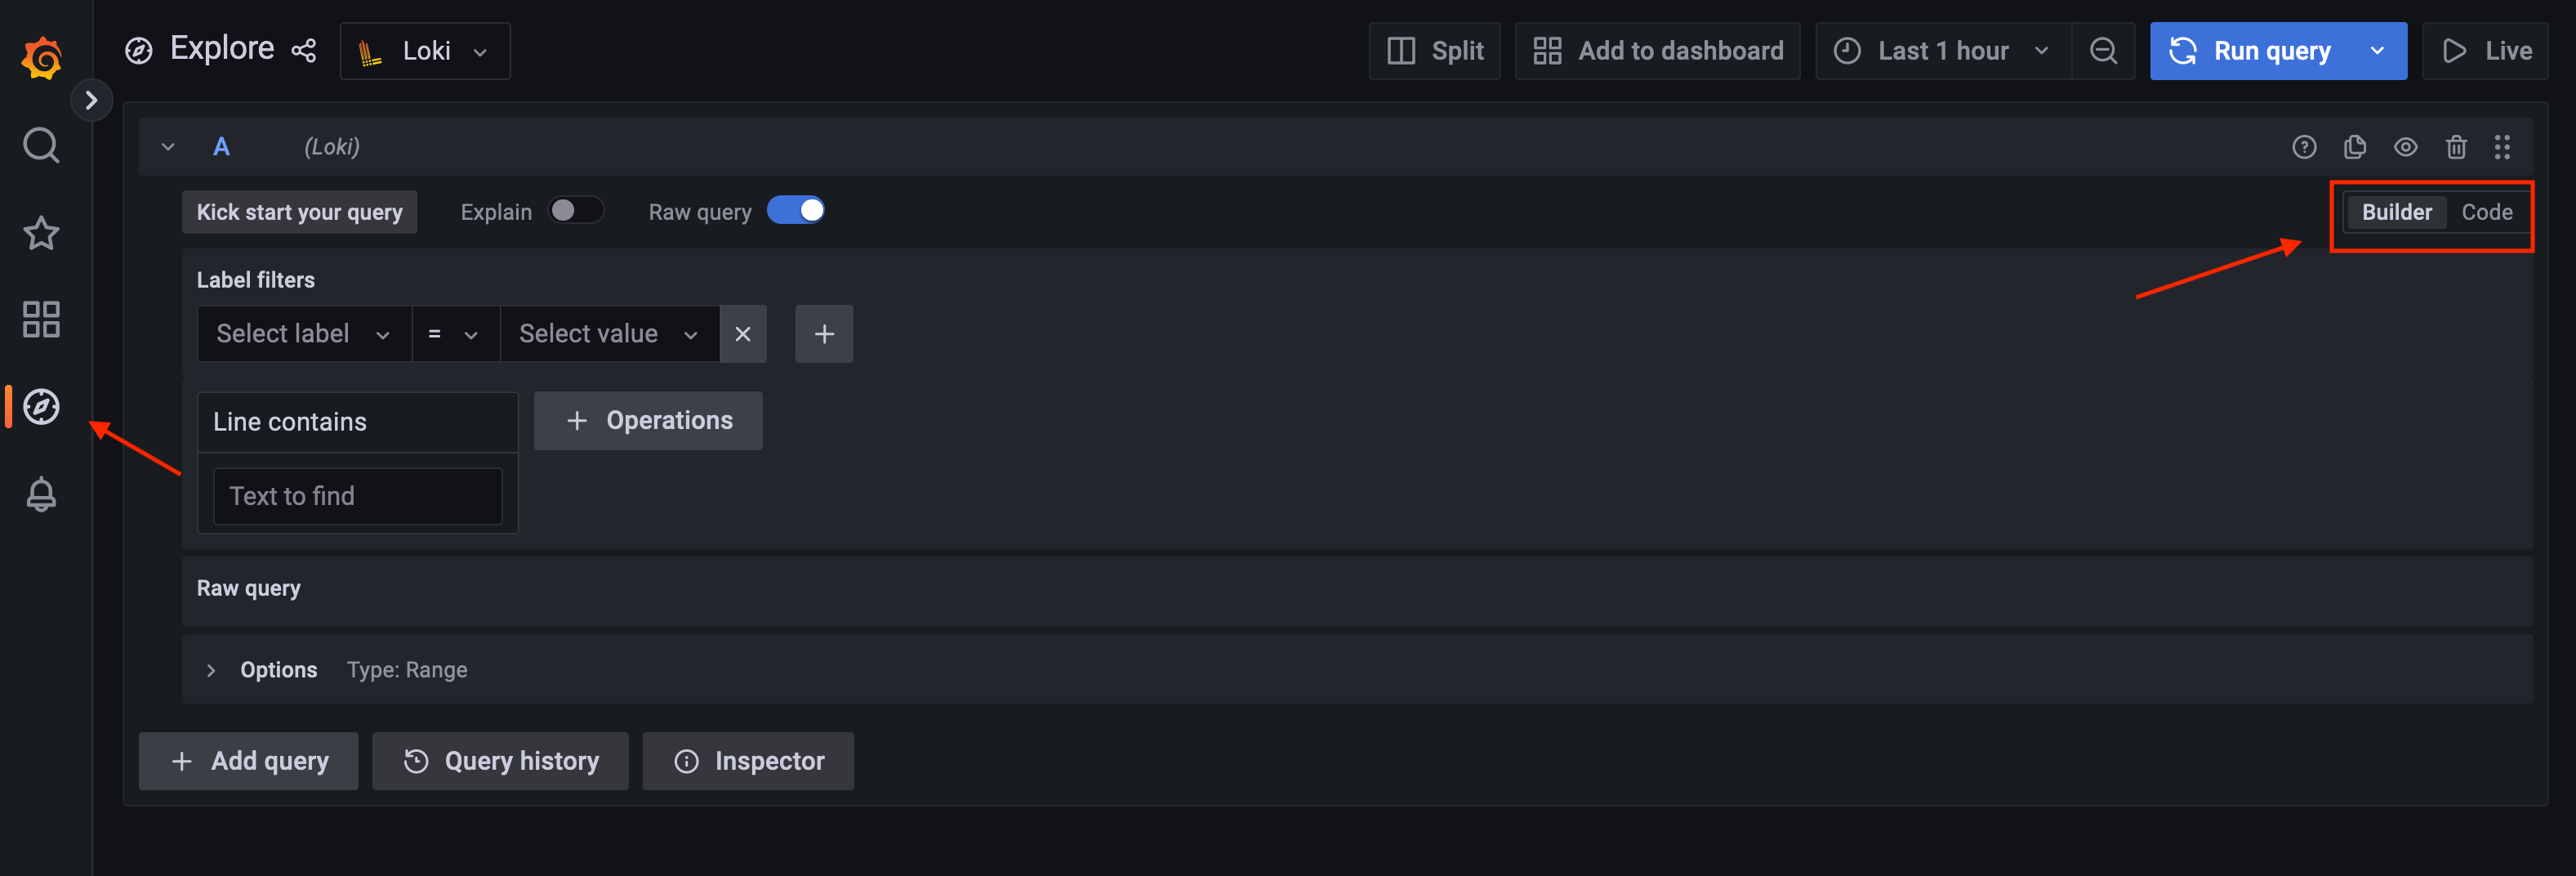
You’ll use {label="label selector"} for this tutorial, which is one of the simpler LogQL expressions. To test it, you’ll query the log output of the standard error stream stderr as it will make it easier to create metrics and alerts later.
To do that, paste the following LogQL code in Label browser box:
{stream="stderr"} |= ``Ignore the regular expression |= for a moment; you’ll move on to that shortly. Instead, press the Run query button located in the upper right corner. The output should be similar to the following:

At the top, the volume of the logs are shown, and at the bottom, you can see the actual logs, the equivalent of using the kubectl logs command. Also, at the top, there is a help dialog box explaining the LogQL code used.
The screen above shows only a fraction of what you can achieve in Grafana Explore. You can add more queries, view query history, customize the view, and more.
Something else you can do from Grafana Explore is to perform metric queries. This type of query allows you to visualize your logs in graphs, something useful to detect patterns more easily.
How to perform metric queries in Grafana
Let’s start by reviewing the code used in the previous section:
{stream="stderr"} |= ``You’ll remember that you ignored the regular expression |=. In LogQL, you can pipe regular expressions to filter logs. For example, you could use the following query to get only logs that contain level=error from the stderr stream:
{stream="stderr"} |= `level=error`The ability to pipe queries and regular expressions allow you to create complex queries; however, they are still log queries. To get metric queries, you need to use a function that quantifies the occurrence of a certain condition.
Consider the following code:
count_over_time({stream="stderr"} |= `level=error` [5m])As you might expect, the purpose of count_over_time is to quantify the occurrence of our log query in a certain amount of time — in this example, every five minutes.
Give it a try, and enter the code shown above in the Label browser box and press the Run query button. The result should be similar to the following:
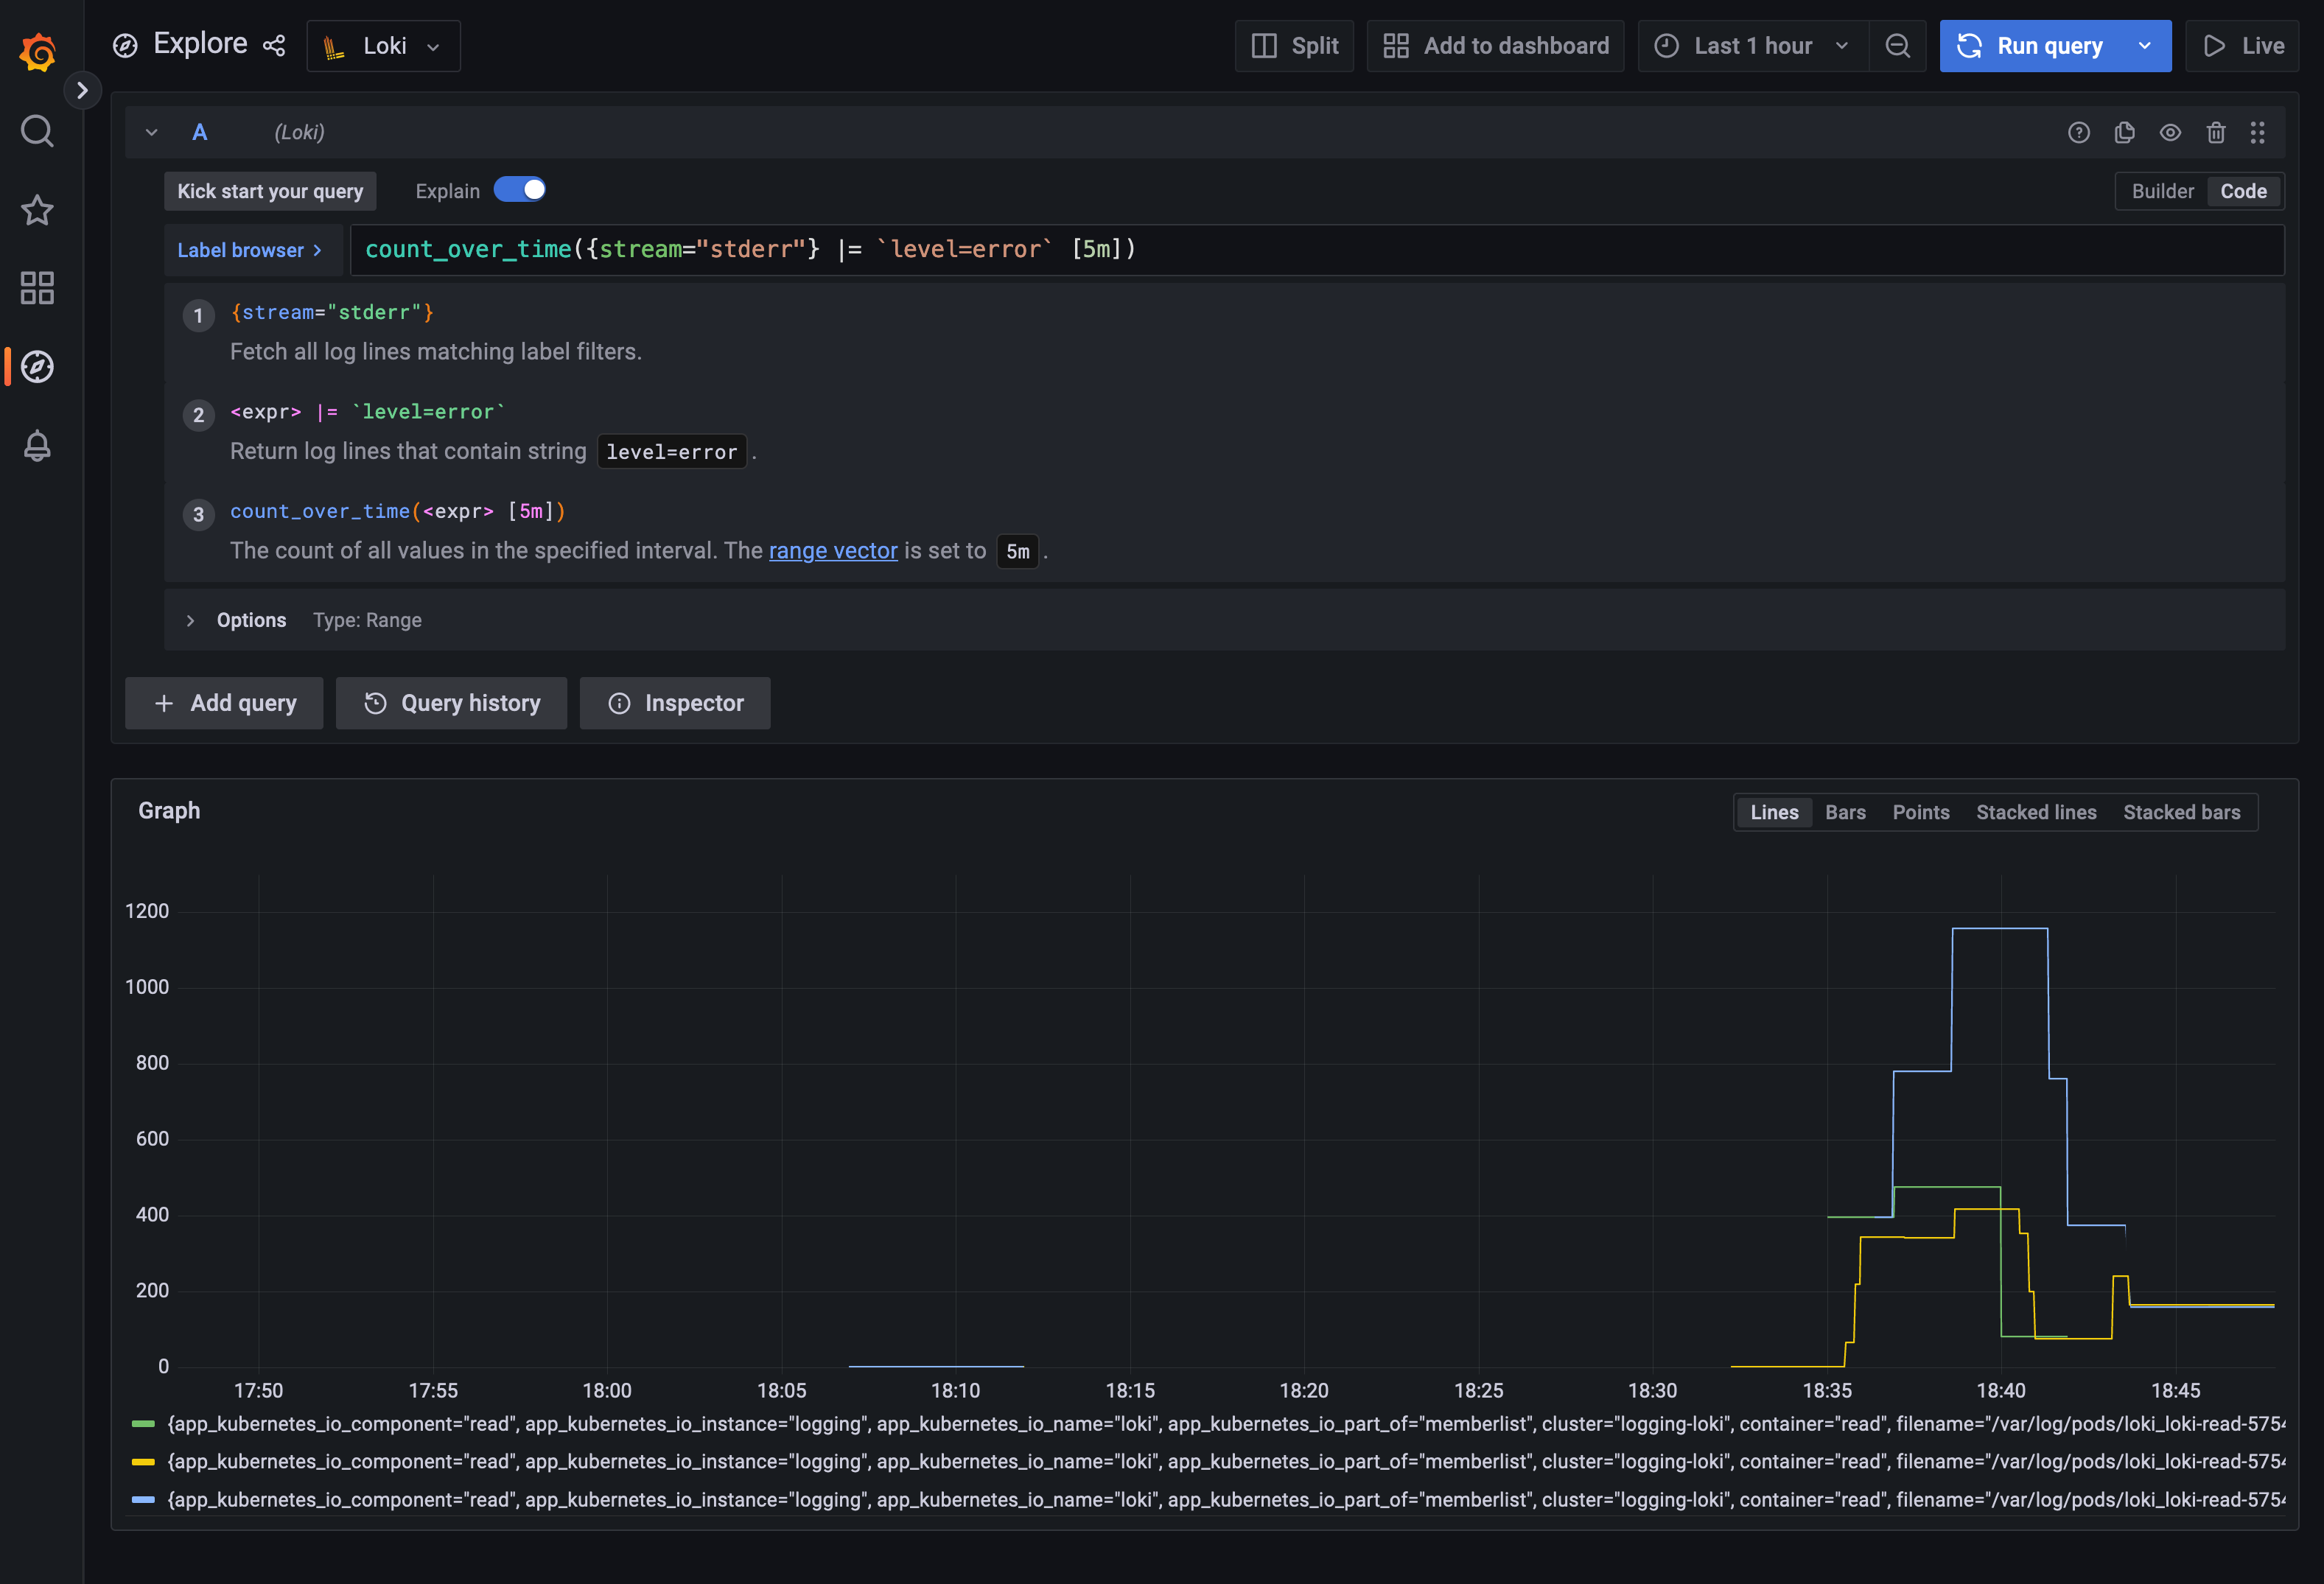
At the top, the LogQL code is briefly explained, and the logs are shown as a line graph at the bottom. This example shows three lines corresponding to errors in the three loki-read pods.
As before, you can customize this view to your liking. You can also add this panel to a dashboard by pressing the Add to dashboard button, as shown below:

In the image below, an example of a dashboard showing error metrics from a logging stream is shown:

As you can see, Grafana Loki can help your team have better observability for your cluster’s logs. But what if an issues arises?
In the final part of this tutorial, we’ll show you how to set up alerts from logs to add another level of insight into the health and performance of your fleet.
How to set up alerts from logs
One of the most useful features of Grafana is its powerful alerting system. To set up an alert, click the bell icon on your left to access the Alerting view.

Next, click the New alert rule button to take you to a screen similar to Explore, as shown below. You’ll use the same LogQL query as in the previous section to set up alerts. A brief explanation of the code will appear again as well as the graph that was derived from the metric query. However, you’ll notice that a red horizontal line is also displayed. This line corresponds to the threshold that triggers the alert.
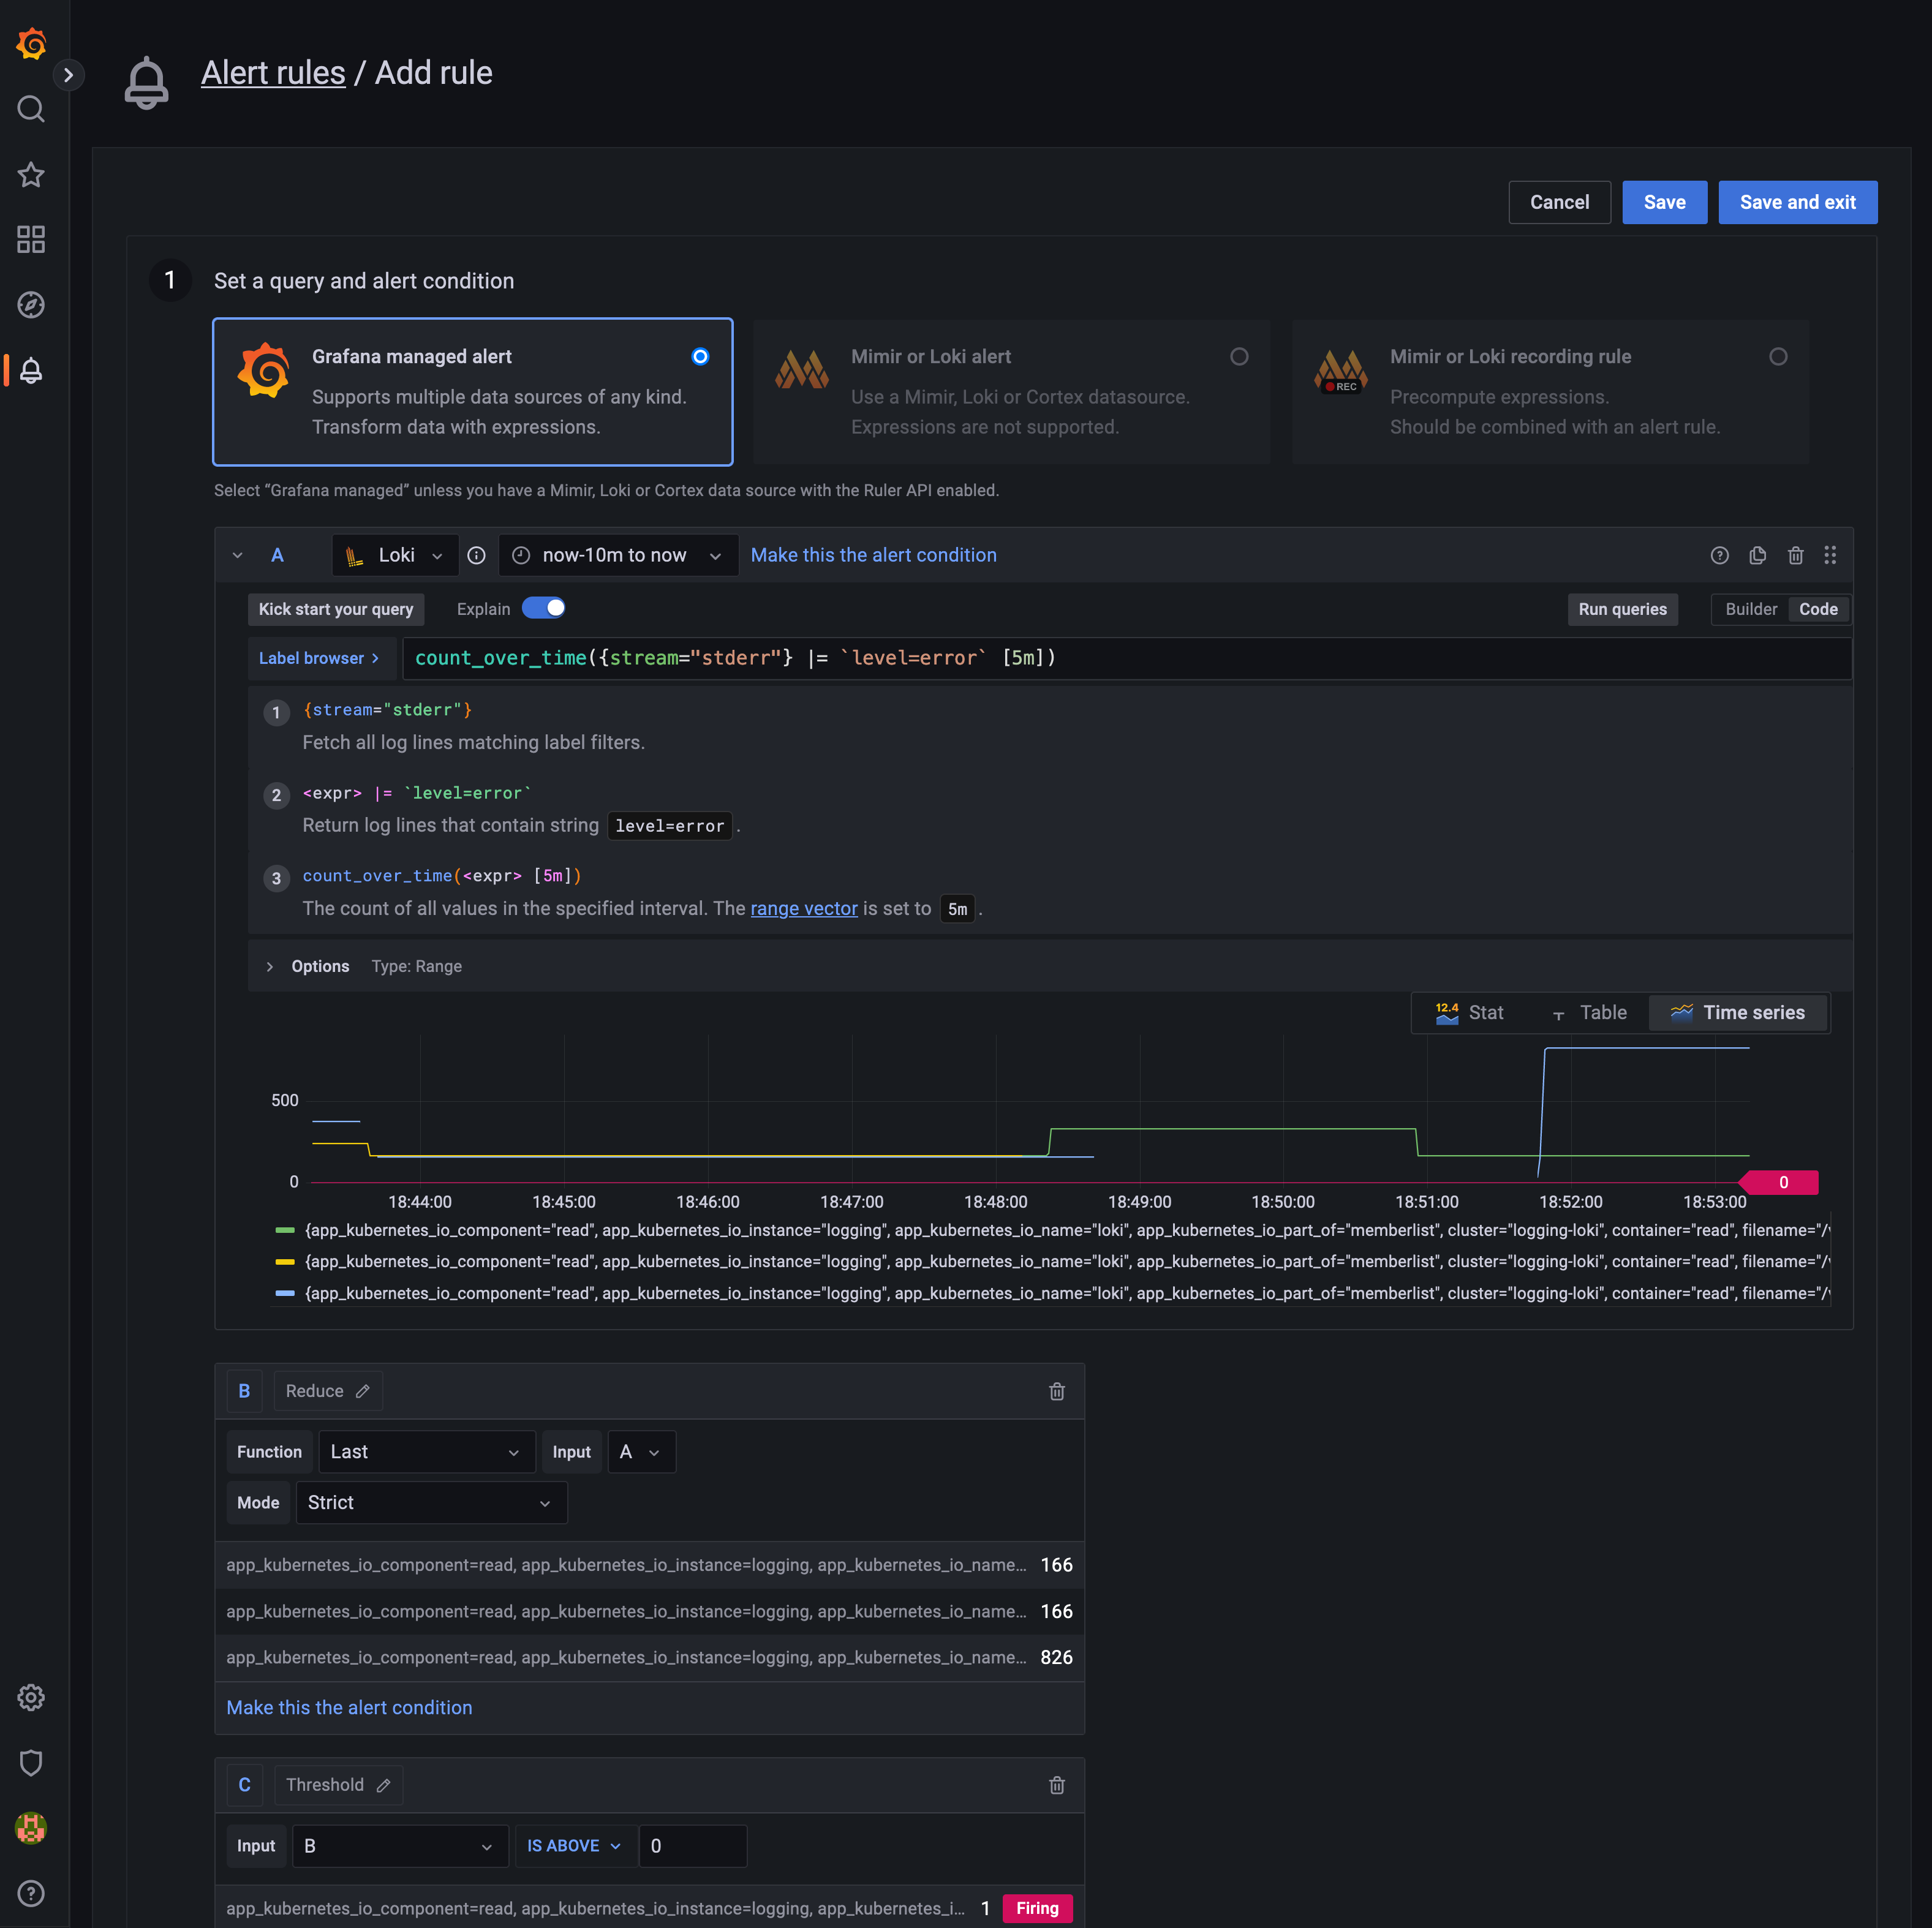
The screen below shows the result of setting the threshold to 400, which in this example only triggers an alert corresponding to the pod represented by the blue line.

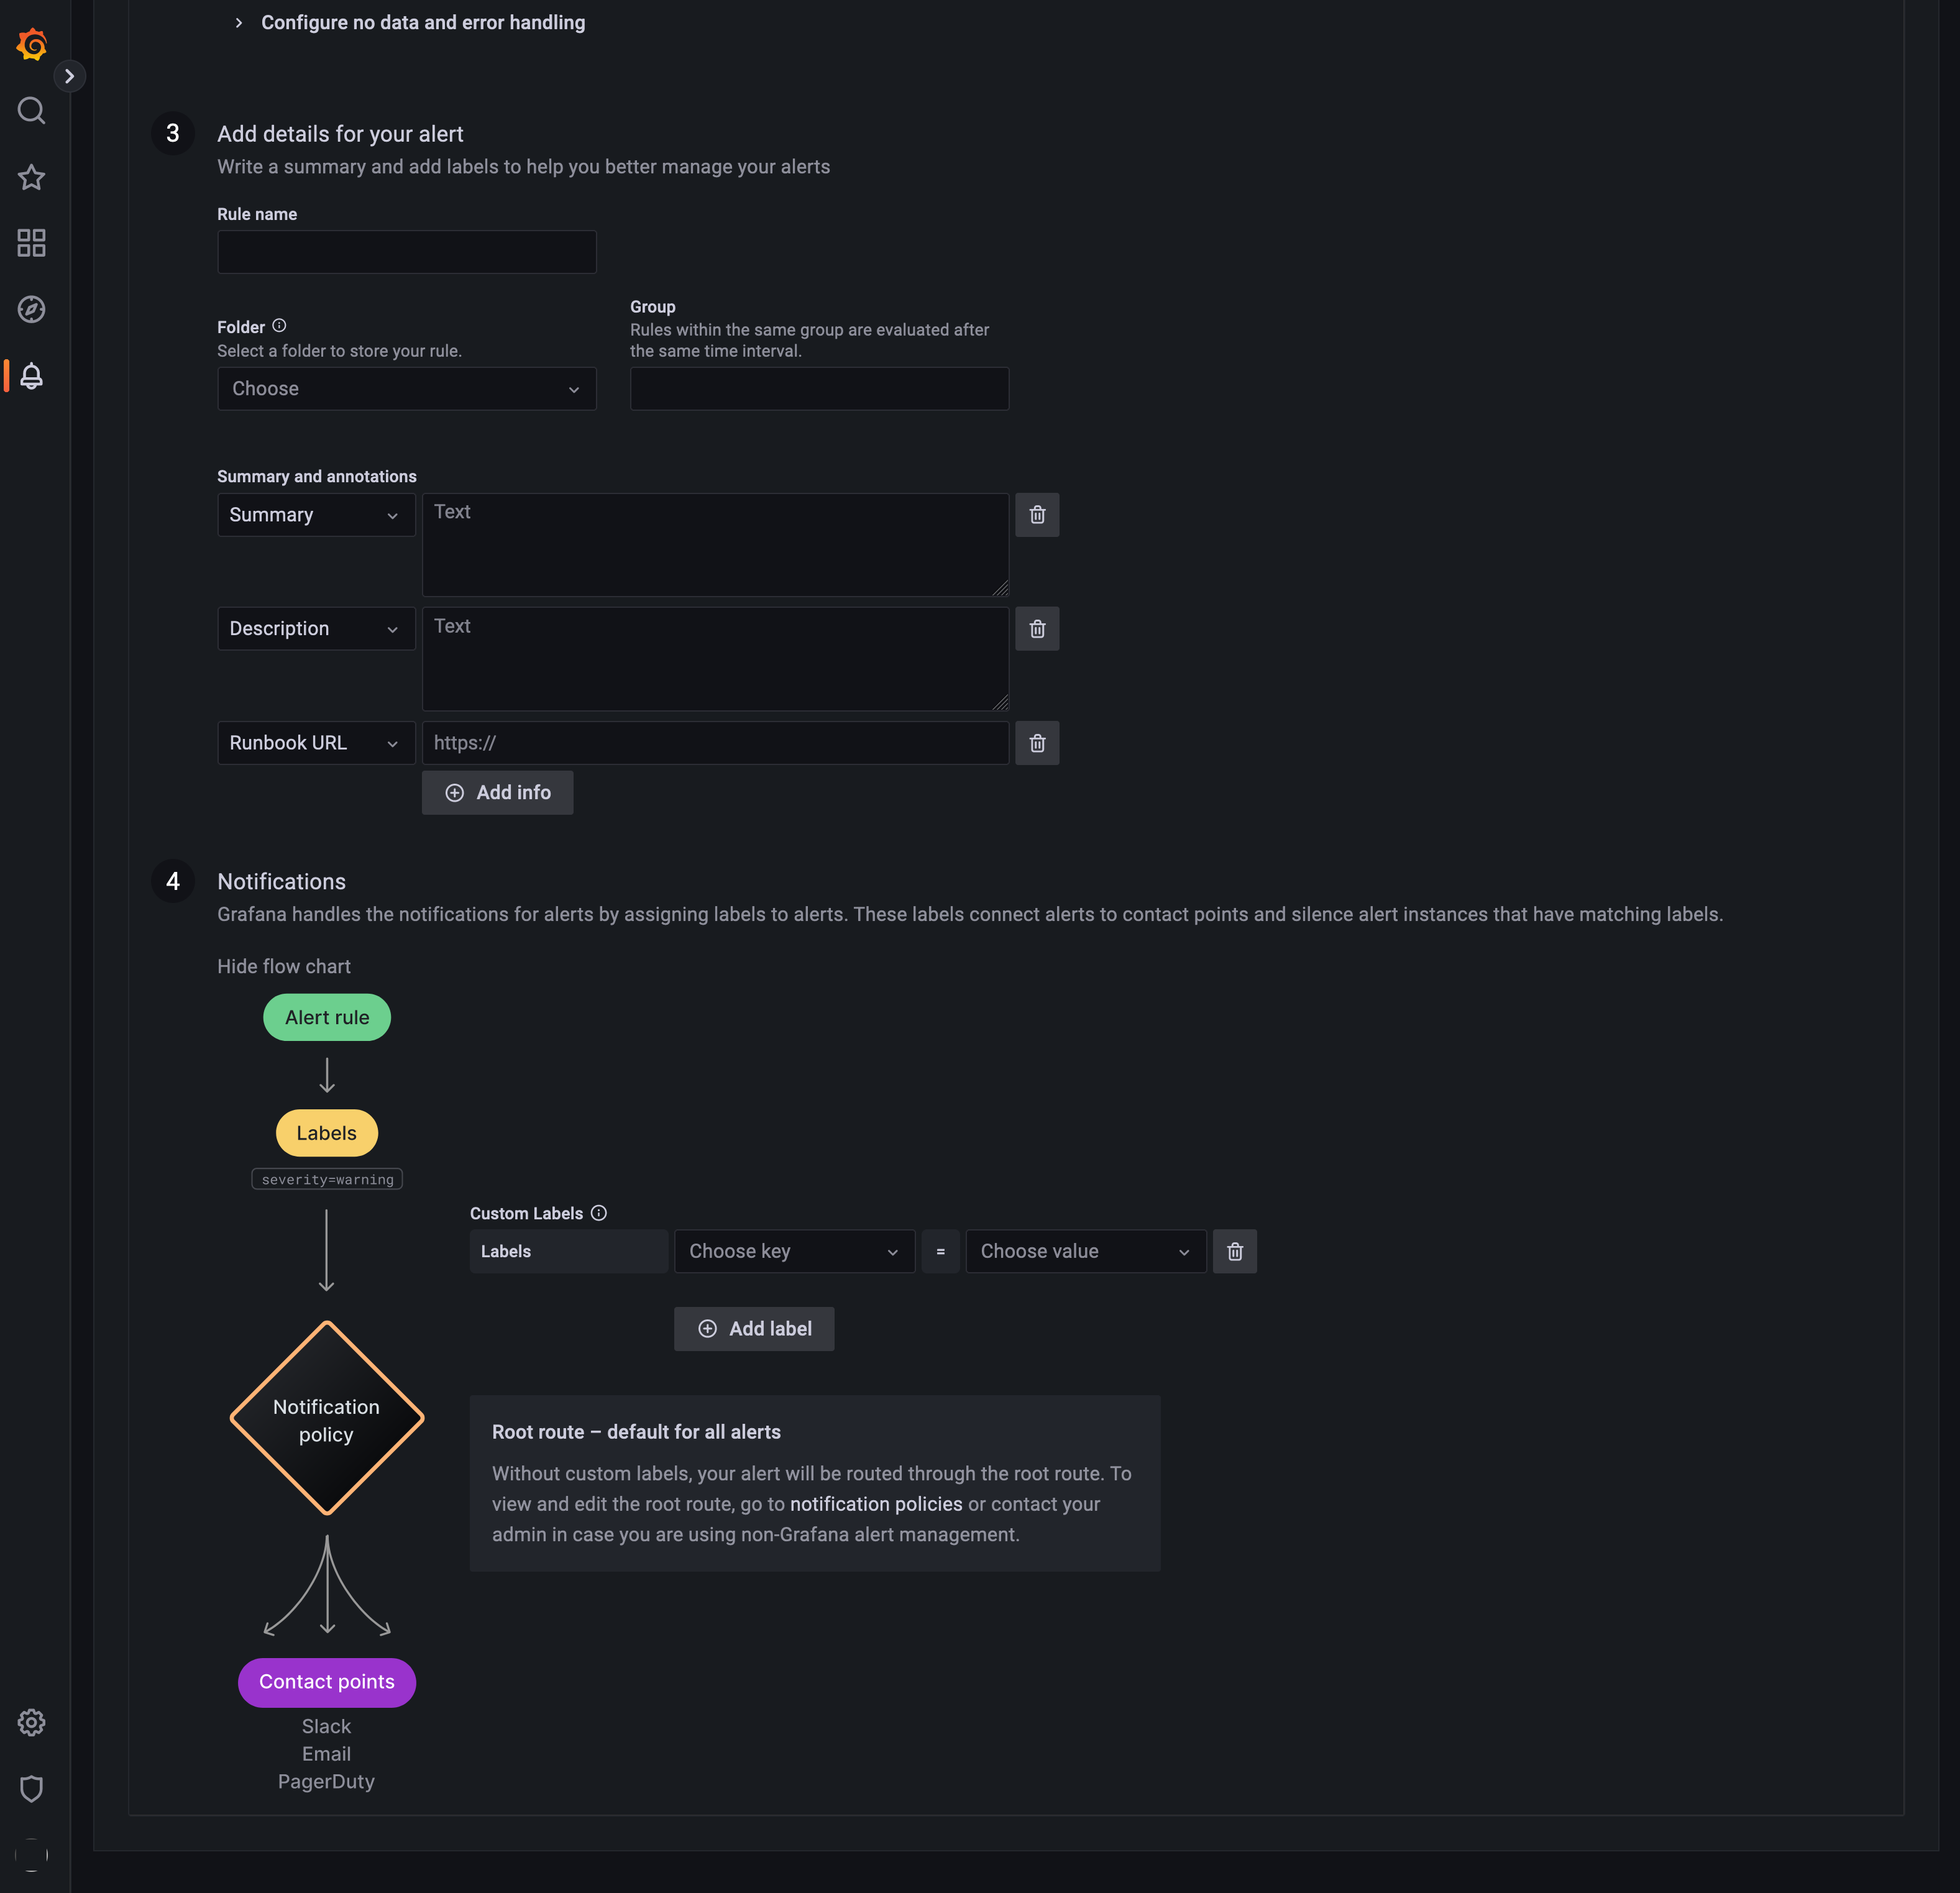
If you scroll down, you’ll see that you have many other options to configure your alert, including notifications.
Conclusion
Kubernetes has transformed cloud native development; however, one shortcoming of the system is that it does not provide a native storage solution for logs.
This tutorial reviewed how to implement an open source logging solution for Kubernetes with Grafana Loki in a single scalable deployment mode. It also explored how to use Grafana to not only visualize your logs, but also expand your understanding of your logging data by creating queries, correlating metrics, and establishing alerts based on logs.
If you’re interested in a fully managed logging solution, check out Kubernetes Monitoring in Grafana Cloud, which is available to all Grafana Cloud users, including those in our generous free tier. If you don’t already have a Grafana Cloud account, you can sign up for a free account today!

