Breathing easy with Grafana dashboards and 3D printing
I lead the Grafana Loki project here at Grafana Labs, and I’ve always loved building things professionally and in my personal life, whether we’re talking about metalworking or coding — or, more recently, 3D printing.
A couple years ago, I purchased my first 3D printer, a Prusa i3 MK3S+. I use it periodically to build functional items I use around my house in Upstate New York. For example, I recently decided to build a solar radiation shield for my outdoor weather station. The shield is essentially a layered, slotted canister that goes over a temperature sensor and prevents incorrect readings caused by direct sunlight.
Most of the time I work with a printing material called polylactic acid (PLA), which is relatively non-toxic. But for this project, I needed something more durable that could hold up to the elements. I opted for acrylic styrene acrylonitrile (ASA), which I hadn’t worked with before but is known for being UV resistant. But there was only one problem — ASA outgasses some potentially hazardous particulates, and my printer is located inside my basement, which I can’t properly ventilate.
As you might have guessed, this conundrum later became the inspiration for this blog post. So let’s dig into the various steps I took to mitigate any air-quality concerns and the role Grafana dashboards played throughout that process.
How to filter for noise, temperature, and ASA
Depending on the size, a 3D print can take a while to finish. (I’ve had some that have taken more than 24 hours.) They need consistent temperatures to avoid any structural integrity issues with the print, and they can also be quite noisy. My basement is better suited to address these needs than my garage, so that’s why it’s inside the house.
You can buy or build enclosures that address some of the noise and temperature issues. Couple that with my concerns about ASA, and I had all the motivation I needed to go in that direction. I opted to build the enclosure myself out of materials from IKEA, following the instructions outlined here. To take it a step further, I looked at ways to filter the air in order to reduce any impacts from the gasses.

Of course, filtering the air was easier said than done. My first objective was to find the right filter, so I purchased a bayonet-style respirator filter. I thought, “If I could use this to protect myself by wearing it on my face, why couldn’t I use it to filter the air inside my new enclosure??”
Next, I had to get the air to actually push through the filter, which, if you’ve ever used a respirator, requires a bit of force. The easy fix would have been to vent the air outside the enclosure, but that airflow push would mean pulling different air in. My 3D printer bed needs to be between 80 and 100 degrees and the extruder can get to several 100 degrees, so even ambient air temperatures could potentially skew the results.
I designed an adapter that would take an 80mm computer case fan on one end and the matching bayonet style connector for the respirator cartridge on the other. This was a fun challenge because I had never tried to 3D model a tapered part before.
My first attempt was a total failure, which I sort of suspected since the 80mm case fans don’t build enough static pressure to move air through the filter cartridge. I knew this may have been a problem, but the cost of trying it was minimal because I already had the fan and printing the parts is very inexpensive.
To remedy this issue I ordered a 40mm fan. This type of fan is designed for moving air at high static pressures, and it’s typically used in server rack enclosures. I changed the dimensions on the part to adapt to the 40mm fan, and my second attempt was much more successful.
How I tested my hypothesis with sensor data and Grafana
Now, maybe testing the air inside of a 3D printer enclosure isn’t everyone’s idea of fun, but I’ve always been fascinated by the space between what machines see and what data can be stored, and how you can visualize all that data to get a better sense of the world around you. It’s part of what drew me to Grafana Labs, after all.
Precisely measuring the gasses that came out of a 3D printer proved to be be tricky because I couldn’t find much information on what exactly I was looking to detect. I decided to test for volatile organic compounds (VOCs) and small particulates. This seemed reasonable, so I purchased a SEN5x Environmental Node, which was a nice all-in-one sensor package for the job. I also added an ESP32 microcontroller to read the sensor values and control the speed of the fan. The speed control was a nice bonus, since the amount of particulates can vary depending on the stage of the build. Plus, the fan can get very loud — think of the high-pitched squeal from a server rack — so I like to keep the speed down when I can.
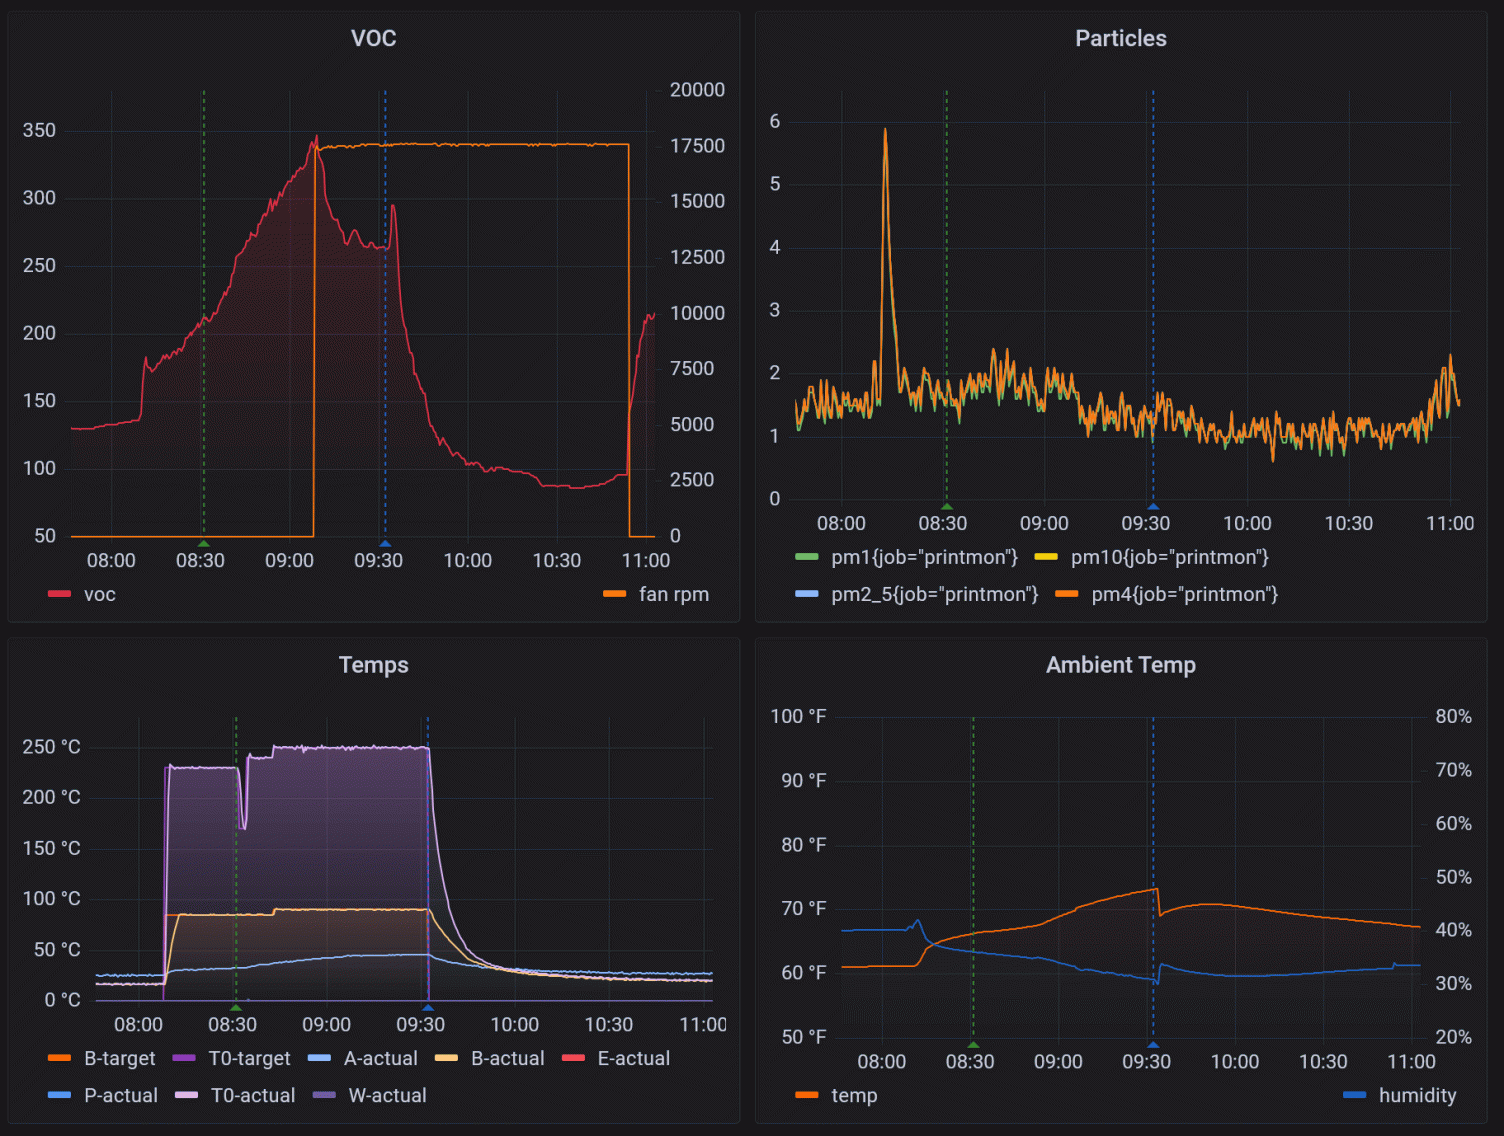
That data is then stored in Grafana Loki and Grafana Mimir, and visualized in Grafana. In my Grafana dashboard, I can track the fan speed, the VOCs, the temperatures, and any relationships between those data points. I also set up alerts in Loki to notify me in Slack when a print is done. (As a nice bonus, I set up a webcam trained on the printer, which I can also view in Grafana.)

Setting up the dashboards took just a few minutes, and in no time I could see the results of all that work. As you can see from the top-left panel in the screenshot above, as the fan speed went up, the VOCs went down. Success!
And while the results were interesting — I still can’t decide if they were exciting or disappointing — the VOC and particulate values never really got that high even when the fan was off. So while my fancy contraption seems to be working, I don’t think it’s really needed after all! ¯\_(ツ)_/¯ In the future, I might dig deeper to see if there are other questions I can answer with this setup. (Am I measuring everything I should? Are there byproducts the sensors can’t capture?) But for now, I’m comfortable with the results.
So, in one sense, this entire project might be considered overkill. Still, it definitely provided some peace of mind knowing that my initial concerns were unfounded. I went into this trying to figure out if I could find a safer way to print, and I got the answers I needed along the way. And more than anything, it was fun. Like I said, I like to build things.