
Get started with Grafana OnCall and Terraform
Managing on-call schedules and escalation chains, especially across many teams, can get cumbersome and error prone. This can be especially difficult without as-code workflows.
Here on the Grafana OnCall team, we’re focused on making Grafana OnCall as easy to use as possible. We want to make it easier to reduce errors with your on-call schedules, create schedule and escalation templates quickly, and fit on-call management into your existing as-code patterns.
That’s why we’re excited to announce the release of a Terraform provider for both Grafana OnCall OSS and Grafana OnCall in Grafana Cloud. (Don’t have a Grafana Cloud account? Sign up for a free account today!) This Terraform provider allows you to manage your integrations, schedules, and escalations in Grafana OnCall as code.
We’re going to help you get started quickly with Grafana OnCall and Terraform through this get started guide. Let’s dive in.
Connect to Grafana OnCall
Terraform set up in Grafana OnCall OSS vs. Grafana OnCall in Grafana Cloud
For the most part, the steps and Terraform instructions required are identical between Grafana OnCall OSS and Grafana OnCall in Grafana Cloud. The key difference is that when using the Terraform provider for OnCall OSS you need to provide an oncall_url parameter in the provider block. This should be the URL of the API of your OnCall OSS instance. This parameter is not needed for Grafana OnCall in Grafana Cloud.
provider "grafana" {

  oncall_access_token = "<YOUR_TOKEN>"

  oncall_url          =  "your_oss_instance_url"

}
Create an API token
First, you need to create an API token to start managing your Grafana OnCall setup via Terraform. These steps are the same whether you are using Grafana OnCall OSS or Grafana OnCall in Grafana Cloud:
- Go to the Settings tab of Grafana OnCall
- Find the API Tokens section and press the Create button.
- Don’t forget to save the token, because you won’t be able to see it again.
Configure the Terraform provider
The next step is configuring the provider.
Grafana OnCall is included in the Grafana Terraform provider, so you just need to provide your Grafana OnCall API token there.
If you want to use the Grafana Terraform provider with Grafana OnCall OSS you will need to provide an oncall_url parameter. It should be the url of the API of your OnCall instance.
You can see an example of how to do this below:
terraform {
  required_providers {
    grafana = {
      source  = "grafana/grafana"
      version = ">= 1.22.0"
    }
  }
}

provider "grafana" {
  // I’m using an alias for convenience because the Grafana provider includes parts for managing Grafana Cloud, Synthetic monitoring, etc.
  alias = "oncall"
  oncall_access_token = <YOUR_ONCALL_API_TOKEN>
}
Interact with Grafana OnCall
Create an integration
Now that you have your API token, let’s create an integration. Grafana OnCall integrations allow you to connect to the monitoring systems of your choice, including Grafana Alerting, to send alerts to Grafana OnCall. Grafana Cloud users will be able to connect Grafana OnCall to Datadog and New Relic.
Let’s create one! Here is an example of how to do that below:
resource "grafana_oncall_integration" "prod_alertmanager" {
  provider = grafana.oncall
  name     = "Prod AM"
  type     = "alertmanager"
  default_route {
  }
}
Check if everything was set up correctly by applying your Terraform configuration. You should see it show up in the UI like below.

Please note: Pay attention to the default_route block. This is the place where all your alerts go by default.
Configure an escalation
The next step is to configure escalations. Escalations dictate how users and groups are notified when an alert notification is created. An alert escalation has three main parts:
- User settings, where you set up your preferred or required notification method.
- An escalation chain, which can have one or more steps that are followed in order when a notification is triggered.
- A route, which allows administrators to route notifications based on the metadata within the alert payload.
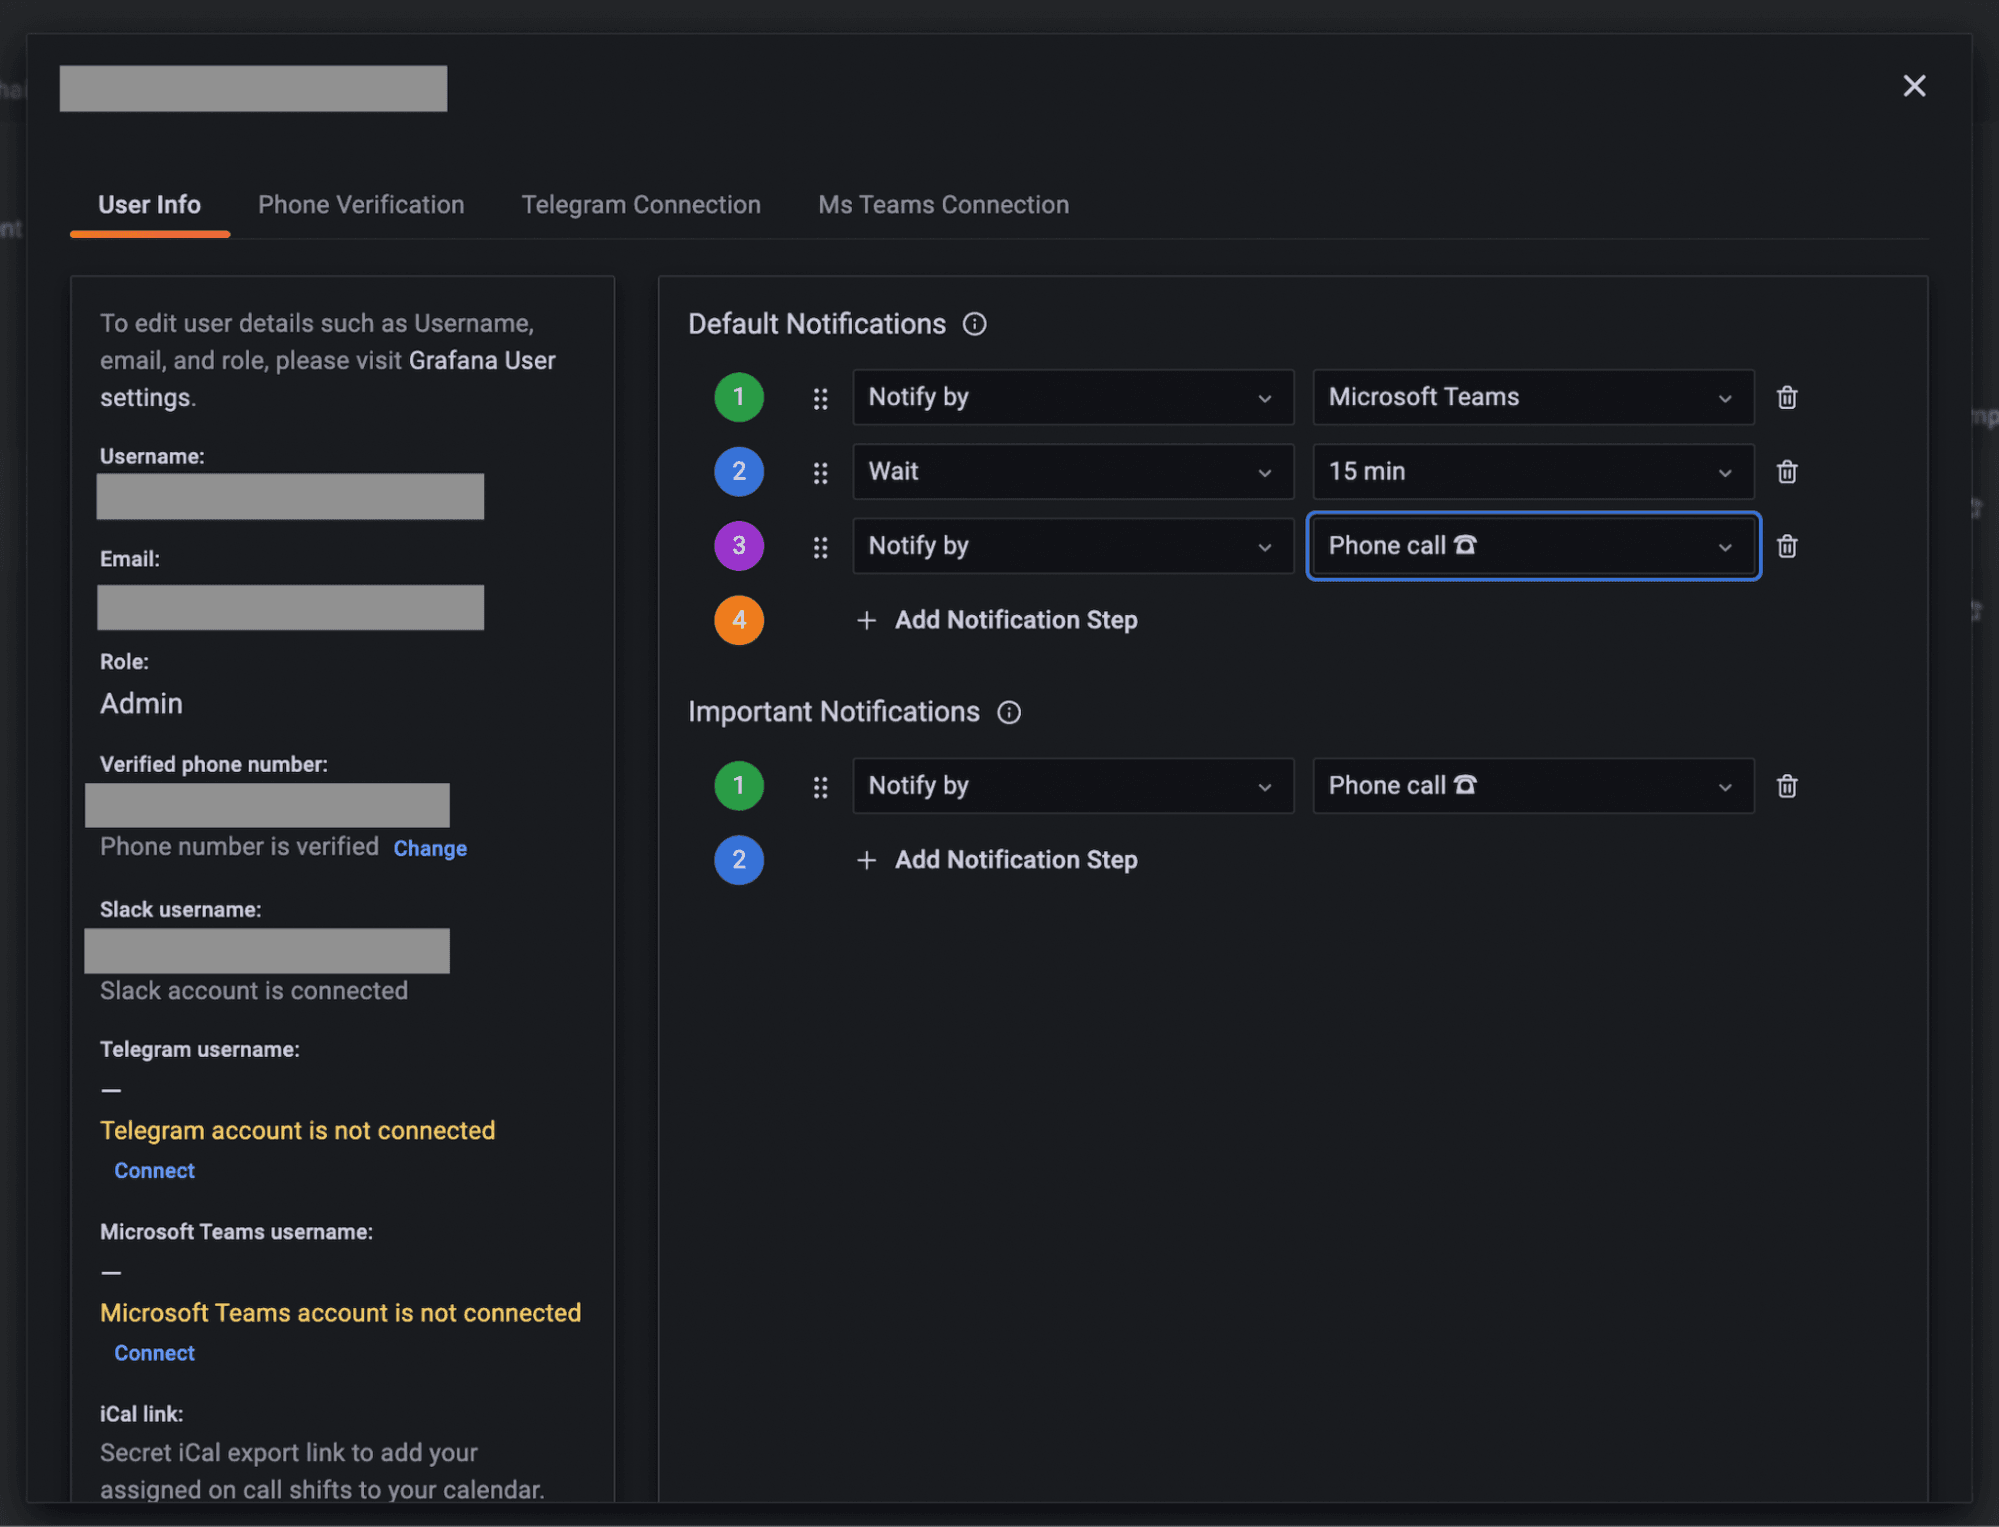
User settings
OnCall users can control how they are notified via their user settings page within Grafana OnCall. (This is separate to the Grafana user settings page.) You can see the setup below in which a Grafana Cloud user is notified via Microsoft Teams notification first for default notifications and via a phone call for important notifications.
Note: Microsoft Teams is only available in Grafana OnCall in Grafana Cloud.
Create an escalation chain
Next, create an escalation chain. I’ll name it default, because I want to connect it to the default route.
resource "grafana_oncall_escalation_chain" "default" {
  provider = grafana.oncall
  name = "default"
}
I’ll then add an escalation policy to this escalation chain. For the first iteration, I will just notify myself.
data "grafana_oncall_user" "ikonstantinov" {
 provider = grafana.oncall
 username = "ikonstantinov"
}

resource "grafana_oncall_escalation" "notify_me" {
 provider            = grafana.oncall
 escalation_chain_id = grafana_oncall_escalation_chain.default.id
 type                = "notify_persons"
 persons_to_notify   = [
   data.grafana_oncall_user.ikonstantinov.id
 ]
 position = 0
}
Set up a route
The last step is connecting the escalation chain to the route. Modify the default_route block of integration created above:
resource "grafana_oncall_integration" "prod_alertmanager" {
 provider = grafana.oncall
 name     = "Prod AM"
 type     = "alertmanager"
 default_route {
   escalation_chain_id = grafana_oncall_escalation_chain.default.id
 }
}
Once this is complete, apply this updated config. Once it’s run, you should see something similar to what you see in the screenshot below in your OnCall web UI integrations page with a newly created Prod AM integration.
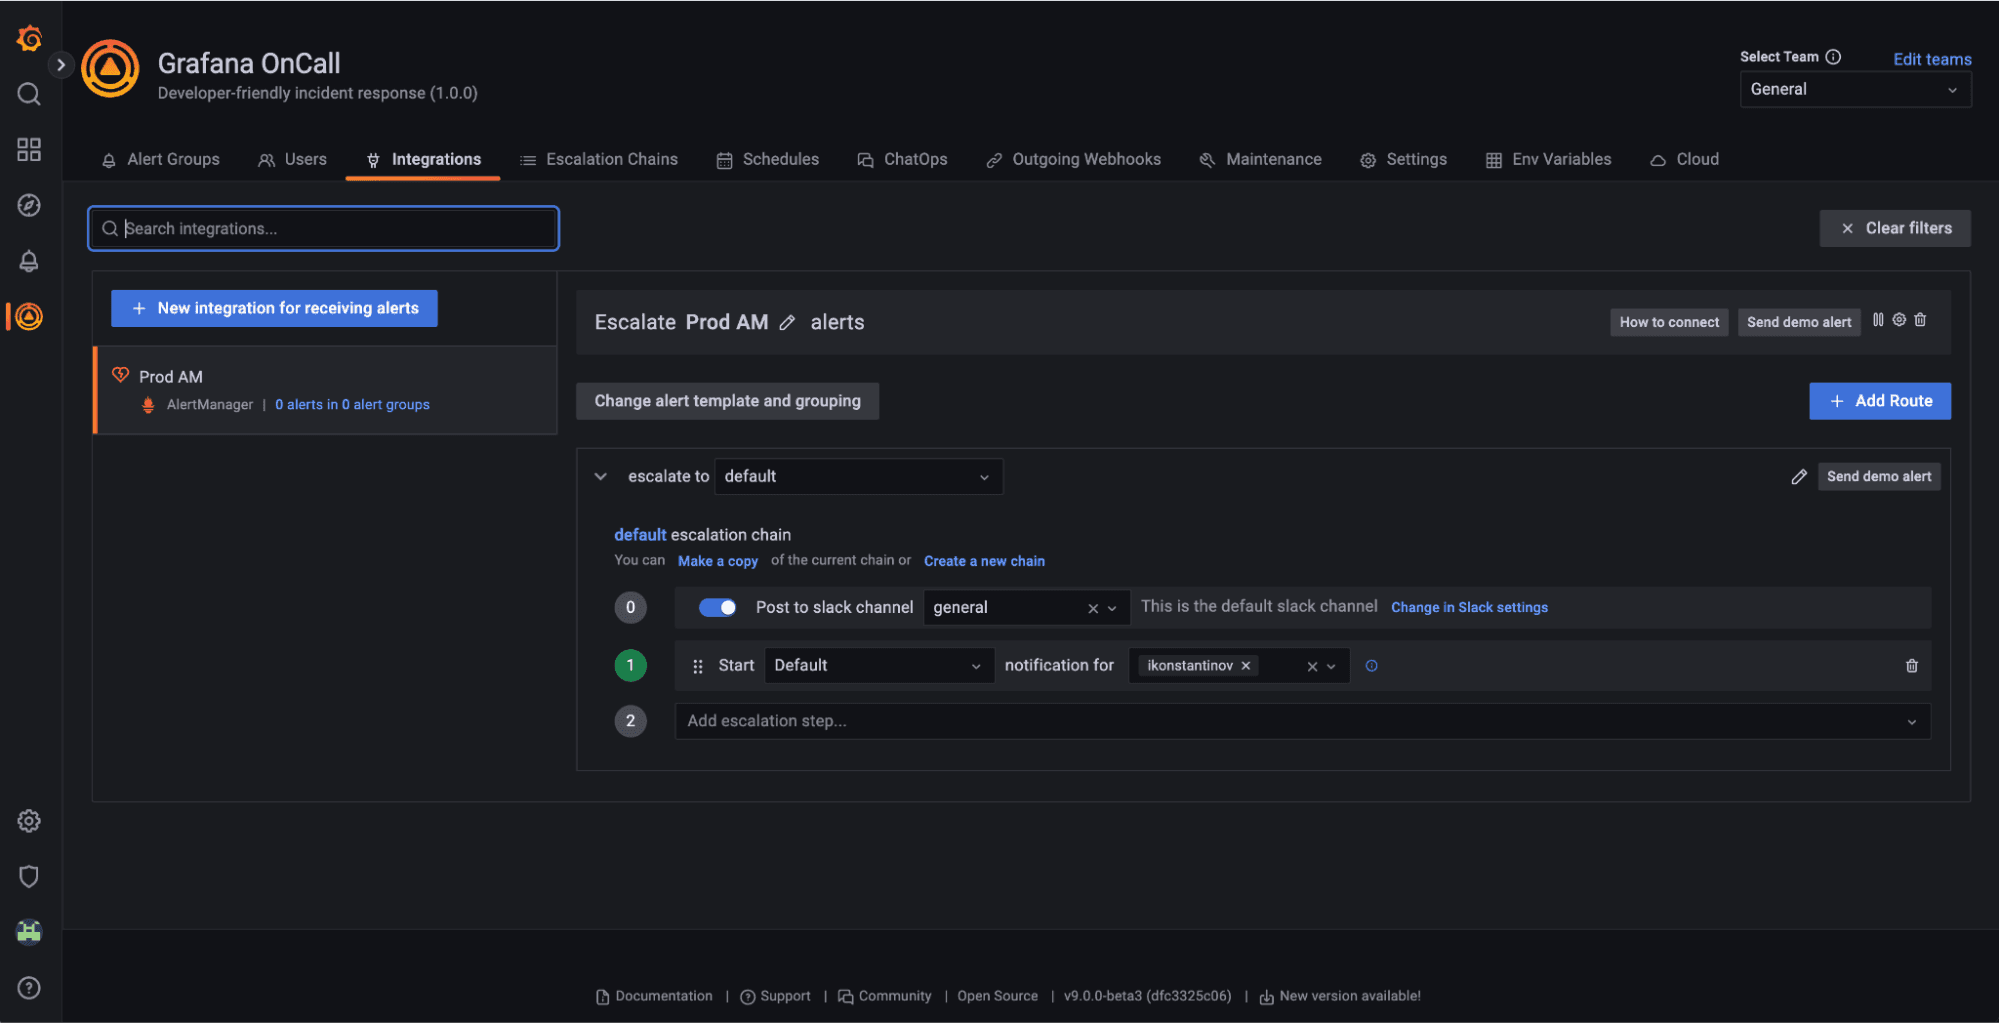
For now, we have a very simple but working Grafana OnCall setup.
You can see the full setup described above, in this tf file.
Set up a schedule in Grafana OnCall
Schedules are a key part of any on-call tool. Grafana OnCall makes it easy to manage your schedules by integrating with your iCal-based calendars and now with Terraform.
Set up on-call rotation via Terraform
Let’s set up an on-call rotation via Terraform. I want to add my colleague Matvey Kukuy to the on-call rotation with me, and have us each be on call for a week at a time, alternating back and forth.
First, I’ll import a new user:
data "grafana_oncall_user" "mkukuy"{
  provider = grafana.oncall
  username = "mkukuy"
}
A schedule consists of on-call shifts. A shift is a period when an individual user is on call. Let’s create an on-call shift first. I am using the rolling_users type which allows me to change the on-call person in this shift depending on the frequency parameter. Since I want the on-call engineer to change every week, I pick weekly frequency and pass all the days of the week to the by_day parameter to cover every day of week with this shift.
resource "grafana_oncall_on_call_shift" "week_shift" {
  provider = grafana.oncall
  name       = "Week shift"
  type       = "rolling_users"
  start      = "2022-06-01T00:00:00"
  duration   = 60 * 60 * 24 // 24 hours
  frequency  = "weekly"
  by_day     = ["MO", "TU", "WE", "TH", "FR", "SA", "SU"]
  week_start = "MO"
  rolling_users = [
    [data.grafana_oncall_user.ikonstantinov.id],
    [data.grafana_oncall_user.mkukuy.id]
  ]
  time_zone = "UTC"
}
The last step is to create a schedule and connect my shift to it:
resource "grafana_oncall_schedule" "primary" {
 provider  = grafana.oncall
 name      = "Primary"
 type      = "calendar"
 time_zone = "UTC"
 shifts    = [
   grafana_oncall_on_call_shift.week_shift.id
 ]
}
To include this schedule in the escalations, let’s modify the default escalation chain. I remove grafana_oncall_escalation.example_notify_step and create a new one to notify our schedule:
resource "grafana_oncall_escalation" "notify_schedule" {
 provider                     = grafana.oncall
 escalation_chain_id          = grafana_oncall_escalation_chain.default.id
 type                         = "notify_on_call_from_schedule"
 notify_on_call_from_schedule = grafana_oncall_schedule.primary.id
 position                     = 0
}
Again, apply config. Go to the Schedules tab in Grafana OnCall. There you can validate your schedule in the web UI or get the iCal link via Export and check the schedule in a calendar such as Google Calendar.

You can see the setup described in the create a schedule section in this tf file.
Set up a route in Grafana OnCall
Grafana OnCall provides the concept of routes, which allow you to route alerts based on the metadata with the alert.
Let’s create a new escalation chain for alerts that are critical. See how to do that below:
resource "grafana_oncall_escalation_chain" "critical" {
 provider = grafana.oncall
 name     = "critical"
}
Then let’s create a route. You can see here how an alert that contains severity critical in the metadata is going to be routed to the critical escalation chain.
resource "grafana_oncall_route" "critical_route" {
 provider            = grafana.oncall
 integration_id      = grafana_oncall_integration.prod_alertmanager.id
 escalation_chain_id = grafana_oncall_escalation_chain.critical.id
 routing_regex       = "\"severity\": \"critical\""
 position            = 0
}
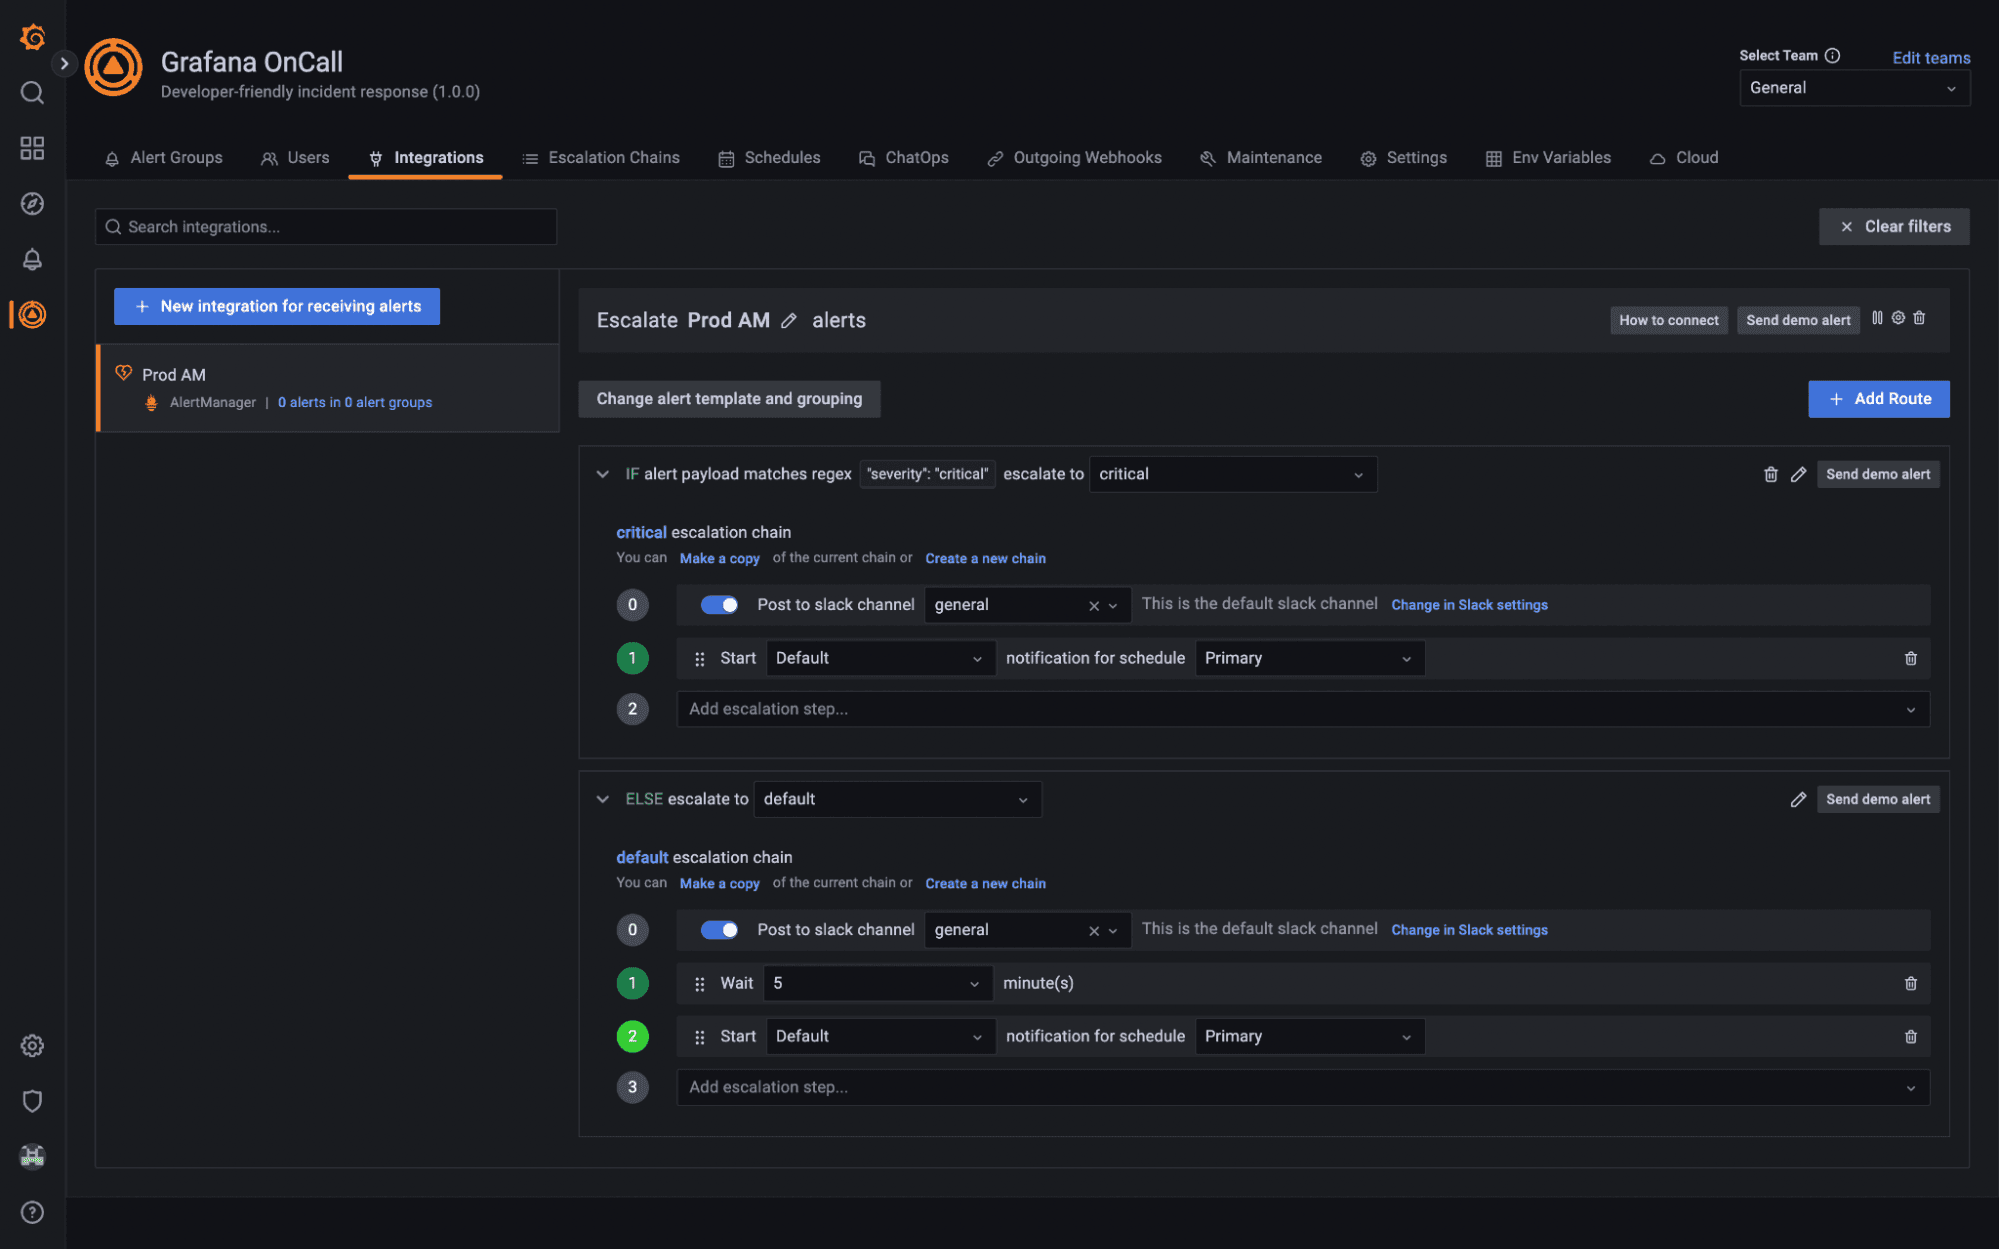
The difference between default and critical escalation is that for default escalations, I want to wait 5 minutes before reacting to the incident (because it might be auto-resolved). This limits distractions for on-call engineers.
For critical alerts, I want to react immediately. Let’s implement it.
First, modify escalations for the default chain:
 provider            = grafana.oncall
 escalation_chain_id = grafana_oncall_escalation_chain.default.id
 type                = "wait"
 duration            = 60 * 5
 position            = 0
}

resource "grafana_oncall_escalation" "notify_schedule" {
 provider                     = grafana.oncall
 escalation_chain_id          = grafana_oncall_escalation_chain.default.id
 type                         = "notify_on_call_from_schedule"
 notify_on_call_from_schedule = grafana_oncall_schedule.primary.id
 position                     = 1
}
Then, let’s add a new escalation for the critical alerts:
resource "grafana_oncall_escalation" "notify_schedule_critical" {
 provider                     = grafana.oncall
 escalation_chain_id          = grafana_oncall_escalation_chain.critical.id
 type                         = "notify_on_call_from_schedule"
 notify_on_call_from_schedule = grafana_oncall_schedule.primary.id
 position                     = 0
}
That’s it! Apply config, and validate that everything was set up correctly in the UI.
You can see the setup described in the create a routes section in this tf file.
What’s next for Grafana OnCall and Terraform
For the teams who already use Grafana OnCall OSS and Grafana OnCall in Grafana Cloud and are planning to switch to Infrastructure as Code, we plan to help them migrate with a Terraform exporter coming soon!
For more about Grafana OnCall OSS, you can read our documentation or go to the Grafana OnCall GitHub repo.
To learn more about Grafana OnCall in Grafana Cloud, please read our Grafana OnCall documentation on how to manage Grafana OnCall in Grafana Cloud with Terraform or check out our Getting started with Grafana OnCall in Grafana Cloud webinar on demand.
If you don’t see a feature you want, join our community calls or go to the Grafana OnCall github discussion.
The easiest way to get started with Grafana OnCall is with Grafana Cloud. There is a generous free forever tier as well as plans for every use case. Sign up for free today!

