
IoT at your home, work, or data center with Prometheus metrics and Grafana Cloud
We recently had a hackathon at Grafana Labs. Anyone who wanted could get several work days without normal responsibilities to do whatever they found meaningful in the wider Grafana community and/or Grafana Labs commercial offerings. This allowed me to invest some time into Kraken, a project designed for reading out different sensors, and to update it for modern hardware and libraries.
In this blog post, I will be focusing on the Bosch BME 680, an integrated sensor for measuring air temperature, relative humidity, ambient pressure, and air quality index. It’s the perfect getting-started project as it’s fun and gives you immediate benefit. Be it monitoring your home office, your cellar, or whatever other room or area you want to get insights on.
This was written for use with Grafana Cloud, our fully managed observability platform, but you can use it for your local Prometheus as well. If you’re not already using Grafana Cloud I suggest you give it a try. The free tier covers metrics, logs, traces, and dashboards; and I have enough insider knowledge to expect that the “forever free and most generous offer in the market” actually holds water. If that sounds interesting, you can sign up here.
Note: We got some questions regarding the section titles. Most of them are drawn from Internet lore.
Somebody set up us the BOM
While we cough may cough have a surprise at some point, in this blog post I will be using off-the-shelf components with no or very little need to solder. If you want to follow along at home, this is what you will need:
- USB power supply (your PC will do, but this makes you less flexible in choosing locations): €5
- Micro-USB cable of decent quality: €2
- ESP32-PICO-D4 development board (others boards work as well; this is just the one I happen to have a handful of): €8-15
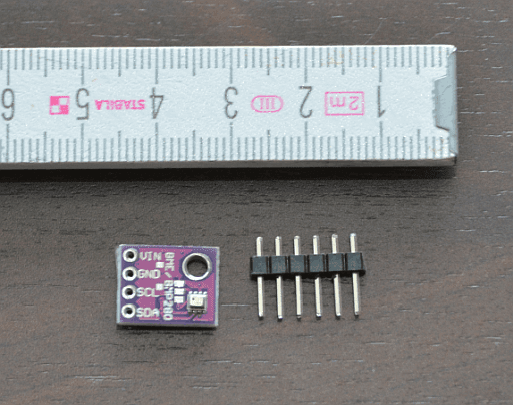
- Bosch BME 680: €10-20 for an original one
- Alternatively, Bosch BME 280: €2
- Four flexible breadboard jumper wires (length according to preference, plug/socket depending on your hardware): €1
Worst case, the whole package should cost 50€ or less. If you only need an ESP32 board and choose a BME 280 instead of the more expensive BME 680, you should come out at under €20 per unit. It’s advisable to always buy two of each or more. You will find more uses for sensors over time, and if you break or lose something, you aren’t blocked while waiting for new parts.
Let’s get physical
In case you need to solder and need to learn how, there are plenty of how-tos on the Internet. In case you don’t have a soldering iron or can’t get yours to work, you won’t go wrong with the PINECIL. Good quality for an outstanding price. The most important points from my personal experience would be:
- Use lead-free solder. This is not military or space equipment, and lead is poisonous. Leaded solder is not worth your health. This is not up for debate.
- Get a flux pen or a syringe with soldering fat. Use more than you think you need. Then add some more.
- Do not keep food or drink nearby while soldering.
- Clean your workspace surface and wash your hands thoroughly after soldering.
- Use more flux.
- If you go below 320°C tip temperature with a modern solder, you will have a bad time.
- No, that’s not enough flux. Use more.
Flux is like garlic. Add more than what you think is remotely reasonable. Then add more.
First, solder your BME’s connectors if they don’t come pre-soldered.
BME 680:

BME 280:
If you have more than one of a particular thing, you should strongly consider giving them an identity. There are high-quality markers that write reliably onto stainless steel and such, and they are immensely useful. Myself, I own a Pica Classic 533 in black and a Pica 532 in white, and I use them at least once per week. Giving an identity is as easy as numbering things from 1 onwards:

And then simply wire them up. If you’ve been waiting for weeks for your short jumper wires, your setup might look something like the following… If you’re lucky and you have shorter wires, yours will be prettier than mine.
The connection itself is quite simple. From the ESP’s point of view, you connect
- Any ESP32 3.3V pin to 3.3V on the sensor
- Any ESP32 ground pin to ground on the sensor
- The ESP32’s pin 21 to SDA on the sensor
- The ESP32’s pin 22 to SCL on the sensor
Ignore all other pins.
BME 680:

BME 280:

Once that’s done, it’s time to flash the ESP32. I have been using Arduino IDE for this project. While the IDE is admittedly somewhat cumbersome in some regards, it offers the widest range of libraries for this type of project. In a future blog post, I might be able to share a more integrated workflow for deploying lots of sensors at once.
Clone https://github.com/RichiH/kraken/ and open bme_680 with Arduino IDE.
Set up Arduino IDE
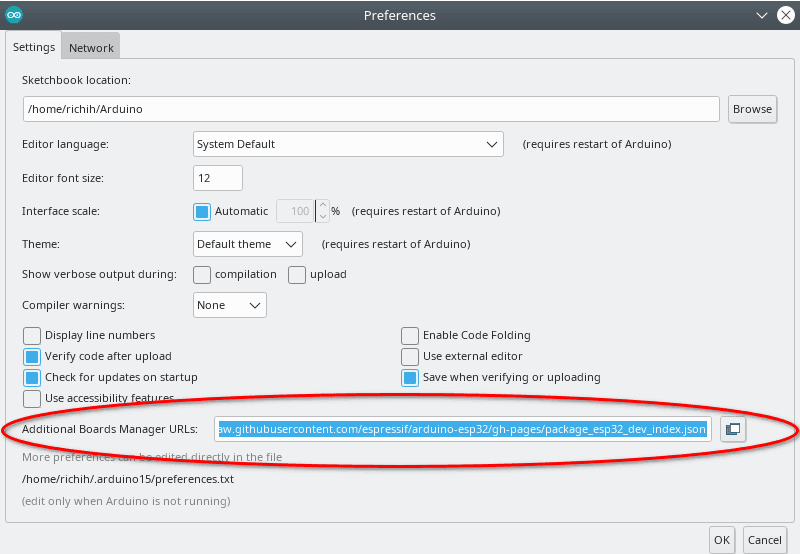
- Add local support for ESP32 boards: Open “File” -> “Preferences” and copy https://raw.githubusercontent.com/espressif/arduino-esp32/gh-pages/package_esp32_dev_index.json into “Additional Board Manager URLs.”
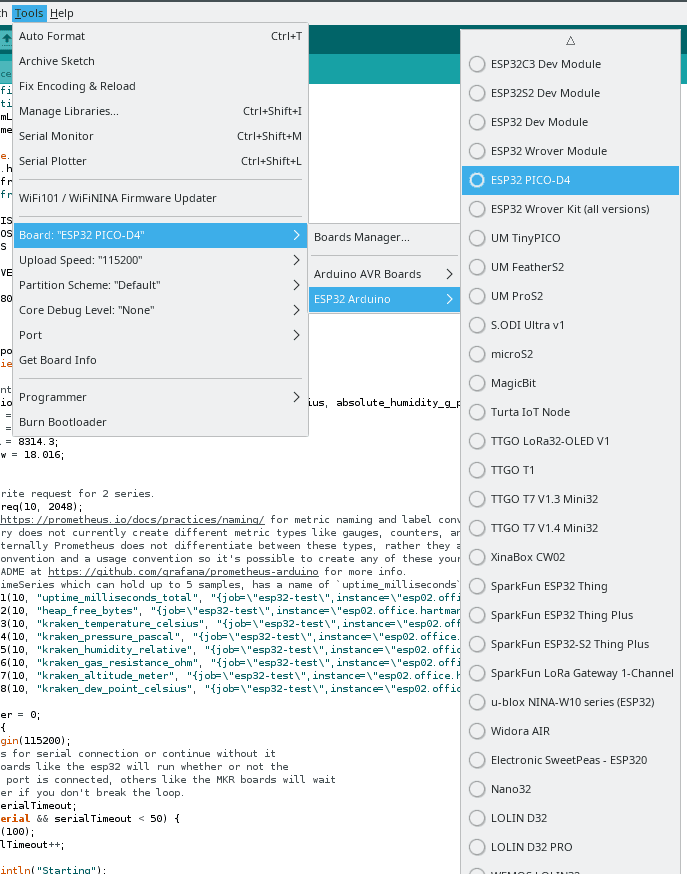
- Select the correct board from “Tools” -> “Board” -> “ESP32 Arduino”:
- Select the serial speed from “Tools” -> “Upload Speed” -> “115200”:

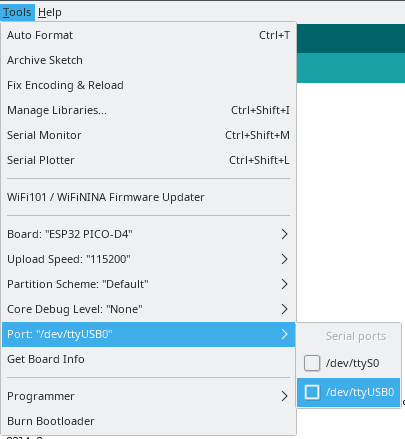
- Select the correct port from “Tools” -> “Port.” On Linux, the correct port should look like
/dev/ttyUSB?.dmesgcan help you find the right one. On some systems, you may need to add your user to usergroups likemodem; if all else fails, on a single user system, you can simply usechmod 777 /dev/ttyUSB*. Not recommended, but it works, and a reboot or device reconnect will reset it.
Clone, clone, clone the code
- Open
bme_680with Arduino IDE. - Select the tab
config.h. - Change
WIFI_SSID&WIFI_PASSWORDto your local values.
We get signal!
- Follow https://github.com/grafana/diy-iot/blob/main/README.md#sending-metrics to get the Grafana Cloud user ID for
GC_USERand API key forGC_PASS. - Select the tab
bme_680. - Search for
instanceand replace all entries with a name that makes sense for you. - Open the serial monitor with “Tools” -> “Serial Monitor.”

- Compile and deploy your code with “Sketch” -> “Upload.” This will automatically compile your code as well.

Now is a good time for verification: Check the serial monitor for output. Your ESP32 should connect to your WiFi and start cycling through data collection and transmission.
Main screen turn on!
After all this work, how about some dashboards?
- Use Grafana Cloud’s Explore mode to verify that you’re received data:

- Go to Grafana Cloud’s Panel Import.


- Import the dashboard from https://github.com/RichiH/kraken/blob/main/bme_680/kraken-bme680-mixin/dashboards/kraken_bme680.json as file or copy-and-paste of the raw JSON.
As an optional step for site operators: Choose alerts from https://github.com/RichiH/kraken/tree/main/bme_680/kraken-bme680-mixin/alerts. I created alerts for ASHRAE 55 recommended, A1, A2, A3, A4, B, and C. That should fit everything from the highest-class data centers to a cowshed. If you’re in Europe and operating/certified under EN 50600, you are free to assess your own needs and simply align with any ASHRAE envelopes if you so choose.
You will also find an alert for dew points in there. This is useful if you have a room that can get damp or moldy: As long as you’re staying 2-3C above the dew point, you will not have any mold growing, ever. If you’re near the dew point, either heat up the air or get moisture out. Either works, and you will see the effects in the dew point curve immediately.
The last step is the most important one: Enjoy!

As always at the end: We’re hiring as fast as we possibly can. If you think having hackathons without limit on topics is fun and Grafana generally sounds like a nice place to work, have a look at what we have to offer.

